The holiday season is upon us, and with it comes a wave of excitement and joy. As festivities fill the air, so does the urge to express your holiday spirit in every possible way. One of the best ways to do that? With stunning red Christmas nails! This post was created because I know how much a great manicure can elevate your holiday look. Just like you, I’ve found myself craving those bold, festive designs that not only catch the eye but also bring a sense of joyful celebration.
If you love all things beauty and are looking for fresh ideas to dazzle at holiday parties, you’re in the right place. Whether you’re a nail art novice or a seasoned pro, this collection of Christmas manicure ideas will inspire you to unleash your creativity. From classic reds to glittering accents, I’ve gathered 18 red Christmas nails ideas that are fun, stylish, and perfect for any holiday occasion.
Get ready to discover designs that are chic, festive, and sure to make a statement. You’ll find everything from simple elegance to elaborate nail art that expresses your holiday cheer. Let’s dive into these festive nail designs that will leave your friends and family in awe, making your holiday season even more memorable.
Key Takeaways
– You’ll find 18 eye-catching red nail designs perfect for Christmas celebrations, allowing you to express your style this holiday season.
– The ideas range from classic to trendy, offering options for every skill level and taste.
– Each design features unique elements, such as glitter, patterns, and seasonal motifs, ensuring there’s something for everyone.
– The post aims to inspire creativity and help you achieve that perfect holiday look for parties or family gatherings.
– Get practical tips on how to replicate these designs at home or at your favorite nail salon for a festive touch.
1. Classic Red with Gold Glitter Tips

Kick off your holiday season with the classic charm of red nails, beautifully adorned with sparkling gold glitter tips. This design strikes a balance between timeless elegance and festive flair, making your nails stand out without being overly flashy. The rich red polish serves as a stunning foundation, while the glitter tips provide just the right hint of shimmer to catch the eye.
To recreate this look, start by prepping your nails and shaping them as you like. Use a base coat for protection, then layer on two coats of your chosen red polish, letting each coat dry before proceeding. For the glitter tips, carefully apply the gold glitter using a fine brush, blending it towards the middle for a gradient effect. Finish with a glossy top coat to lock in your design and enhance the shine.
Key steps to achieve this festive look:
– Shape your nails for a polished finish
– Use a base coat for added protection
– Apply two coats of red polish
– Add gold glitter tips for a festive touch
– Seal with a top coat for durability
This design embodies the warmth and joy of the season, making it an ideal choice for holiday parties or gatherings with loved ones.
How To Choose the Right Red Christmas Nails
Choosing the perfect red Christmas nails can transform your holiday look. With so many designs and styles available, it’s crucial to narrow down your options. Here are some helpful tips to guide your selection process.
1. Consider the Occasion
Think about where you’ll be wearing your festive nails. If it’s a casual get-together, you might opt for simple designs like classic red or matte finishes. For a more formal holiday party, consider something bold, like glittery ombre or nail art featuring snowflakes. Matching your nail design to the event ensures you’ll feel confident and stylish.
2. Choose Your Nail Shape
Nail shapes can significantly impact the overall look. Popular shapes include almond, square, and stiletto. Almond shapes often look elegant, while square nails can give a more modern vibe. Think about your personal style and how different shapes might complement your red Christmas nails. For instance, long stiletto nails might be perfect for a dramatic statement.
3. Select the Right Finish
The finish can change the entire feel of your nails. Glossy finishes are classic and vibrant, while matte effects can add a trendy touch. If you want to dazzle, look for options with glitter or metallic accents. If you prefer a more understated look, consider matte red with glossy dots or simple gold stripes. Mixing finishes can also enhance your holiday nail art.
4. Explore Nail Art Designs
Consider how much nail art you want on your Christmas nails. If you’re a fan of intricate designs, options like Santa Claus art or candy cane stripes can be fun. For a more subtle look, floral accents or simple decals may suit your style better. You can even combine red polishes with holiday-themed stickers for a playful touch.
5. Think About Longevity
How long do you want your holiday manicure to last? Gel polish tends to last longer than regular polish, which can chip easily. If you’re planning multiple festive events, gel could be worth the investment. Ensure you also use a good topcoat to protect your design and maintain its shine throughout the holiday season.
6. Budget for Your Christmas Nails
Nail art can range from affordable to luxurious. Determine how much you’re willing to spend. If you’re on a tight budget, you can create stunning designs at home with quality nail polish and tools. Alternatively, if you want a professional touch, investing in a salon design might be worthwhile for that extra wow factor.
Pro Tip: Always carry your favorite topcoat in your bag. This way, you can easily touch up any chips or wear while you enjoy holiday parties.
Now that you know how to choose the perfect red Christmas nails, you can experiment with various designs and finishes. Use these tips to find a look that suits you and gets you into the holiday spirit!
2. Santa Claus Nail Art
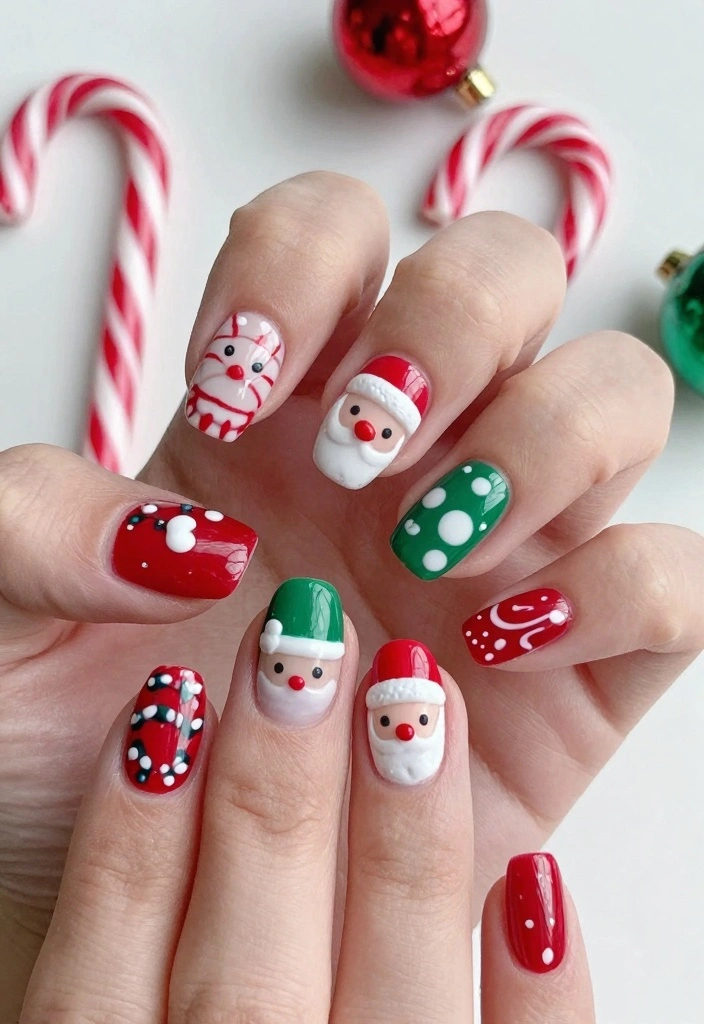
Embrace the holiday spirit with charming Santa Claus nail art! This playful design showcases your creativity while adding a festive touch to your look. Each nail can feature elements that capture Santa’s jolly essence, from his signature red suit to his fluffy white beard.
To create this fun design, start by applying a base coat to protect your nails. Paint all your nails with two coats of a bright red polish. For an accent nail, use white polish for Santa’s face, then carefully paint on his facial features with a fine brush. Don’t forget to include his iconic hat and cheerful expression! Seal everything with a top coat for durability.
Steps to bring Santa to your nails:
– Start with a protective base coat
– Apply two coats of red polish on all nails
– Use white polish for Santa’s face
– Add details like eyes, hat, and beard
– Finish with a top coat for lasting fun
This delightful nail art not only spreads joy but also becomes a conversation starter at your holiday gatherings, showcasing your festive spirit in style.
Fun fact: red christmas nails with Santa accents are a quick 3-step wow—base coat, two coats of red, then a white beard on one nail. It’s playful, festive, and totally shareable.


3. Red and White Candy Cane Stripes
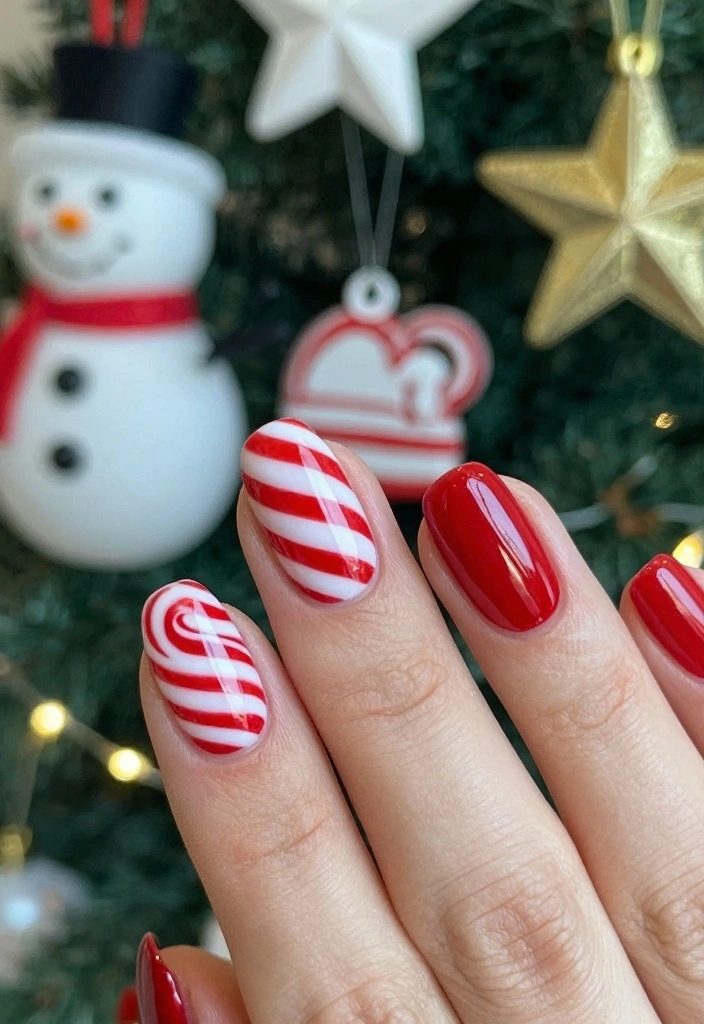
Capture the playful essence of Christmas with red and white candy cane striped nails! This fun design brings a festive vibe to your look, making it perfect for any holiday celebration. The classic red and white colors work harmoniously to evoke the spirit of the season.
To achieve this sweet design, begin with a protective base coat. Apply two coats of vibrant red polish on all your nails. Once dry, use striping tape to create diagonal lines for that candy cane effect. Paint over the exposed areas with white polish, and remove the tape while the polish is still wet for clean lines. Seal your masterpiece with a glossy top coat for added shine.
Steps to create candy cane stripes:
– Start with a base coat for protection
– Apply two coats of vibrant red polish
– Use striping tape for diagonal lines
– Paint white polish over exposed areas
– Finish with a top coat for durability
This design is simple yet festive, making it a great choice for nail art beginners. Pair these striped nails with your favorite holiday outfit for a complete festive look.
4. Festive Floral Accent Nails
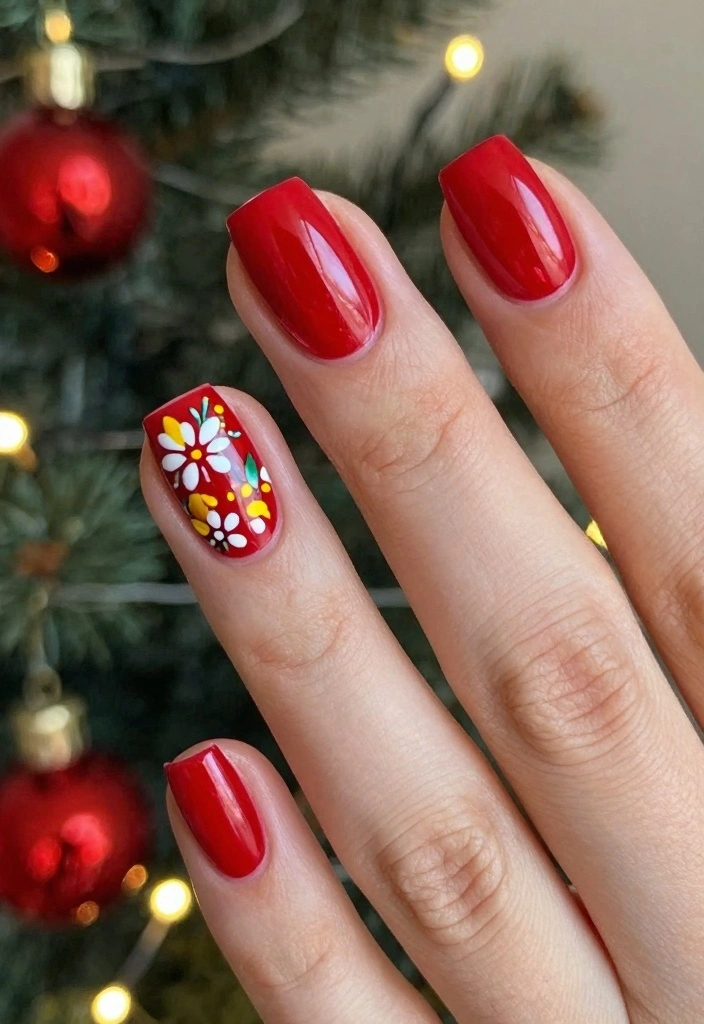
Add a refreshing touch to your holiday nails with festive floral accents! While deep red serves as the primary color, the floral pattern brings a unique twist that blends holiday cheer with a hint of springtime freshness. This design beautifully showcases your creativity while celebrating the season.
To create this look, start with a protective base coat and apply two coats of a rich red polish on all nails. Choose one accent nail for the floral design, and once the red polish dries, use a fine brush to paint flowers in white, green, and yellow. You can create small flowers with petals or playful dots. Finally, seal your design with a top coat to keep it lasting longer.
Steps to achieve floral accents:
– Start with a base coat for protection
– Apply two coats of red polish
– Select an accent nail for floral design
– Paint flowers with fine brush
– Seal everything with a top coat
This design captures the festive spirit while adding a fresh and lively twist, making your holiday celebrations even brighter!
5. Matte Red with Glossy Dots
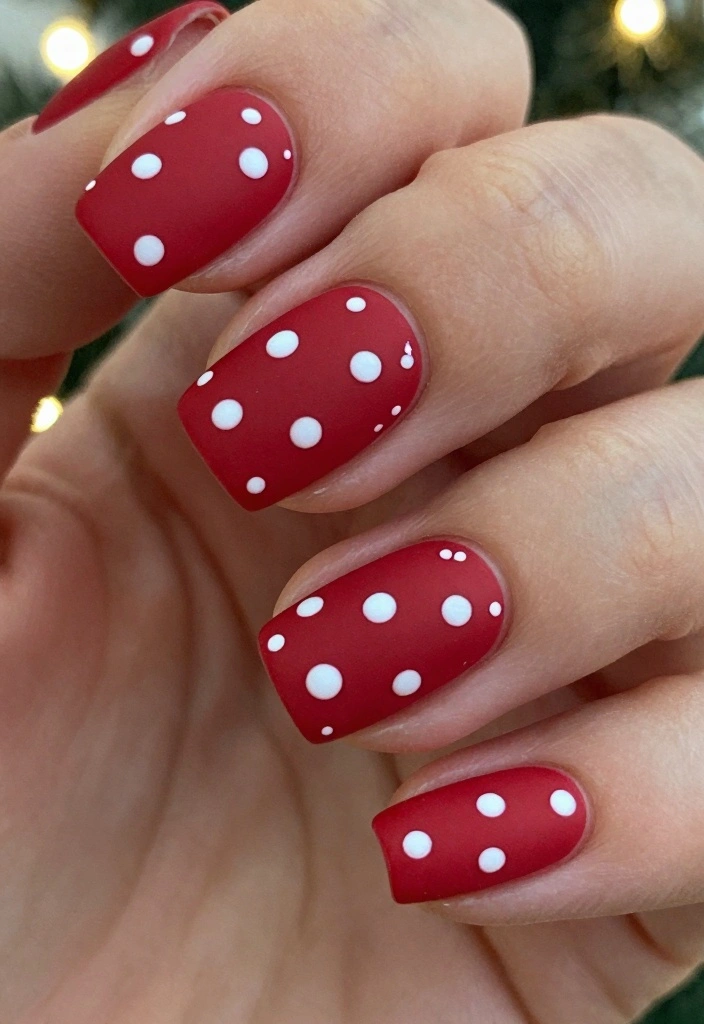
For a modern holiday look, try matte red nails embellished with glossy polka dots! This design artfully combines textures, creating a striking contrast that will surely catch attention at any festive gathering. The matte finish paired with glossy details offers a fresh take on holiday nail art.
To achieve this chic style, start with a protective base coat. Apply two coats of high-quality matte red polish, allowing each to dry completely. Once dry, use a dotting tool or bobby pin to create glossy dots using a clear top coat or glossy white polish. Arrange the dots randomly or in patterns for added flair. Finish with a layer of topcoat to seal the design and enhance longevity.
Steps for this modern look:
– Start with a base coat for protection
– Apply two coats of matte red polish
– Create glossy dots using a dotting tool
– Arrange dots randomly or in patterns
– Seal with a top coat for durability
This nail art design is perfect for those who enjoy standing out. Pair them with a chic outfit, and you’re all set for a sophisticated holiday look.
6. Glitter Ombre Red Nails

Bring a dazzling sparkle to your holiday look with glitter ombre red nails! This stunning design embodies the magic of the season, creating a beautiful gradient effect that will catch the light beautifully. It’s a perfect way to celebrate the festivities with a touch of glamour.
To achieve this eye-catching style, start with a base coat for protection. Paint two coats of a vibrant red polish on all your nails. On a makeup sponge, apply red polish at the bottom and a fine silver or gold glitter polish at the top. Dab the sponge onto the tips of your nails to create the ombre effect. Seal your design with a top coat for added shine and to prevent chipping.
Key steps for the ombre effect:
– Start with a base coat for protection
– Apply two coats of vibrant red polish
– Use a sponge for ombre effect with glitter
– Dab sponge onto tips for a smooth blend
– Finish with a top coat for shine
This design adds depth and dimension to your nails, making them a festive delight for holiday celebrations!
❝ Glitter ombre red nails are your holiday secret—bold enough to turn heads, yet easy to recreate at home. Start with a red base, dab on silver on the sponge, and blend upward for a festive ombre that screams red christmas nails. ❞
7. Red Nail Art with Snowflakes
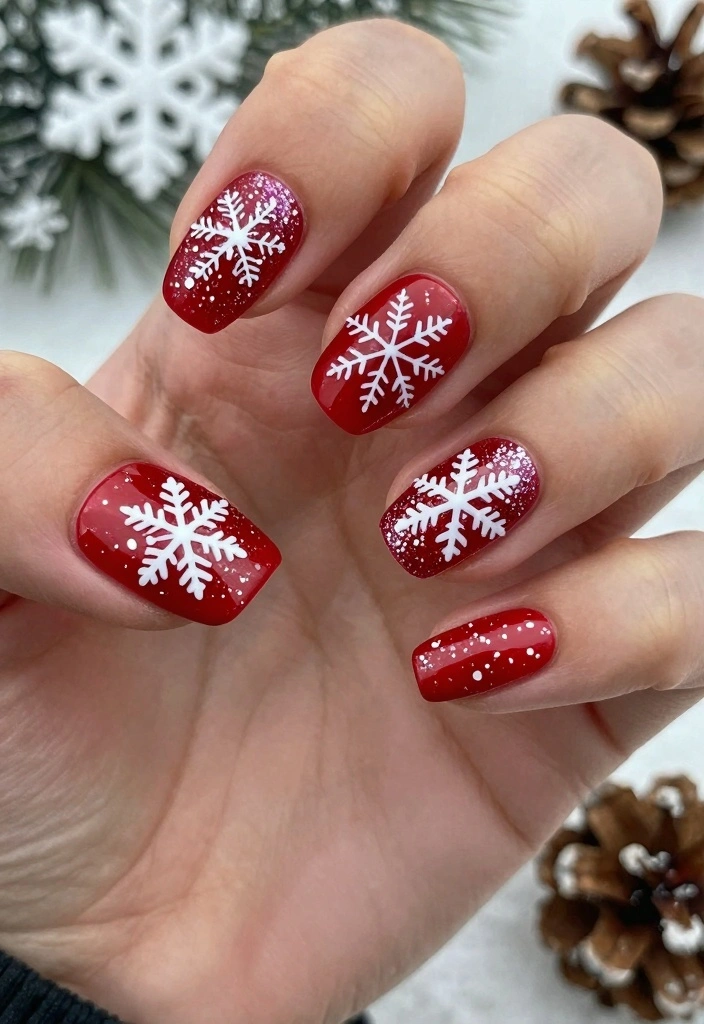
Celebrate the beauty of winter with red nail art featuring delicate snowflakes! This design perfectly captures the chilly essence of the holiday season while maintaining a festive vibe. It’s a wonderful way to showcase your creativity and spread winter cheer.
To create your snowy masterpiece, start with a clean nail base and apply a protective base coat. Paint two coats of bright red polish on all nails. Once dry, use a fine brush or nail art pen to draw snowflakes in white polish. Varying the size of the snowflakes can add more interest. For an extra sparkle, consider adding glitter to some snowflakes. Finish with a top coat to secure your design and add shine.
Steps to create snowy nails:
– Start with a clean base and protective coat
– Apply two coats of bright red polish
– Draw snowflakes with white polish
– Add glitter for extra sparkle
– Seal with a top coat for longevity
This design beautifully embodies the festive spirit while celebrating winter, making it perfect for the holiday season!
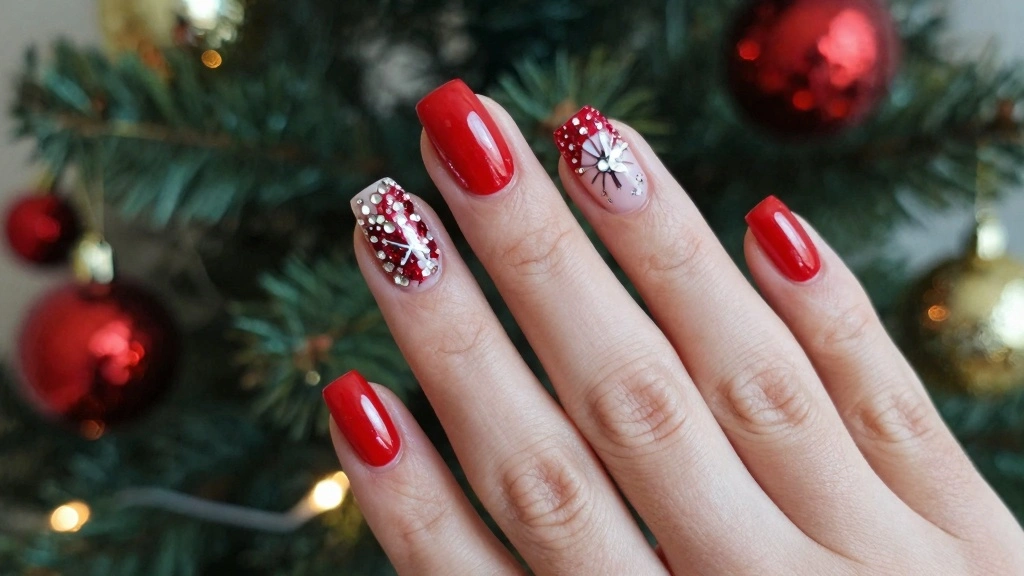
8. Jewel Toned Red with Rhinestones
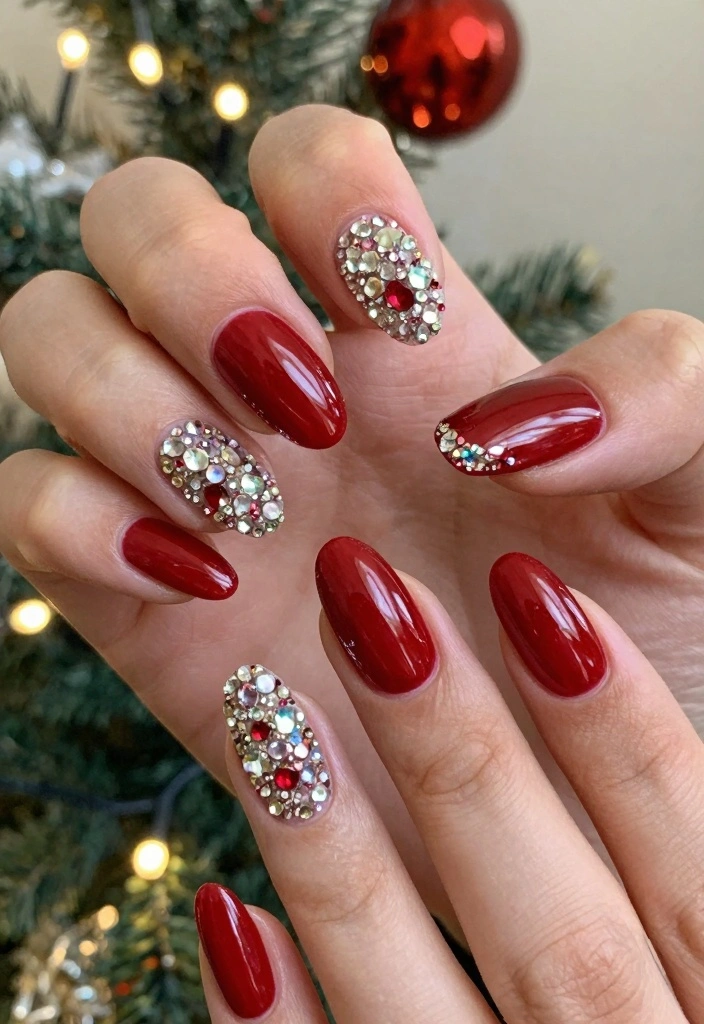
Elevate your holiday nail game with a jewel-toned red base adorned with rhinestones! This glamorous design is for those who want to stand out and make a statement at any festive gathering. The richness of the red combined with sparkling rhinestones creates an eye-catching effect.
To achieve this look, start with a base coat for protection. Apply two coats of a rich jewel-toned red polish for a vibrant foundation. Once dry, strategically place rhinestones on select nails for a touch of glam. You can use a rhinestone picker or a small dot of top coat to secure them in place. Finish with a top coat to seal everything in and enhance the shine.
Steps to create this luxurious look:
– Start with a base coat for protection
– Apply two coats of rich jewel-toned red polish
– Place rhinestones on select nails
– Secure with a top coat for longevity
This dazzling design is perfect for a night out, giving your nails a sense of elegance and sophistication that matches the festive season beautifully.
Fun fact: Jewel-toned red nails with rhinestones read as festive on every camera—experts say metallic accents boost sparkle by up to 70% in holiday lighting. Pair this with a glossy topcoat, and your red Christmas nails truly pop at parties.
9. Red with Holiday-Themed Decals
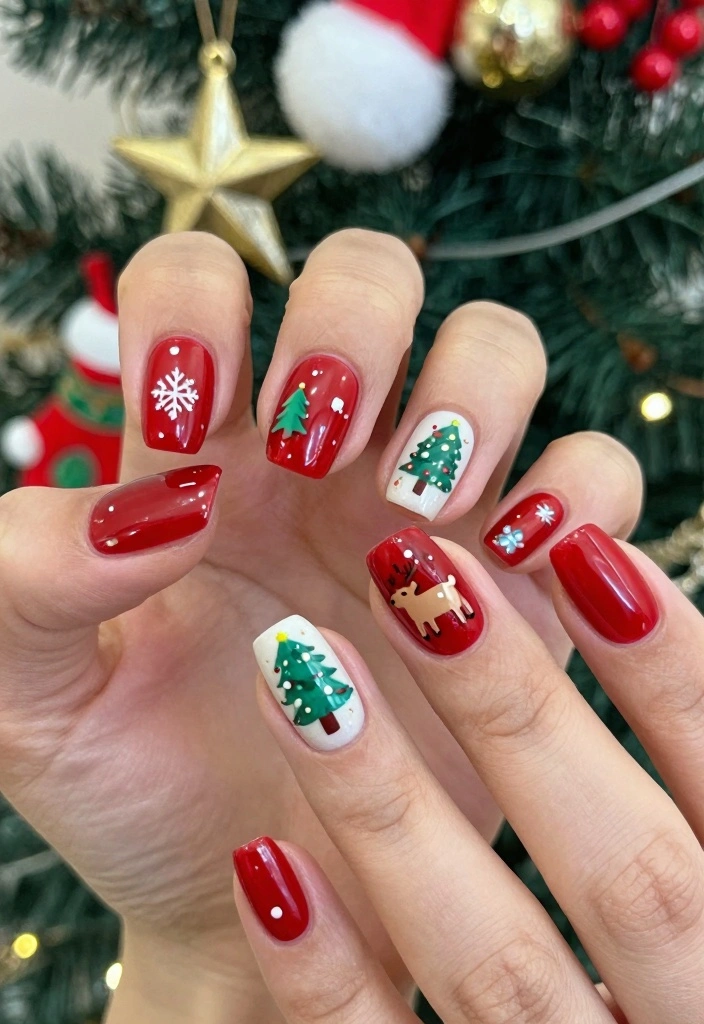
Bring your holiday spirit to life with red nails adorned with charming holiday-themed decals! This design allows you to express your creativity while celebrating the joy of the season. You can mix and match various decals for a playful and delightful look.
To achieve this fun style, start with a base coat for a clean canvas. Paint two coats of red nail polish on each nail. Once dry, apply fun holiday-themed decals like reindeer, Christmas trees, or ornaments. Finish by sealing your design with a top coat to ensure longevity and protect your artwork.
Steps for a playful nail design:
– Start with a base coat for protection
– Apply two coats of red polish
– Add holiday-themed decals of your choice
– Seal with a top coat for durability
This design embodies the Christmas spirit while providing endless opportunities for creativity, making your nails a true testament to the joy of the holiday season.
10. Red with Silver Foil Accents
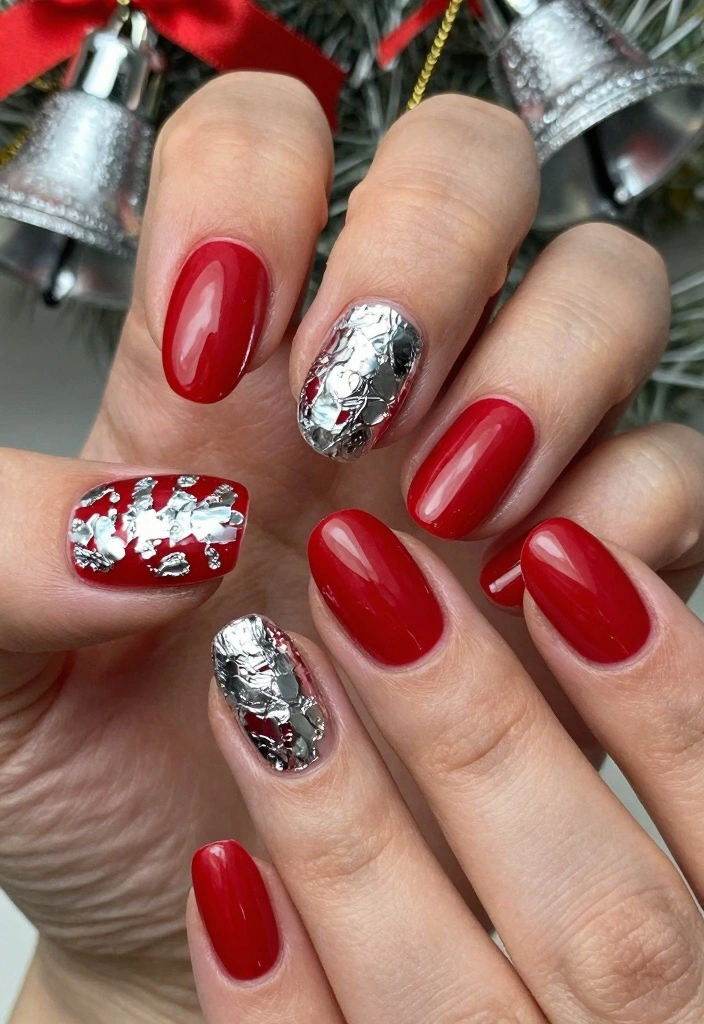
Enhance your holiday nails with stunning red polish featuring silver foil accents! This design combines elegance and modern flair, making it perfect for festive gatherings. The contrast between the bold red and shimmering silver creates a striking visual appeal.
To recreate this chic look, start with a base coat for protection. Paint two coats of a bold red polish on your nails. Once dry, use nail glue to apply small pieces of silver foil randomly on some nails for an artistic touch. Alternatively, create a half-moon design by placing the foil at the base of your nails. Seal everything with a top coat to lock in your design and add a glossy shine.
Steps to achieve this stylish design:
– Start with a base coat for protection
– Apply two coats of bold red polish
– Apply silver foil accents for contrast
– Seal with a top coat for durability
This style beautifully combines classic and contemporary elements, making it a versatile choice for all holiday occasions.
11. Simple Red Nails with Gold Stripes
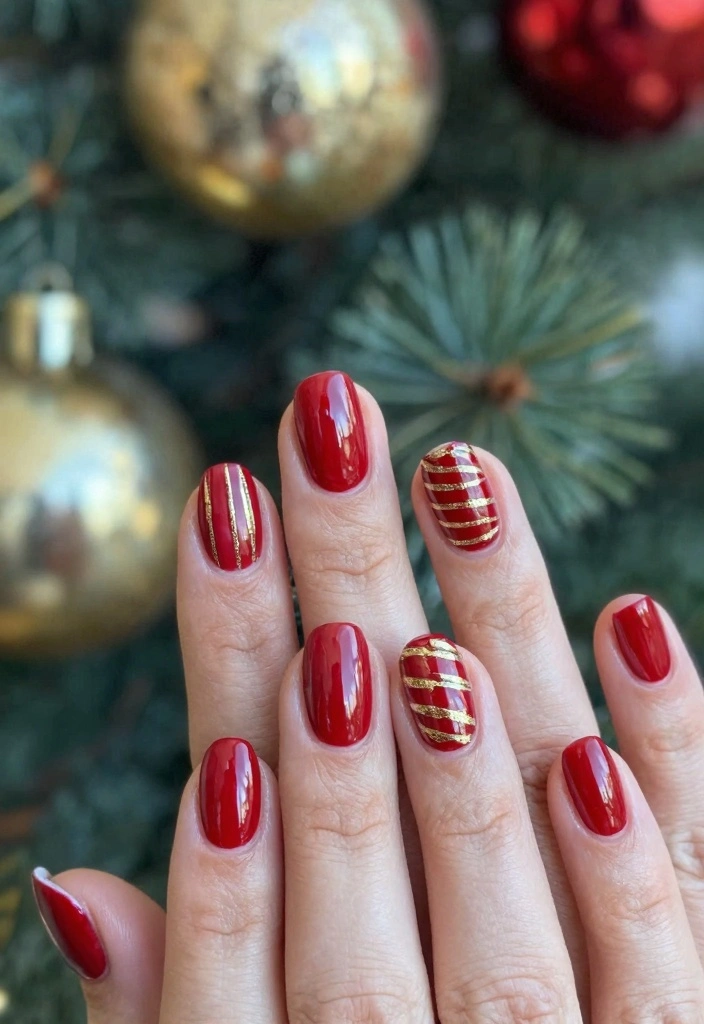
Sometimes, simplicity shines the brightest! Simple red nails accentuated with elegant gold stripes are perfect for those who prefer a clean and sophisticated design. This understated approach captures the festive essence without overwhelming your look.
To achieve this chic design, start with a base coat to protect your nails. Paint two coats of classic red polish. Once dry, use striping tape to create thin gold lines across your nails. Apply gold polish over the tape and remove it while the polish is still wet for crisp edges. Finish with a top coat to enhance durability and shine.
Steps for a sophisticated look:
– Start with a base coat for protection
– Apply two coats of classic red polish
– Use striping tape for gold stripes
– Remove tape while polish is wet for clean lines
– Finish with a top coat for extra shine
This design adds a touch of elegance and is perfect for holiday office parties or family gatherings, ensuring your nails make a stylish statement.
12. Red Nails with Winter Landscapes
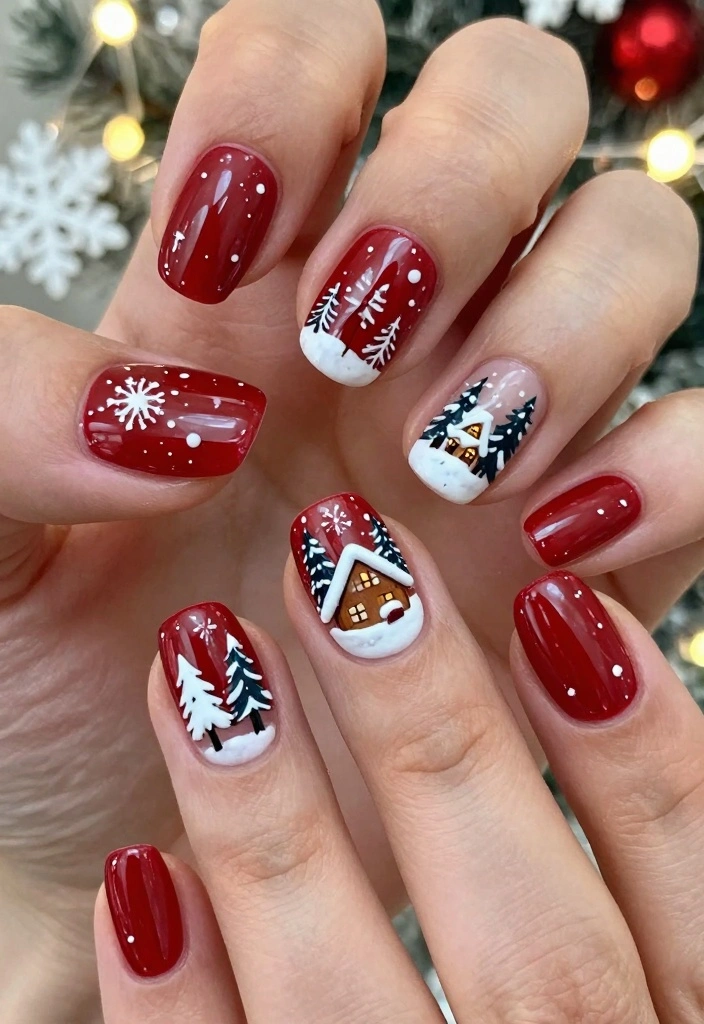
Transform your nails into a winter wonderland with hand-painted winter landscapes on vibrant red polish! This design allows you to showcase your artistic flair while celebrating the beauty of the season. It’s a unique way to embrace the holiday spirit with creativity.
To create this picturesque design, start with a clean nail base and apply a protective base coat. Paint two coats of red polish for a vibrant backdrop. Once dry, use a fine brush to create winter scenery, such as snow-covered trees or cozy cabins, on selected accent nails. Add shimmering white polish for snow and a touch of glitter for stars in the night sky. Seal your design with a top coat to maintain shine and longevity.
Steps for a winter wonderland effect:
– Start with a clean nail base and protective coat
– Apply two coats of red polish
– Paint winter scenery on accent nails
– Add glitter for an enchanting finish
– Seal with a top coat for protection
This design beautifully captures the essence of winter while highlighting your creativity, making it a stunning statement piece for the holidays.


13. Red Holiday Nails with Glitter Stars

Complete your festive look with stunning red nails adorned with sparkling glitter stars! This design encapsulates the essence of the season, twinkling like the stars in the night sky. It’s a fun way to celebrate the holidays while adding a touch of whimsy to your nails.
To create this enchanting design, start with a base coat for protection. Paint two coats of vibrant red polish on your nails. While the red polish is still wet, sprinkle fine glitter on select nails to create starry accents. You can also use star-shaped glitter for a more thematic approach. Finish with a top coat to secure the glitter and enhance shine.
Steps for a twinkling star effect:
– Start with a base coat for protection
– Apply two coats of vibrant red polish
– Sprinkle glitter on wet polish for star accents
– Seal with a top coat for durability
This design is perfect for festive gatherings, allowing you to shine brightly and celebrate the magic of the holiday season with a sprinkle of sparkle!
14. Red Nails with a Plaid Accent

Celebrate the cozy season with red nails featuring a stylish plaid accent! This design captures the warmth of the holidays while adding a chic twist to your manicure. It’s perfect for those looking to combine comfort with festive flair.
To recreate this trendy look, start with a base coat to protect your nails. Paint two coats of red polish on all nails. Choose one accent nail to create the plaid design. Once the red polish is dry, use a fine brush to paint a plaid pattern with black and white polish. Finish with a top coat to seal your design and add shine.
Steps to achieve a cozy plaid design:
– Start with a base coat for protection
– Apply two coats of red polish
– Paint a plaid pattern on an accent nail
– Seal with a top coat for lasting shine
This design is perfect for holiday gatherings, bringing a cozy and stylish feel to your overall look. The plaid accent adds an extra layer of interest, making it an ideal choice for sweater weather!
15. Bold Red with Geometric Patterns
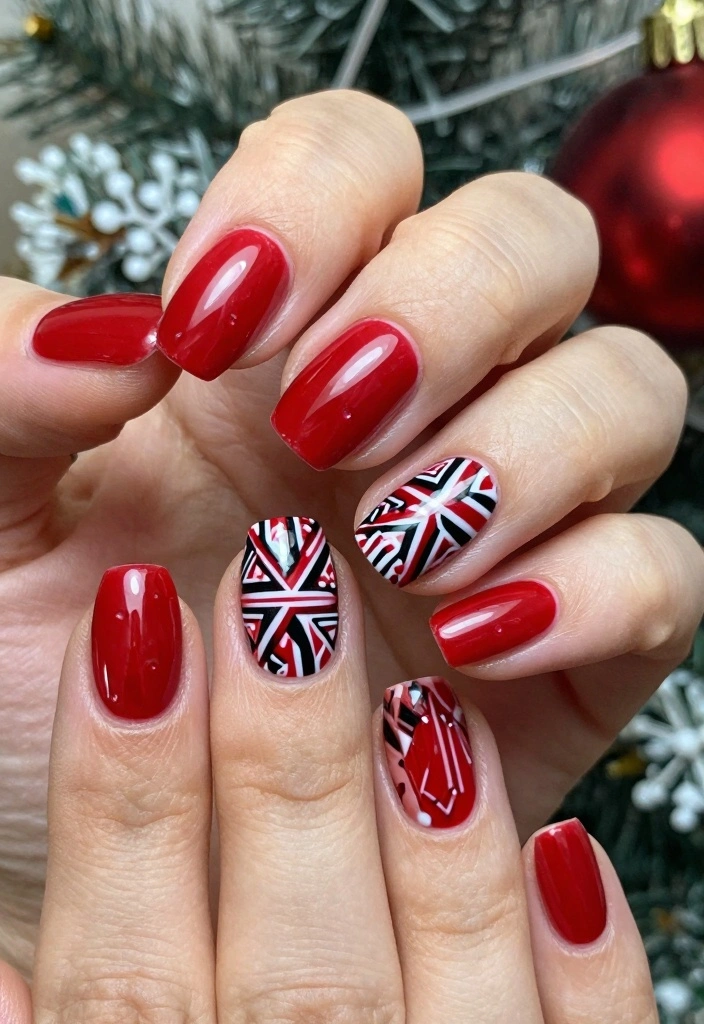
For those who love to make a statement, bold red nails adorned with geometric patterns offer a striking design for the holidays! This contemporary look allows you to showcase your edgy side while embracing the festive spirit. It’s the perfect blend of traditional and modern styles.
To create this eye-catching design, start with a base coat to protect your nails. Paint two coats of vibrant red nail polish. Once dry, use tape to create geometric shapes or lines on selected nails. Paint over the exposed areas with black or white polish, then carefully remove the tape while it’s still wet for clean lines. Finish with a glossy top coat for added shine.
Key steps for a geometric look:
– Start with a base coat for protection
– Apply two coats of vibrant red polish
– Use tape for geometric designs
– Remove tape while polish is wet for crisp lines
– Finish with a top coat for durability
This design is bold and modern, sure to turn heads at any holiday event. It combines the traditional red of Christmas with a fresh take on nail art, highlighting your creativity and style.
16. Red and Silver Glittering French Tips
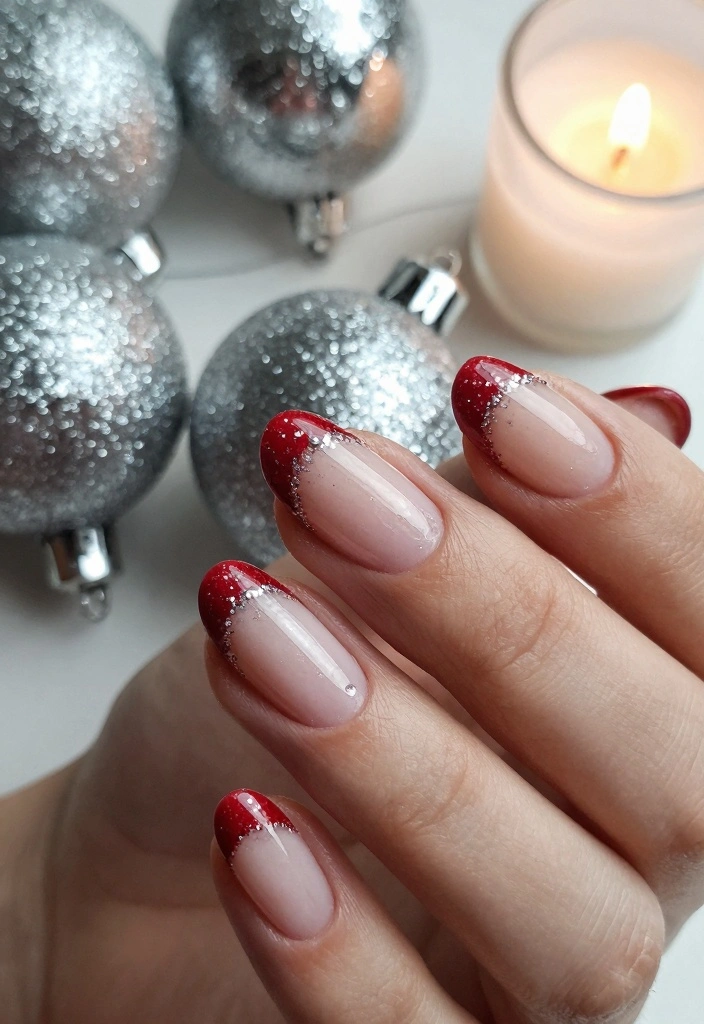
Put a festive twist on the classic French manicure with red and silver glittering tips! This design seamlessly combines elegance with holiday cheer, making it perfect for any festive occasion. The striking contrast of red and silver adds a touch of glamour to your nails.
To achieve this beautiful look, start with a base coat on your nails. Apply a nude or light pink polish as the base color. Use a fine brush to create a red tip along the edge of your nails. While the red polish is still wet, sprinkle fine silver glitter on the tips for a sparkling finish. Finally, seal your design with a top coat to enhance shine and durability.
Steps for a chic French twist:
– Start with a base coat for protection
– Apply nude or light pink polish as base
– Create red tips on nail edges
– Add silver glitter for a festive touch
– Seal with a top coat for lasting shine
This twist on the French manicure allows you to celebrate the season while keeping it classy. It’s perfect for holiday parties or festive dinners, giving your nails a chic and sophisticated look.
17. Christmas Tree Nail Art

Celebrate the season with delightful Christmas tree nail art! This playful design adds a fun and festive touch to your look while showcasing your creativity. Each nail can feature a different tree, making your manicure a true celebration of the holiday spirit.
To create this festive look, start with a protective base coat. Paint two coats of red nail polish on all nails. On an accent nail, carefully paint a Christmas tree using green polish. Add ornaments with colorful dots of polish and a star on top with yellow or gold polish. For a magical feel, consider adding a layer of glitter. Seal everything with a top coat for extra shine.
Steps to create tree-tastic nails:
– Start with a base coat for protection
– Apply two coats of red polish
– Paint a Christmas tree on an accent nail
– Add colorful ornaments and a glitter finish
– Seal with a top coat for durability
This design brings joy and cheer to your holiday nails, making them a cheerful part of your Christmas ensemble. Plus, it’s sure to spark conversations at any gathering!


18. Festive Red with Holiday Quotes

Complete your festive nail journey with red nails adorned with inspiring holiday quotes! This design adds a personal touch to your manicure, spreading joy wherever you go. It’s a meaningful way to express your holiday spirit through your nails.
To bring this design to life, start with a clean nail base and apply a protective base coat. Paint two coats of vibrant red polish. Once dry, use a fine brush or nail art pen to write cheerful quotes or phrases in white or gold polish on select nails. Mix various phrases like ‘Joy’, ‘Peace’, or ‘Celebrate’ for added fun. Finish with a top coat to protect your quotes and maintain shine.
Steps for spreading holiday cheer:
– Start with a clean base and protective coat
– Apply two coats of vibrant red polish
– Write holiday quotes on select nails
– Seal with a top coat for protection
This design isn’t just visually appealing; it also spreads positivity and holiday cheer. It’s perfect for sharing the joy of the season with friends and family!
Conclusion

With these 18 stunning red Christmas nail ideas, your holiday celebrations are sure to be extra special and memorable. Whether you prefer classic looks or trendy designs, there’s something here for everyone. As you experiment with different styles, don’t forget to embrace the festive spirit and have fun while doing it!
Nail art is a form of personal expression, especially during the holidays. So gather your nail polishes and get creative! Wishing you sparkling nails and a joyful holiday season!
Frequently Asked Questions
What are some bold red christmas nails ideas for holiday parties?
Go bold with red christmas nails that shine at holiday parties.
Try a classic glossy crimson with a luxe gold accent nail, red velvet texture for a sumptuous festive nail designs vibe, red nails with candy cane stripes for holiday nail art, or a snowflake-stamped accent on one nail.
To nail the look: start with a smooth base coat, apply two coats of red, add your accent design with tape or a stamping plate, then seal with a top coat.
For longer wear, cap the free edge and reapply a top coat every few days.
How can I recreate festive nail designs at home without special tools?
Yes—great holiday nail art is possible with common tools. Gather red nail polish, a fine brush or tape, a dotting tool (or the end of a bobby pin), a top coat, and optional stickers or glitter.
Steps: apply a base coat, two coats of red, then use striping tape to create lines or a stamping plate to add snowflakes. Use the dotting tool for dots or place a small rhinestone for sparkle. Finish with a top coat and let it dry fully.
Tip: choose a quick-dry top coat for busy days and lean into seasonal nail trends to keep it current.
Which red shades work best for Christmas manicure ideas?
For Christmas manicure ideas, start with classic red christmas nails shades like true crimson or cherry red for bold impact. If you want depth, try a deep burgundy or wine red; for a brighter festive vibe, choose a bright scarlet.
Pair with metallics like gold or emerald accents to stay on seasonal nail trends. Consider finishes (glossy, matte, or velvet) to suit your look and skin tone.
A simple accent—such as a single metallic line or tiny snowflake—adds chic festive nail designs without overwhelming the nails.
What are quick red christmas nails ideas for busy weeknights?
Short on time? Here are fast festive nail designs with red. 1) Solid red with a quick glossy top coat; 2) Red nails with one accent nail featuring a rhinestone or metallic stripe; 3) Candy cane stripes using nail tape; 4) Red glitter gradient at the tip for instant sparkle.
How to do fast: apply base coat, two coats of red, then add tape or stamping for the accent; finish with a top coat and allow ample drying time. If you’re in a rush, keep nails short for quicker filing and cleanup.
These ideas fit current seasonal nail trends and pair well with any holiday outfit.
How do I care for red christmas nails to last through the holidays?
Keep your red christmas nails looking fresh with a strong base coat and a durable top coat.
Reapply the top coat every 2–3 days to prevent chipping during the busy season.
Avoid acetone-heavy removers and protect nails with cuticle oil or lotion; wear gloves when washing dishes to minimize water exposure.
If you use gel or press-ons, follow manufacturer curing times and safe removal steps to preserve nail health. With proper care, your holiday nail art will stay vibrant through Christmas.
Related Topics
red christmas nails
holiday nail art
festive nail designs
Christmas manicure
bold nail colors
seasonal nail trends
easy nail art
party ready nails
nail art inspiration
glamorous nails
beginner friendly
trendy nail styles