The holiday season is upon us, and with it comes the excitement of festive nail art. If you’re like me, you’re probably craving some unique and eco-friendly ways to express your holiday spirit. This year, why not embrace the beauty of green Christmas nails? They are not only stylish but also a nod to sustainability, perfect for anyone looking to add a modern touch to their holiday look.
If you’re someone who loves all things beauty, especially nail art, this post is just for you. You’ll find 15 fabulous ideas that make use of green nail polish, bringing a fresh vibe to classic holiday designs. Whether you’re in search of festive nail designs or simply want to try out the latest modern nail trends, these ideas are bound to inspire your next Christmas manicure.
Get ready to dive into a world of creative possibilities! I’ve gathered a collection of nail art ideas that are festive, fun, and perfect for any holiday occasion. You’ll discover designs that sparkle, shine, and make your nails the talk of the holiday party. Let’s explore the charming styles that will have you sporting green Christmas nails in no time!
Key Takeaways
– Discover 15 unique designs that blend modern nail trends with festive themes, focusing on green Christmas nails.
– Uncover eco-friendly nail art techniques to achieve stunning looks while being mindful of sustainability.
– Learn how to incorporate popular elements like glitter, ombre, and textures into your holiday nail art.
– Explore various styles from minimalist to bold, ensuring there’s something for every taste and occasion.
– Get inspired by tips that help you create your own beautiful Christmas manicure ideas effortlessly.
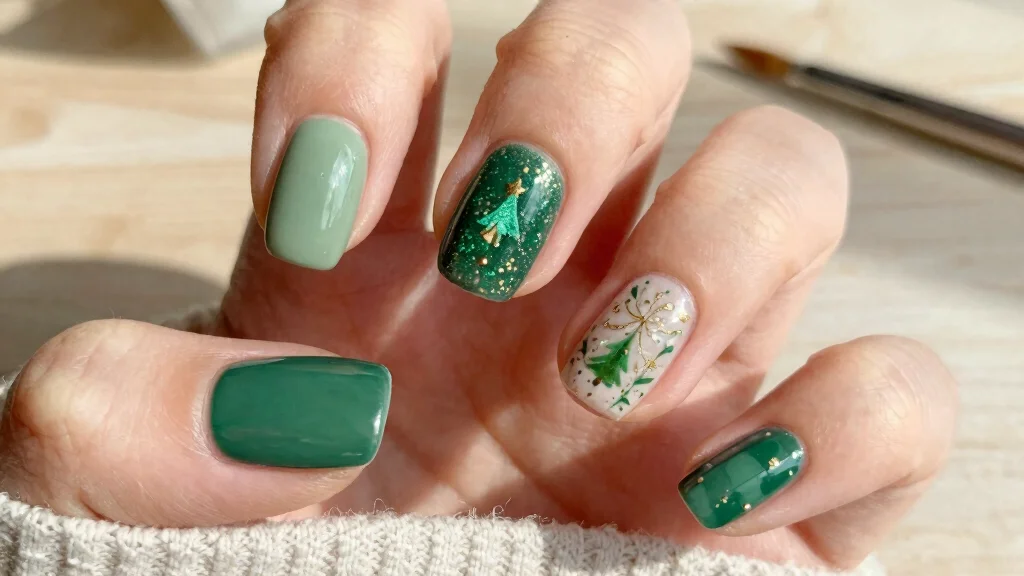
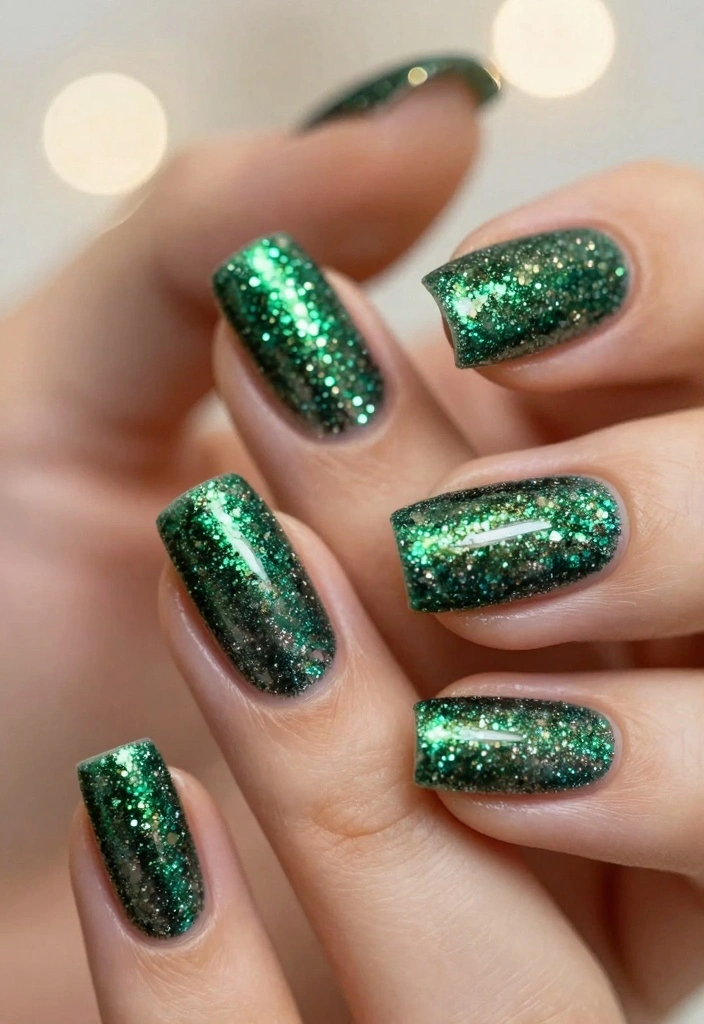
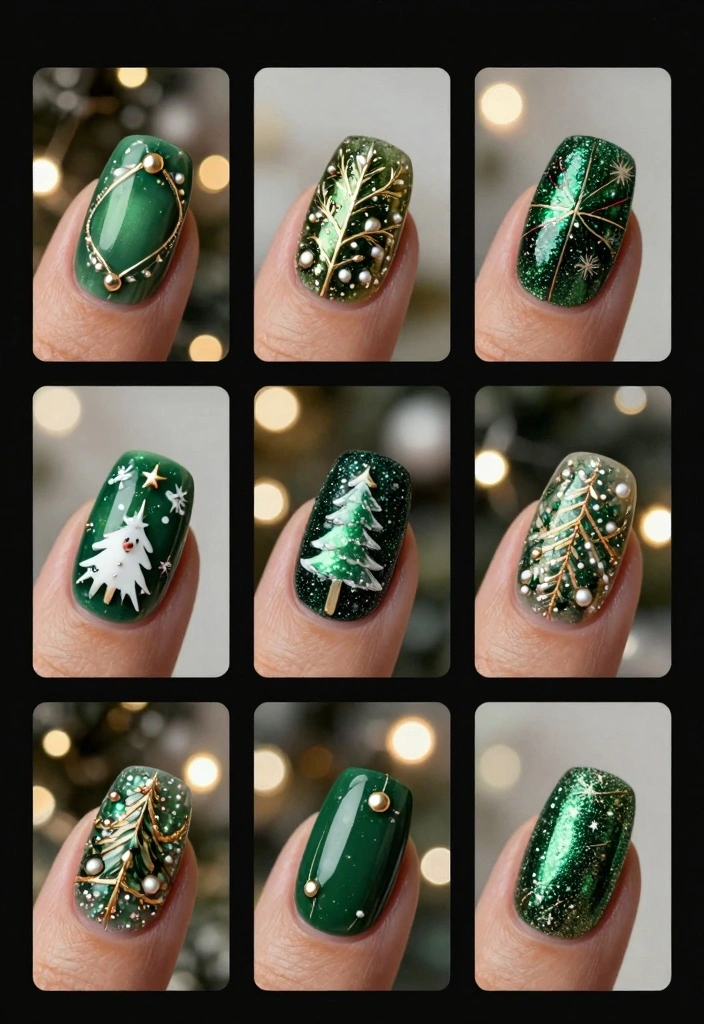
1. Glittering Emerald Elegance

Kick off your holiday nail art with an eye-catching emerald green polish that twinkles under festive lights. This stunning shade captures the essence of glamour during the season, making it a go-to choice for celebrations. To create a salon-worthy finish, start with a base coat to protect your nails, then apply two coats of emerald polish. Top it off with a glittery top coat for a dazzling effect, and feel free to embellish with gold foils or rhinestones for an added touch of luxury!
Begin by ensuring your nails are clean and dry. Use a fine brush for precise glitter application to keep everything looking neat. Finish with a top coat to ensure your glamorous nails shine bright all season long.
Key steps for your elegant look:
– Clean and dry your nails thoroughly
– Apply glitter precisely with a thin brush
– Seal your design with a protective top coat
This design merges a classic festive color with a modern twist, making it perfect for both casual gatherings and elegant parties.
Green christmas nails start with a simple base coat, then two coats of emerald polish for that salon-worthy glow. Add a glitter top coat and a touch of gold foil for festive flair—eco-friendly glam you can wear all season. It’s practical, playful, and totally Pinterest-worthy.
How To Choose Eco-Friendly Green Christmas Nails
Choosing the right eco-friendly products for your green Christmas nails can greatly enhance your holiday spirit while caring for the planet. With so many options available, here’s a helpful guide to make your selection process easier.
1. Nail Polish Type
You have several choices when it comes to nail polish. Look for brands that are labeled as “3-free,” “5-free,” or even “10-free,” meaning they exclude harmful chemicals like formaldehyde and toluene. Water-based polishes are also a great choice for a more natural option. These polishes are less toxic and often easier to remove without harsh chemicals.
2. Color Selection
When it comes to festive designs, choosing the right shade of green is key. Opt for deep emerald or forest green for a classic Christmas feel, or try a lighter mint green for a modern twist. Paired with gold or silver accents, these colors can create stunning holiday looks. Check how the color looks both in the bottle and on your nails to ensure you love it.
3. Eco-Friendly Ingredients
Read the label to find polishes made with natural ingredients. Look for organic and vegan options that avoid synthetic chemicals. Ingredients like mineral pigments and botanical extracts are often less harmful to the environment and your health. Research brands that emphasize sustainability in their ingredient sourcing.
4. Application Tools
Consider the tools you will use for your nail art. Choose brushes and tools made from sustainable materials like bamboo or recycled metals. This way, you not only get to create beautiful designs but also contribute to reducing plastic waste. Check if the brushes are easy to clean and reusable for multiple uses.
5. Nail Art Techniques
Explore different eco-friendly nail art techniques. Techniques like stamping or using natural sponges for ombre effects can create intricate designs without excessive waste. You can also use biodegradable glitter to add sparkle to your holiday nails. This way, you can enjoy a festive look without harming the environment.
6. Budget Considerations
Set a budget for your nail supplies while keeping in mind that eco-friendly products can sometimes be more expensive. Consider the long-term benefits of investing in high-quality, sustainable products. Look for deals or bundles that many brands offer during the holiday season to save money while still getting the best.
Pro Tip: Make a list of your desired nail art ideas and required materials before shopping. This will help you stay focused and ensure you pick eco-friendly options that meet your holiday nail goals!
By following these guidelines, you can confidently choose eco-friendly products that will keep your Christmas nails looking festive and stylish while supporting sustainability. Enjoy the process of creating your green Christmas nails and let your creativity shine!
2. Matte Forest Green with Glossy Tips
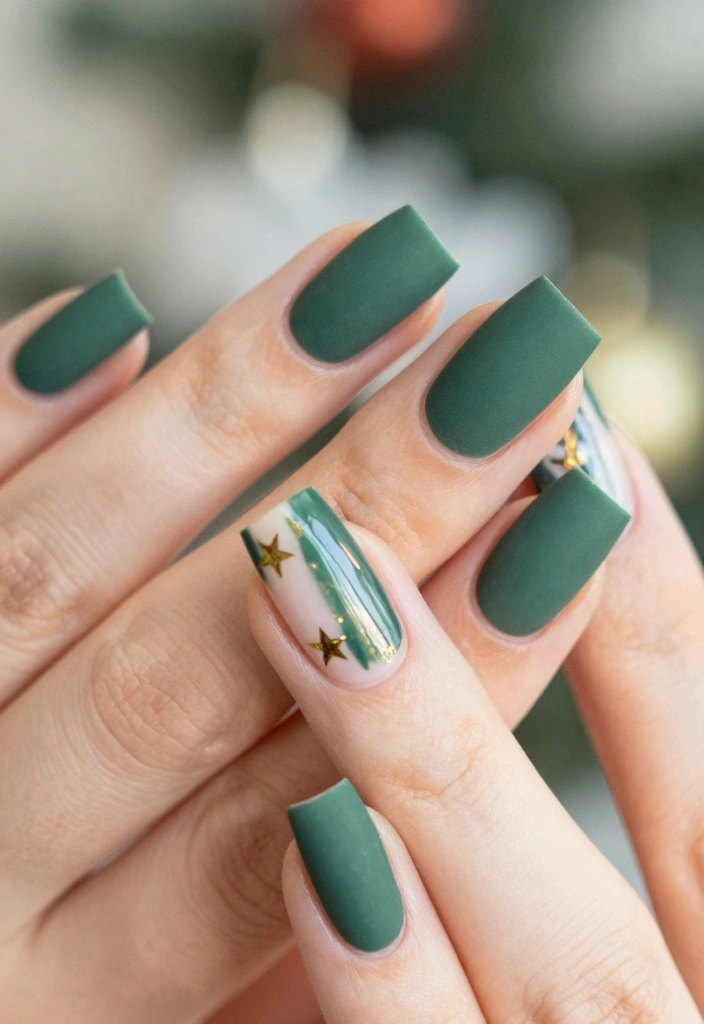
Elevate your nail game with a chic matte forest green base paired with glossy tips. This modern take on the classic French manicure is both fresh and captivating. Start by applying a matte forest green polish, allowing it to dry completely. Then, use a glossy top coat to draw a sleek line at the tips, creating a striking contrast that adds sophistication to your nails.
To make the most of this design, use tape for precise lines and get creative by adding tiny gold stars or snowflakes on accent nails. Coordinate your nails with your outfit to create a seamless style.
Here’s how to achieve this stunning look:
– Tape off tips for a clean finish
– Add tiny decorations on accent nails
– Match your outfit’s color scheme for a cohesive look
This design beautifully reflects modern nail trends, blending simplicity and elegance, making it an ideal choice for holiday festivities without being overly flashy.
For Green Christmas Nails, start with a matte forest green base, then crown with glossy tips—it’s a chic, modern twist that still feels festive. Tape the lines for clean edges, and sprinkle tiny gold stars or snowflakes for subtle sparkle.
3. Festive Floral Accents
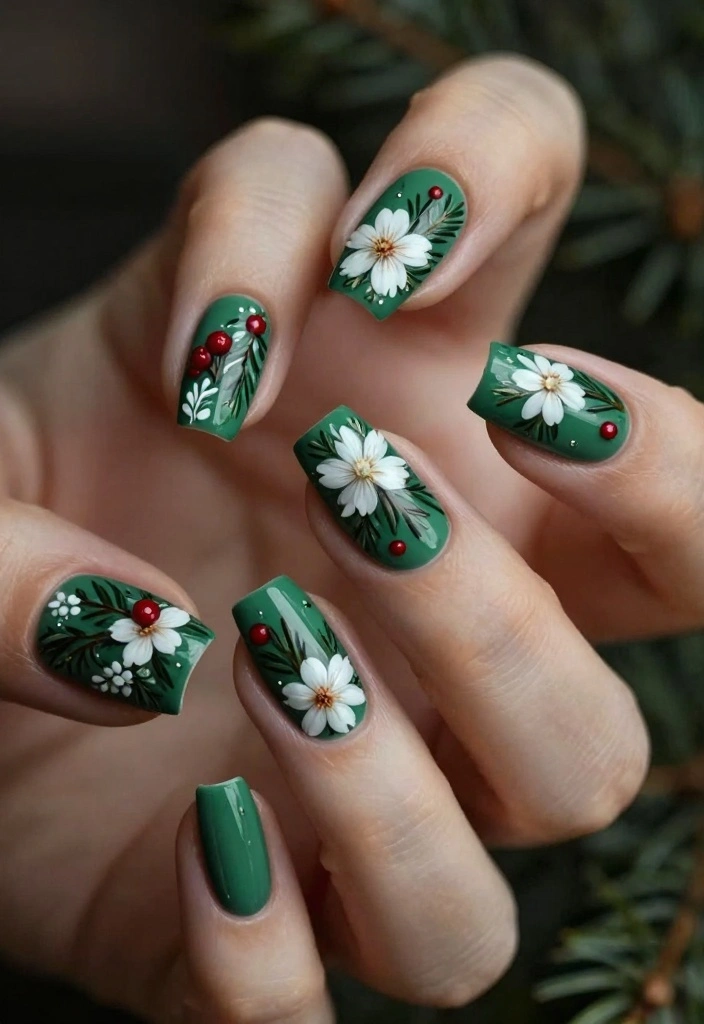
Infuse your holiday spirit with delightful floral accents on your green Christmas nails. Start with a rich green base and let it dry before painting delicate white or red flowers on a few accent nails. This design embodies the beauty of winter foliage and offers a personal touch that stands out. Consider using eco-friendly polishes to support sustainability during the festive season.
To create this charming look, follow these simple steps: paint your base coat, use a fine brush for floral designs, and finish with a glossy topcoat to seal in your art. Practice on paper beforehand if you’re unsure about your technique.
Steps to create your floral masterpiece:
1. Paint your base coat and let it dry
2. Create floral designs or dots with a fine brush
3. Seal with a glossy topcoat
Keep the flowers simple for an elegant touch, and coordinate the colors with your holiday outfit. This design offers a fresh twist on traditional Christmas colors, ensuring your nails are a standout feature.
Fun fact: Three tiny white or red flowers on green Christmas nails can create a fresh, festive focal point in minutes. Start with a rich green base, then add delicate blooms with a fine brush—eco-friendly polishes help you stay kind to the planet.
4. Snowy Green Ombre
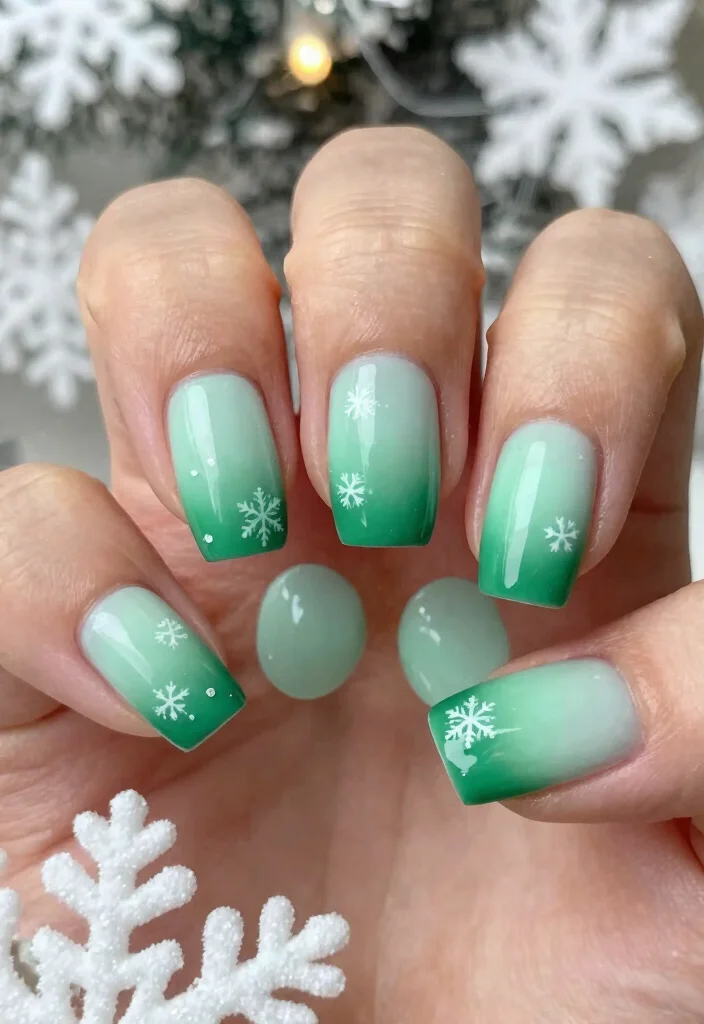
Ombre nails are a stunning way to create a beautiful blend of colors for a festive look. Start with a light mint green at the base, gradually transitioning to a deeper green toward the tips. To enhance the winter theme, add touches of white to mimic snowflakes or frost. This versatile design is perfect for both casual and formal occasions.
To achieve this effect, apply a base coat of mint green, then use a makeup sponge to dab on darker green polish, blending upwards. Finish with white dots or snowflake designs to complete the wintery vibe.
Follow these steps for your snowy ombre:
1. Apply a mint green base coat
2. Use a sponge to blend darker green polish
3. Add white snowflakes or dots for a frosty effect
For best results, use a clean sponge for blending and seal your design with a top coat. Pair your nails with soft, cozy outfits to showcase your festive look beautifully. Ombre designs allow for creativity, making it easy to adapt for any holiday gathering.
5. Metallic Green Glam
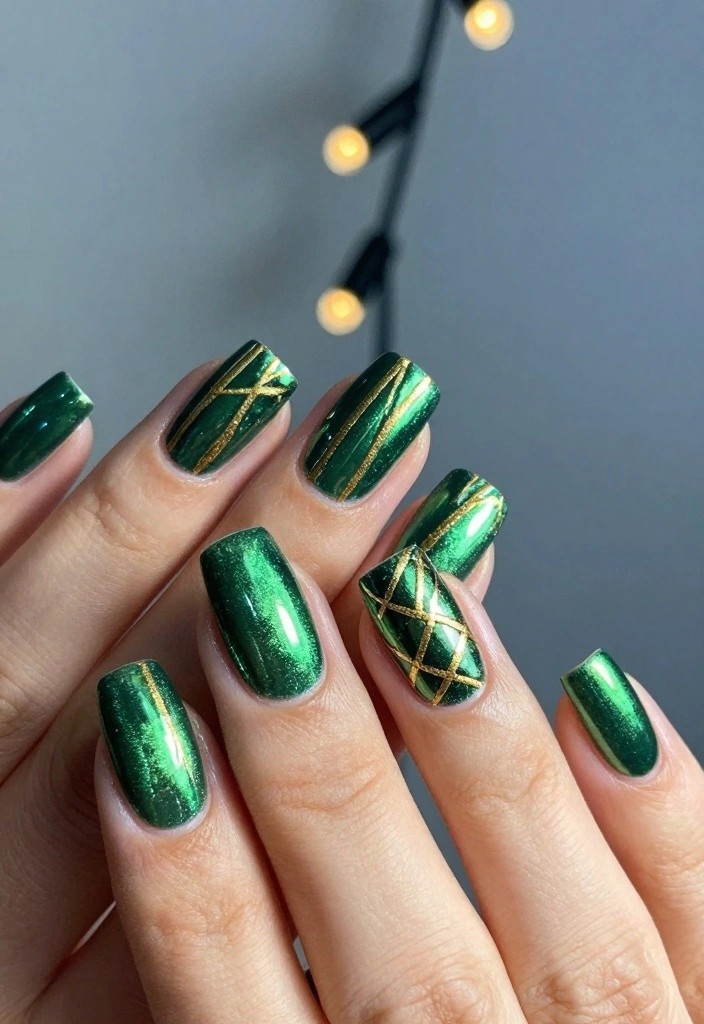
Shine like a star this holiday season with a striking metallic green nail design. This trend exudes boldness and glamour, perfect for those who love a bit of sparkle. Choose a full metallic green coat or mix it up with various nail shapes and accents. Incorporate shiny gold stripes or geometric patterns using tape for a chic look that pairs perfectly with dazzling jewelry.
When applying metallic polish, remember that it can show brush strokes, so apply it sparingly for a smooth finish. Use nail tape for clean lines and try mixing matte and shiny finishes for an edgy twist.
Get started with these steps:
– Apply metallic polish carefully to avoid streaks
– Use tape for sharp designs and lines
– Experiment with different finishes for added style
Metallic colors are perfect for holiday celebrations, especially with festive lights reflecting off your nails.
6. Minimalist Green Dot Art
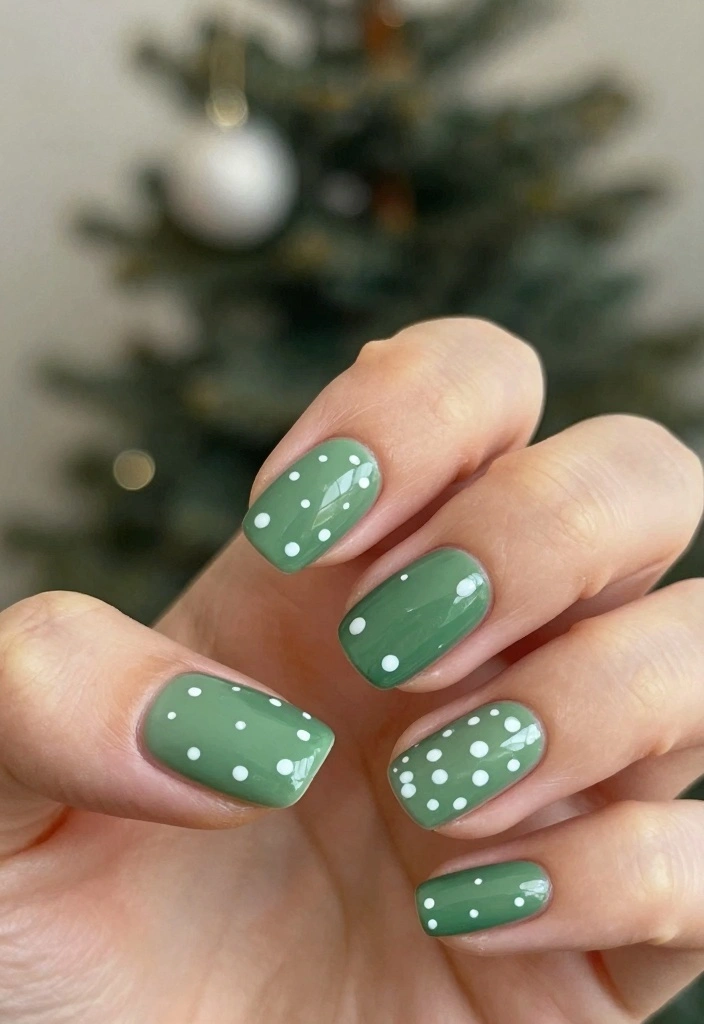
Minimalist designs are in vogue, and what better way to celebrate than with charming green dot art? Start with a simple green base, then create tiny white or yellow dots in a random pattern across your nails. This playful yet refined look captures the holiday spirit without being overwhelming—ideal for office settings or casual gatherings.
To achieve this look, begin with a green base coat and use a dotting tool to apply dots of varying sizes. Finish with a clear top coat for a polished appearance.
Steps to create your minimalist design:
1. Start with a green base coat and let it dry
2. Use a dotting tool for varying dot sizes
3. Seal with a clear top coat for a smooth finish
Ensure your base color is completely dry before adding dots. This design pairs excellently with neutral outfits, showcasing that simplicity can often be stunning!
7. Christmas Tree Designs
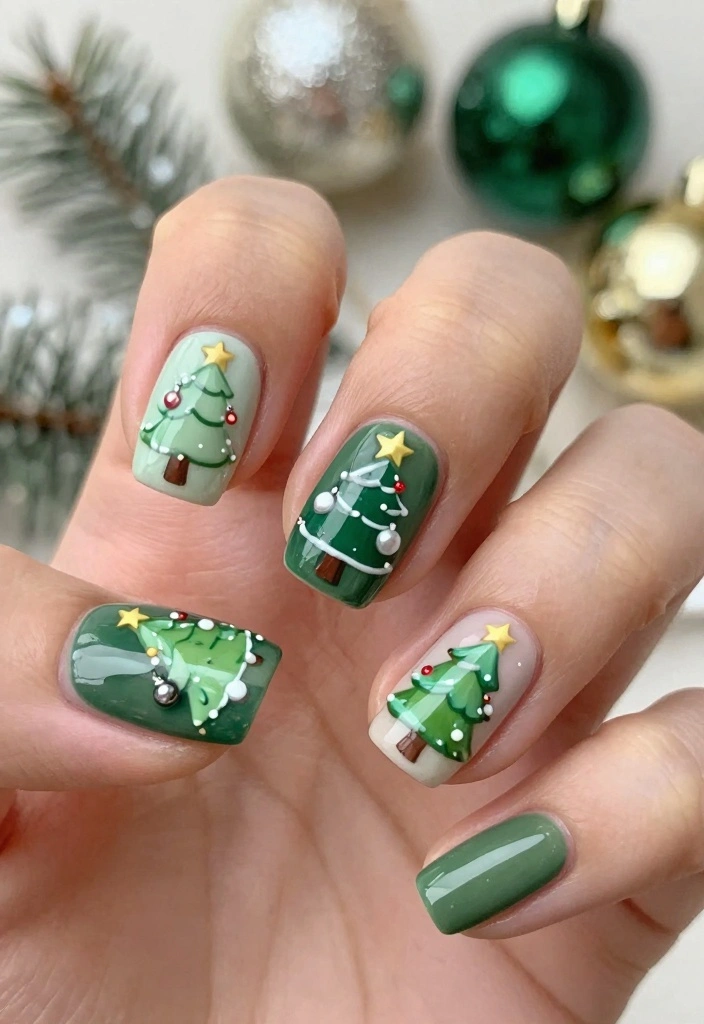
Celebrate the holiday spirit with whimsical Christmas tree designs on your nails. Choose a green base and create small trees on accent nails using various shades of green, topped with glimmering stars. This festive nail art not only showcases the season but also serves as great conversation starters at holiday gatherings.
To create your charming trees, apply a green base coat and let it dry. Use a fine brush to paint a triangle shape for the tree and decorate with tiny dots for ornaments, finishing with a star on top!
Steps to achieve this festive look:
1. Apply a green base coat and let it dry
2. Paint a triangle shape for the tree
3. Add dots for ornaments and finish with a star
Consider a glittery top coat to enhance the sparkle. This design is delightful on both short and long nails, adding a playful touch to your holiday style.


8. Glitter Gradient
A glitter gradient is a simple yet glamorous way to elevate your green Christmas nails. Start with a solid green base and layer glitter from the tips toward the base, creating a beautiful fading effect. This design evokes a sparkling winter wonderland and can be customized with various glitter colors to suit your style.
To create this look, apply a base green coat and let it dry. Use a sponge to dab glitter toward the tips of your nails, gradually reducing the amount as you move down.
Follow these steps for your glittery look:
1. Apply your base green coat and allow it to dry
2. Use a sponge to blend glitter toward the tips
3. Gradually decrease glitter for a fading effect
Experiment with different glitter colors to personalize your gradient. Seal your design with a top coat to minimize chipping and pair your nails with glittery accessories for a complete festive ensemble. Glitter gradients are versatile, suitable for any holiday event from cozy family gatherings to elegant parties.
9. Candy Cane Twist
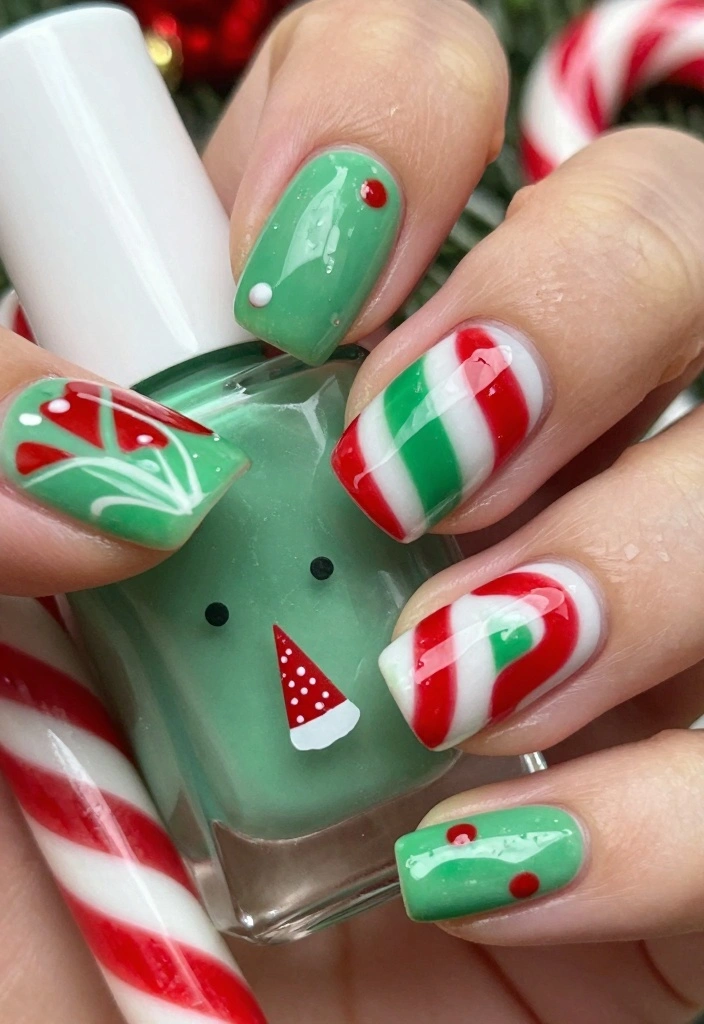
Add a playful twist to your holiday style with delightful candy cane nail art! Using classic red and green colors, this design brings a cheerful, festive vibe. Start with a green base and create alternating diagonal lines using red polish to mimic the iconic candy cane stripes.
To achieve this fun look, paint a green base and allow it to dry completely. Then, use a thin brush to draw diagonal stripes with red polish, finishing with a shiny top coat to seal in your creativity.
Here’s how to craft this playful design:
1. Paint a green base and let it dry
2. Use a fine brush to create diagonal stripes
3. Seal with a shiny top coat for a polished finish
Make sure the green base is fully dry to avoid smudging. Adding a bit of glitter to the red stripes can enhance the festivity. This playful design captures the joy of the holiday season, making it a delightful choice for any Christmas celebration!
10. Winter Wonderland
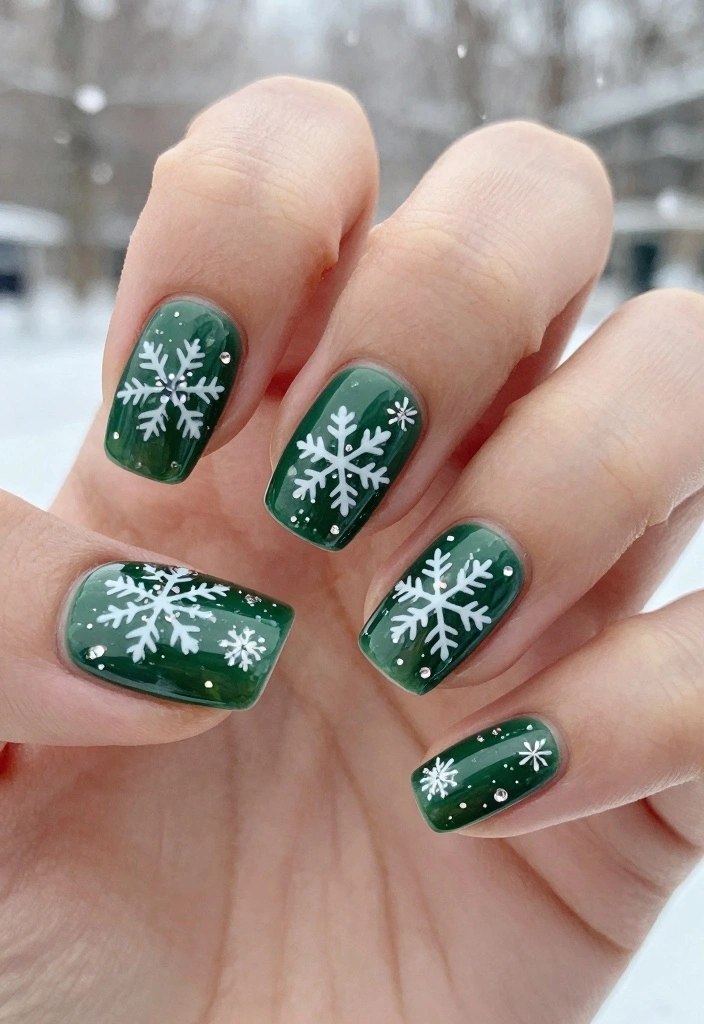
Embrace the beauty of winter with snowy designs on your green Christmas nails. Choose a dark green base and delicately paint white snowflakes to create an elegant seasonal look. This design is perfect for festive gatherings and can even include tiny rhinestones to mimic frost, adding an extra sparkle.
To achieve this enchanting look, apply a deep green polish and let it dry. Use a fine brush to create snowflakes on each nail, and consider adding rhinestones at the center of each snowflake for a touch of glamour.
Steps to make your winter wonderland:
1. Apply a dark green polish and allow it to dry
2. Use a fine brush for snowflake designs
3. Add rhinestones for extra flair
Practice your snowflake design on paper first if you’re not confident. A matte top coat can provide a modern twist on this classic look. This design pairs beautifully with cozy winter attire, ensuring your nails shine throughout the season!
11. Pine Needle Textures
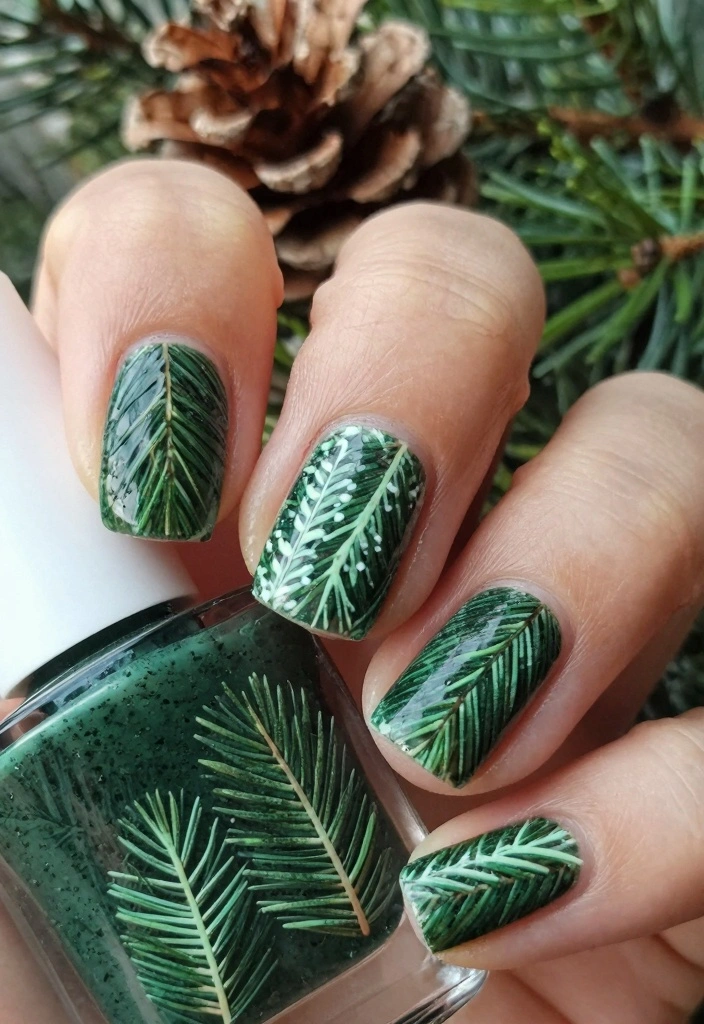
Bring the essence of nature to your nails with textured designs that mimic the look of pine needles. Start with a dark green polish and use a thin brush to create long strokes for that pine needle effect. This stylish design pays homage to one of the season’s most iconic symbols while adding a unique touch.
To create this look, apply your base coat of dark green, then use a fine brush to create long, thin lines with a lighter shade of green. Consider adding tiny red dots for ornaments or berries to enhance the festive feel.
Steps for your pine needle design:
1. Apply a dark green base coat
2. Use a fine brush for long green strokes
3. Add red dots for ornaments or berries
Practice your stroke technique on paper to perfect it. Mixing different shades of green creates depth, and this design pairs beautifully with earthy-toned outfits. Textured designs bring an organic feel to your nails, making them perfect for nature lovers during the holiday season.
12. Reindeer Antlers
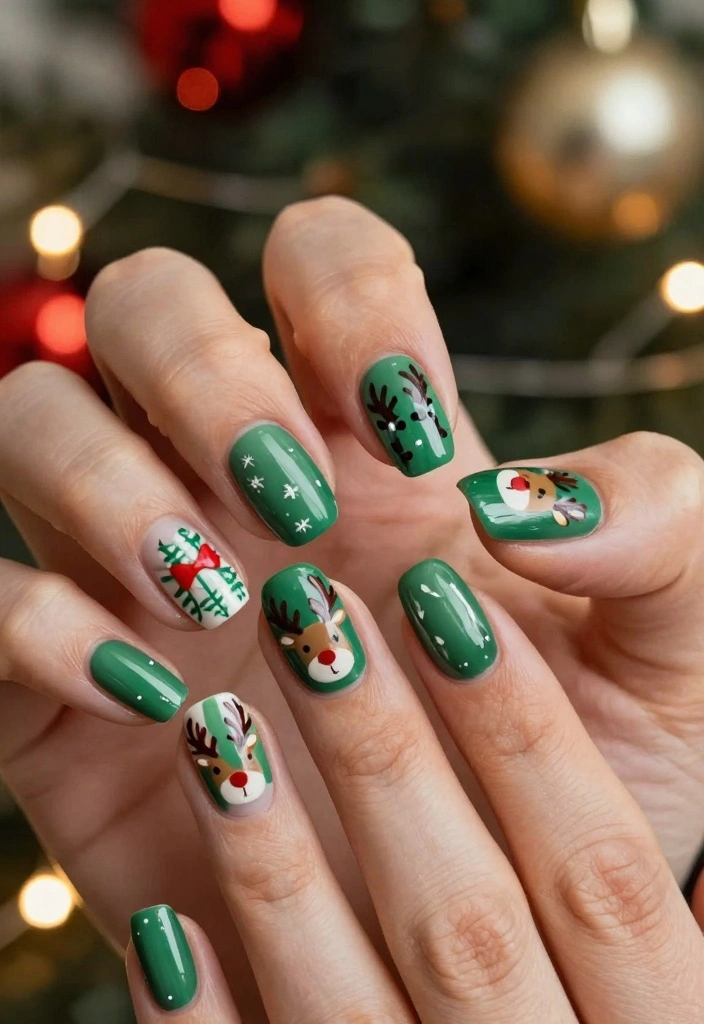
Infuse your nails with a touch of whimsy by adding charming reindeer antlers! Start with a green base and use brown polish to create the antler designs. This playful nail art is perfect for anyone wanting to bring a light-hearted spirit to their holiday celebrations.
To craft this fun design, paint your nails green and allow them to dry. Use a fine brush to create the antlers on accent nails, and consider adding red dots for a nose effect to complete the look.
Steps to create your reindeer nails:
1. Paint your nails green and let them dry
2. Use a fine brush to create antlers
3. Add red dots for a nose on accent nails
Ensure you have a steady hand for clean lines. This design works wonderfully on short nails, making it a versatile choice. Pair your playful nails with holiday accessories for a complete festive look. This design captures the fun side of the holiday season, allowing your nails to shine with joy!
13. Textured Sweater Nails
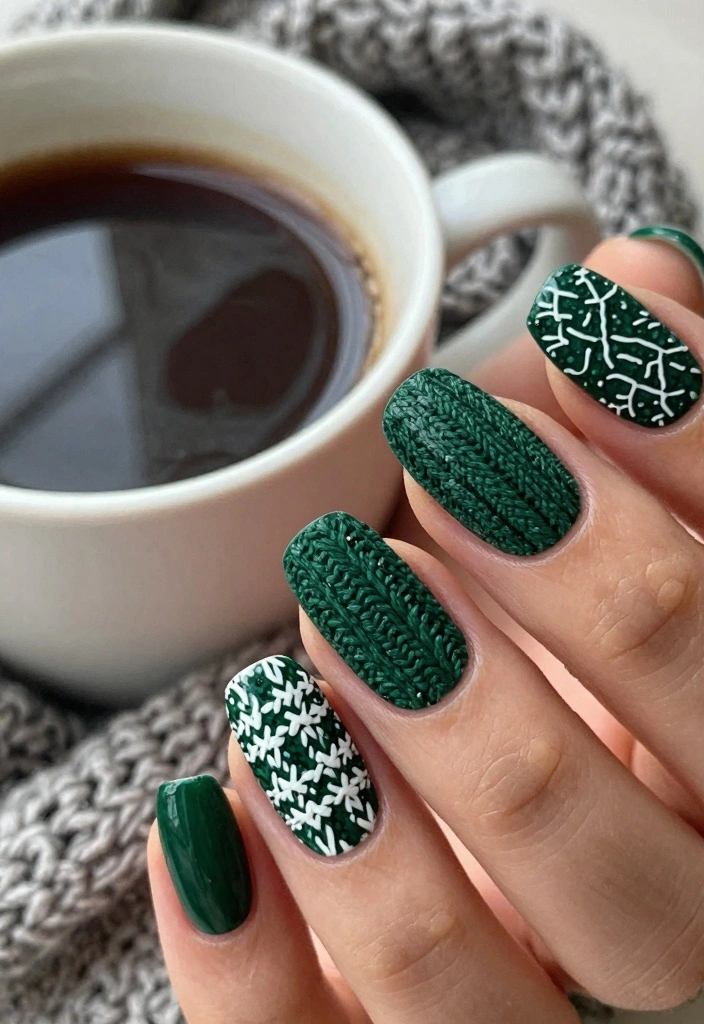
Embrace the cozy spirit of winter with textured sweater nails! This design evokes the warmth of your favorite holiday sweater with a knitted pattern. Choose a deep green base and create a textured effect using a nail stamping kit or fine brush for a fun, festive look.
To achieve this cozy design, apply a deep green polish and let it dry thoroughly. Use a stamping kit or a fine brush to create sweater patterns, finishing with a matte top coat for that knit-like effect.
Steps to create your textured sweater nails:
1. Apply a deep green polish and let it dry
2. Use a stamping kit or fine brush for patterns
3. Finish with a matte top coat for texture
Practice your technique on paper first to ensure clean lines. Mixing shades of green can add depth to your design. This cozy nail art pairs perfectly with warm-toned outfits, reflecting the togetherness of the holiday season.
14. Holiday Plaid
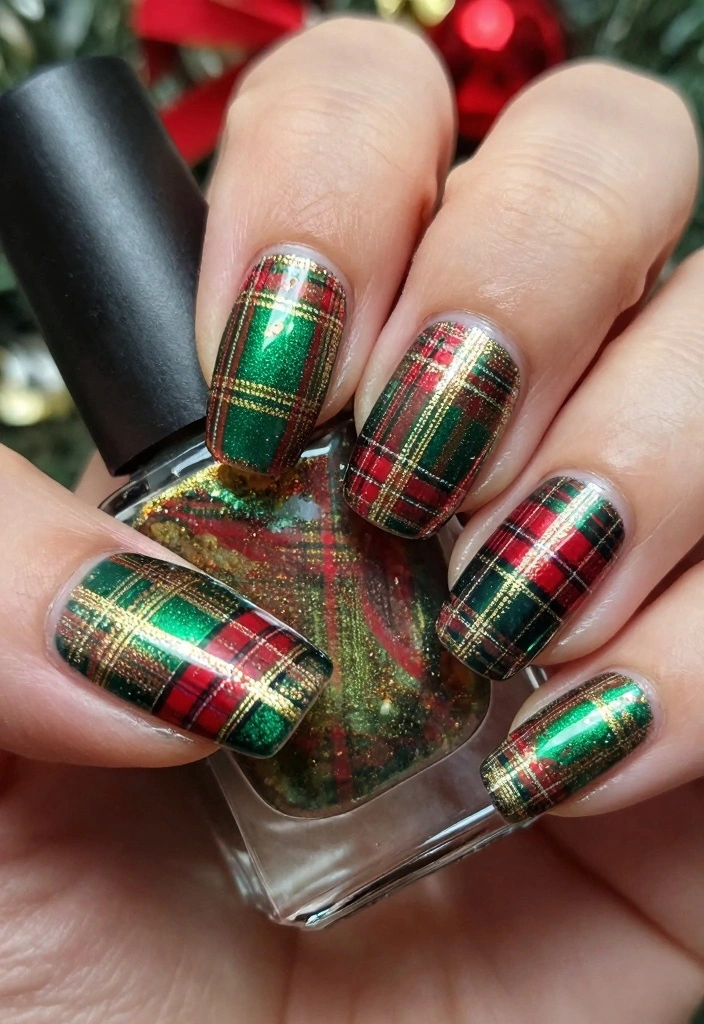
Celebrate the season with a timeless plaid design on your nails. Start with a green base and use red and gold for the plaid pattern, creating a festive look that’s perfect for holiday gatherings. This nail art combines classic colors with a modern style, making it a great choice for any occasion.
To achieve the plaid effect, apply a forest green base and let it dry completely. Use tape for clean lines to form the plaid pattern, adding red and gold stripes for a charming finish that you can seal with a clear top coat.
Steps to achieve your plaid design:
1. Apply a forest green base and let it dry
2. Use tape for clean lines in the plaid pattern
3. Add red and gold stripes and seal with a top coat
Exercise patience when applying each color to ensure neat lines. Using a thin brush for details will enhance your design. Consider wearing plaid clothing to match your festive nails. The plaid design brings a touch of holiday cheer while remaining elegant enough for any event.
15. Festive Confetti
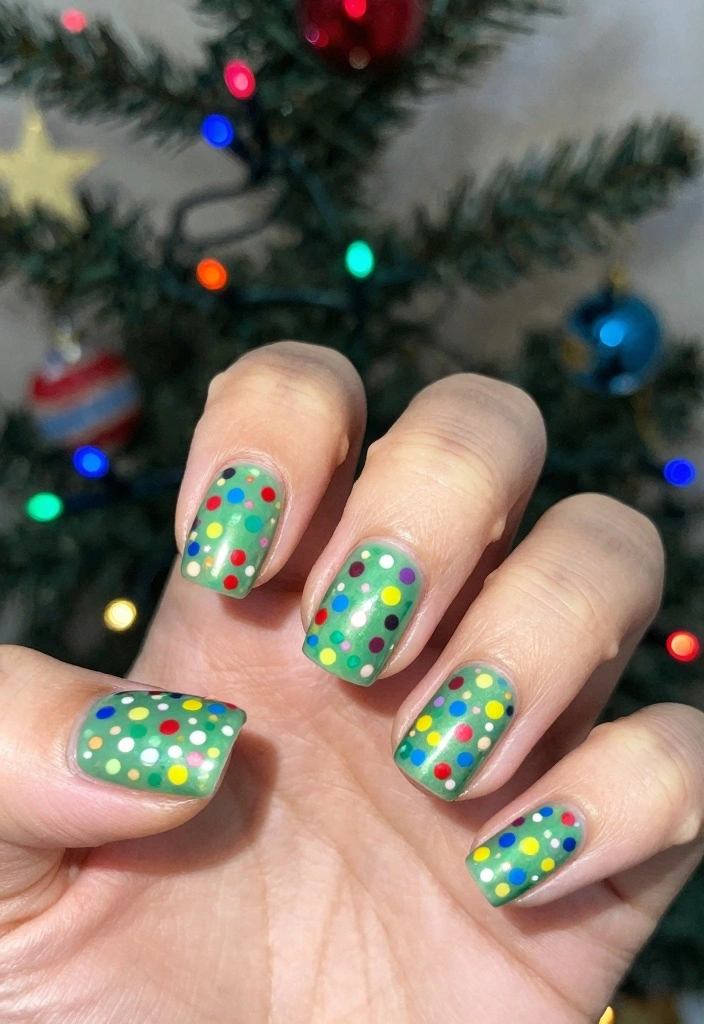
Wrap up your holiday nail art journey with a joyful confetti design celebrating the season! Begin with a green base and add colorful confetti dots in various sizes for a fun, festive look. This design is perfect for parties, allowing you to showcase your festive spirit in a playful way.
To create this cheerful design, apply a green base coat and let it dry. Use a dotting tool to randomly apply colorful confetti dots, sealing everything with a shiny top coat for a polished finish.
Here’s how to bring your confetti nails to life:
1. Apply a green base coat and let it dry
2. Use a dotting tool for colorful confetti dots
3. Seal with a shiny top coat for a smooth finish
Be adventurous with colors and sizes for a playful effect. Ensure each layer is dry before adding more dots. Pair your nails with colorful outfits to create a fun look! Confetti nails celebrate joy, making them perfect for embracing holiday cheer.
Conclusion
These 15 green Christmas nails ideas are sure to inspire your next festive manicure!
Embracing eco-friendly nail art techniques allows us to celebrate with style while being mindful of our planet. From glittering elegance to playful designs, there’s something here for everyone, ensuring your nails will shine bright this holiday season! Explore these trends and let your creativity flow, bringing the joy of the season to your fingertips!
Frequently Asked Questions
What Are the Best Eco-Friendly Techniques for Creating Green Christmas Nails at Home?
Start with an eco-friendly green nail polish (look for green nail polish that is 10-free, vegan, and cruelty-free).
Then prep nails with a reusable glass file and cuticle care. Use reusable tools like silicone brushes, stamping plates, and a glass file to reduce disposables.
For designs, opt for festive nail designs using stamping plates or decals instead of long painting sessions. Add accents with biodegradable glitter or a subtle matte top coat for a modern touch.
Finish with a durable top coat to extend wear. Removal should be done with an eco-friendly remover and a small lint-free pad to cut waste.
Practical steps: 1) prep, 2) base coat, 3) two thin coats of green nail polish, 4) add design with stamping/decals, 5) top coat. This keeps your look aligned with holiday nail art and Christmas manicure ideas while staying green.
How Can I Incorporate Festive Nail Designs While Staying Eco-Friendly?
To blend festivity with sustainability, start with a solid base of green christmas nails using green nail polish and add accents in white or red for Christmas vibes. Use stamping plates, reusable decals, or vinyls for crisp holiday nail art patterns to reduce brush waste and cleanup.
Choose designs that minimize materials—think negative space, pine needles, holly leaves, or snowflakes—and keep sparkle with biodegradable glitter if you like. Finish with a long-lasting top coat to extend wear and minimize retouching, staying true to Christmas manicure ideas and festive nail designs.
What Are Some Modern Nail Trends That Fit a Christmas Manicure Idea?
Great news: current modern nail trends pair beautifully with green christmas nails. Try gradients or ombre greens, negative-space designs that reveal a pine silhouette, and matte finishes with glossy accents. Minimalist motifs like pine needles or holly leaves work well with stamping for a clean, contemporary look. Opt for formulas from eco-friendly green nail polish brands and keep ornamentation light to stay aligned with holiday nail art and festive nail designs.
How Can I Extend the Life of Green Christmas Nails and Reduce Waste?
Boost longevity with a solid base coat and a durable top coat, applying thin coats and sealing the free edges to prevent chipping. Emphasize minimal soaking by using a peel-off base coat or responsible removal methods to cut down on acetone use. Store polishes upright, in a cool place, and recycle or repurpose leftover shades into new looks.
Use a non-acetone remover when possible and keep cleanup minimal with a small brush dipped in remover. All of these steps help your green christmas nails last longer, lowering waste while keeping your holiday nail art fresh.
Are There Beginner-Friendly Green Christmas Nails Ideas That Look Professional?
Absolutely. Here are easy, stylish starters for green christmas nails that still look polished:
– Monochrome Green with White Snow Accent: two coats of green, then white snowflake or dot accents on an accent nail using a stamping plate.
– Pine Needles on Green: thin lines in a darker green painted with a fine brush or stamping for a delicate, modern look.
– Holly Leaves with Red Berries: simple holly leaves in green with tiny red dots for berries on one accent nail.
– Green and White Plaid: quick plaid using a stamping plate or careful freehand with a striping brush.
– Green Gradient (Ombre): blend light to dark green from tip to base and seal with a top coat. These ideas keep things festive nail designs and Christmas manicure ideas while staying beginner-friendly and eco-conscious.
Related Topics
green christmas nails
holiday nail art
eco-friendly beauty
festive nail designs
modern nail trends
green nail polish
sustainable manicure
beginner friendly
easy nail art
Christmas nails
trendy nail styles
seasonal nail designs