Are you craving a pop of color for your next special occasion? Neon red nails have made a bold comeback, and they are the perfect way to express your personality and elevate any look. Whether you’re heading to a party, a wedding, or just want to stand out on a casual day, these eye-catching designs are sure to turn heads. I created this post to inspire you with 15 fabulous neon red nails ideas that embody fun, flair, and fierce style.
If you’re someone who loves beauty trends and wants to nail that bold statement look, this post is for you. From classic designs to more adventurous nail art, you’ll find something that speaks to your aesthetic. Whether you prefer a glossy finish or something more unique, these ideas cater to all tastes and preferences. You will discover how to incorporate vibrant nail colors into your nail routine effortlessly.
Get ready to unleash your creativity with these stunning neon red nails ideas. Each one is designed to help you explore different styles and techniques that will make your manicure pop. By the end of this post, you’ll have plenty of inspiration to create the trendy manicure styles you’ve always wanted. Let’s dive into the world of neon nail designs and make your next nail appointment the best one yet!
Key Takeaways
– Neon red nails are a bold choice for making a statement at any event, offering a wide range of styles to fit different occasions.
– Classic neon red nails with a glossy finish provide a timeless look that never goes out of style.
– Creative designs like ombre, glitter, and negative space can elevate your nail game and showcase your personal style.
– Experimenting with patterns such as stripes or animal print can add a fun twist to your manicure, making it uniquely yours.
– Accessories like rhinestones or gold foil can enhance your neon red nails, bringing an extra layer of glam to your overall look.
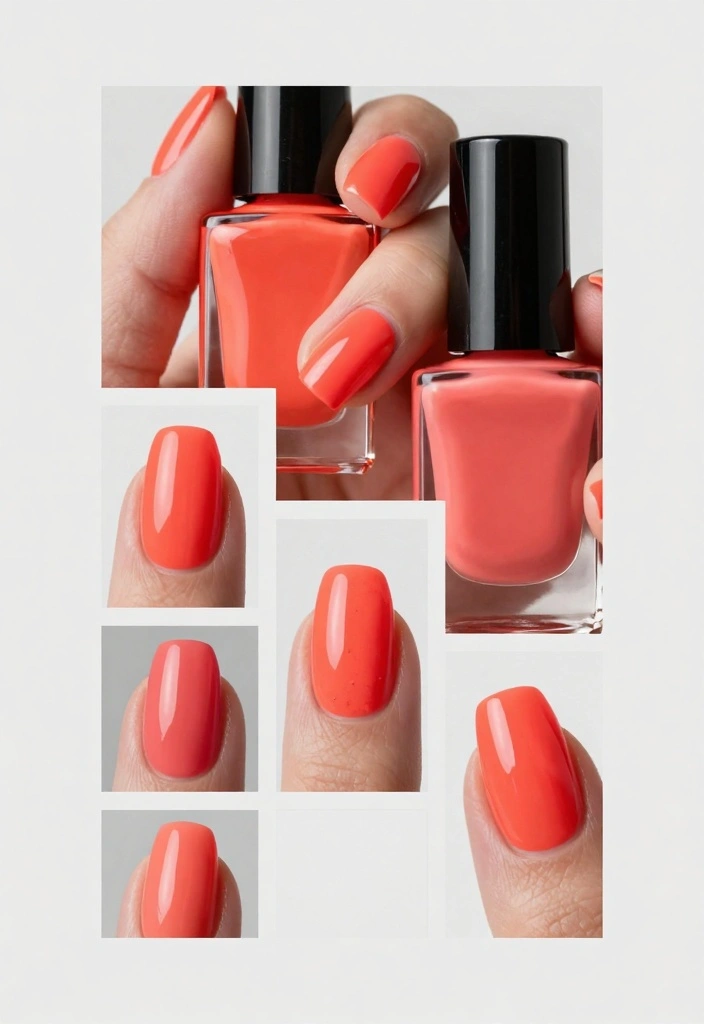
1. Classic Neon Red with Glossy Finish
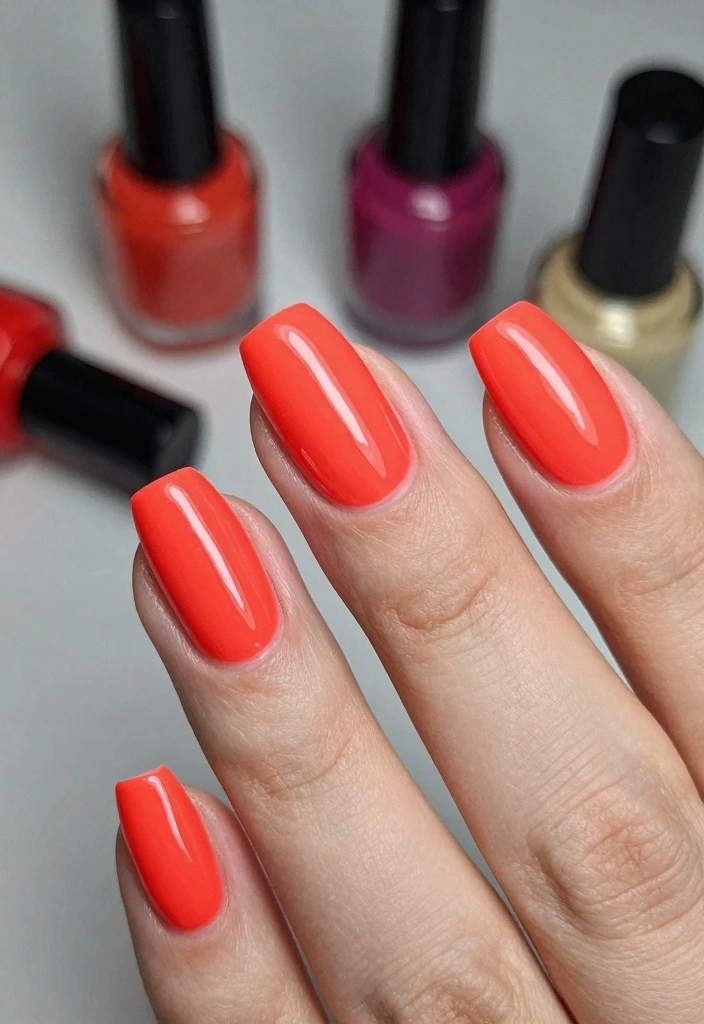
Looking to make a statement? The classic neon red nail polish is your go-to choice! This striking color not only radiates confidence but also suits any occasion, from casual hangouts to formal gatherings. Its glossy finish enhances the vibrant hue, making your nails shine beautifully under any light.
To nail this look, ensure your nails are clean and manicured. Apply a protective base coat, followed by two coats of your favorite neon red polish. A high-shine topcoat will give you that glass-like finish that captures attention.
Key steps to achieve the look:
– Select a quality nail polish for durability.
– Let each coat dry thoroughly before applying the next.
– Schedule regular manicures to keep your nails looking fresh!
This classic style is versatile and pairs beautifully with minimalistic accessories, allowing your nails to take center stage.
2. Neon Red Ombre Nails
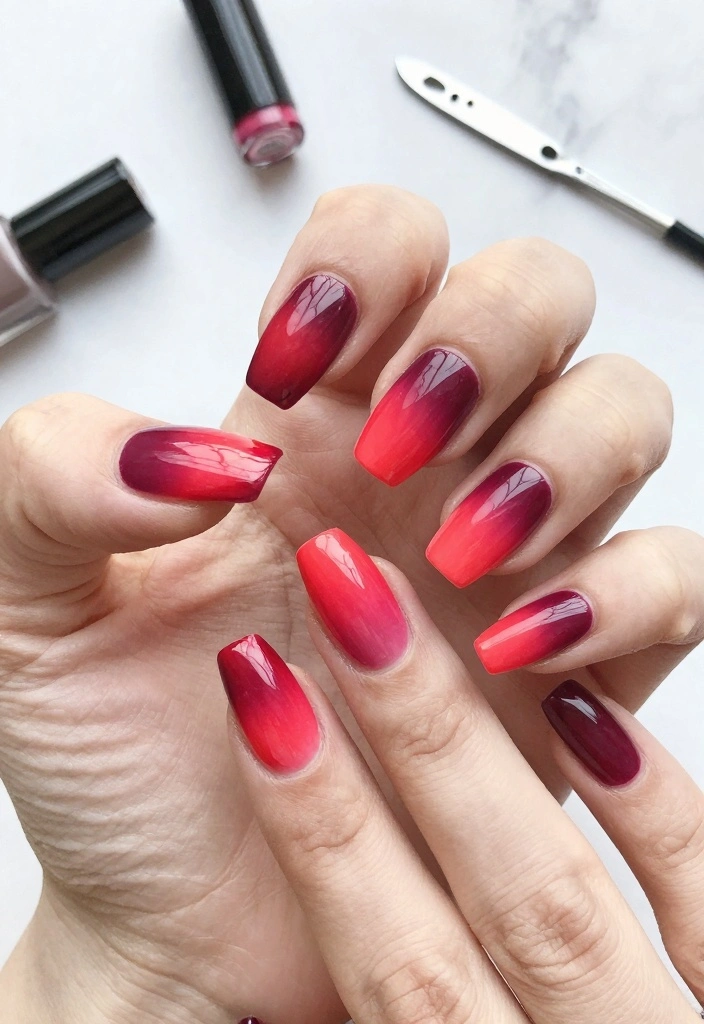
Ombre nails are a stylish trend, and when you incorporate neon red, the result is simply stunning! This technique creates a gradient effect that’s visually captivating and perfect for showcasing your artistic flair. Pair neon red with deeper shades like burgundy or black for a dramatic twist.
To achieve this chic ombre look, start with your chosen base color. Using a makeup sponge, dab the neon red polish, working it toward the tips to create a seamless gradient. Finish with a glossy topcoat to blend everything smoothly.
Essential tips to create ombre nails:
– Choose complementary colors for the best effect.
– Practice dabbing on paper before applying to your nails for a smoother finish.
– Keep a cleanup brush handy for any mistakes around your cuticles.
This elegant style is perfect for evening events, allowing you to express your creativity with confidence.
Fun fact: 3-4 sponge dabs create a neon red ombre gradient that transforms your look in minutes. Layer deeper shades like burgundy near the base for drama, then fade to bright neon tips for an unforgettable pop.
3. Neon Red with Gold Foil Accents
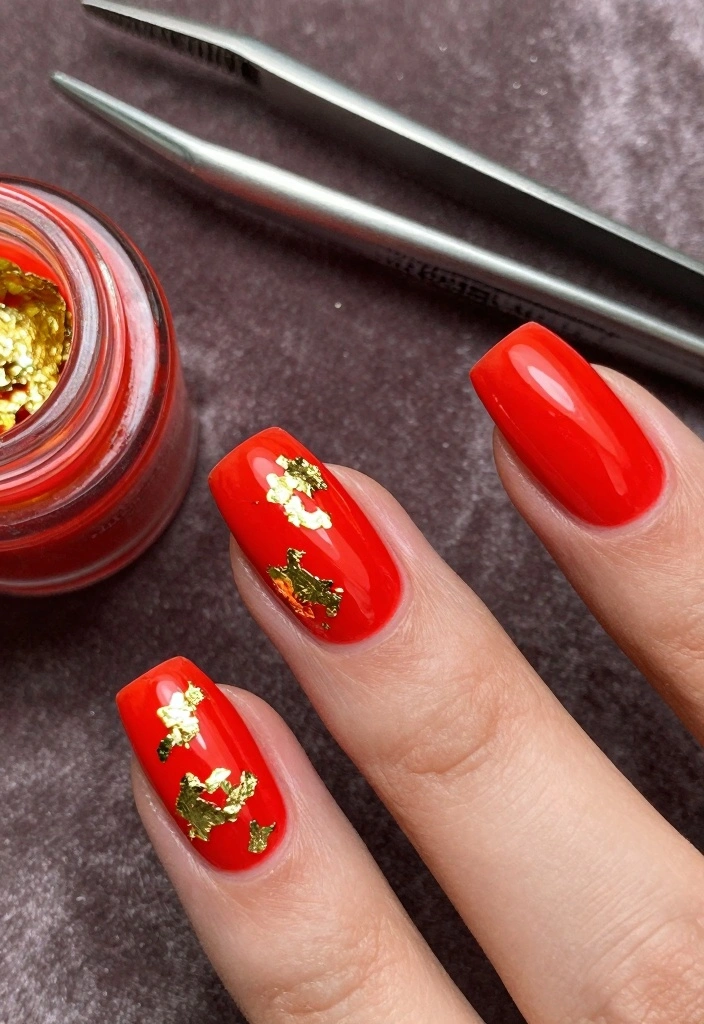
Want to add a touch of glamour to your neon red nails? Gold foil accents are the perfect solution! This design fuses the boldness of neon red with the luxe appeal of gold, making it an ideal choice for special occasions. The gold foil elevates your manicure, transforming it into a work of art.
To create this look, start with two coats of neon red. While the polish is still slightly tacky, apply small pieces of gold foil for that extra sparkle. Finish with a topcoat to seal everything in for a glossy shine.
Helpful tips for applying gold foil:
– Use a clear adhesive base coat for better foil adhesion.
– Don’t overcrowd your nails with foil; simplicity often looks best.
– Ensure the red polish is not completely dry for optimal foil application.
This striking combination is perfect for weddings, parties, or any event where you want to dazzle with your nails.
Neon red nails ideas glow when you add gold foil while the polish is tacky to level up to luxe in seconds. It’s bold, yet chic—perfect for any special occasion, from weddings to cocktails.
4. Neon Red and Black Stripes
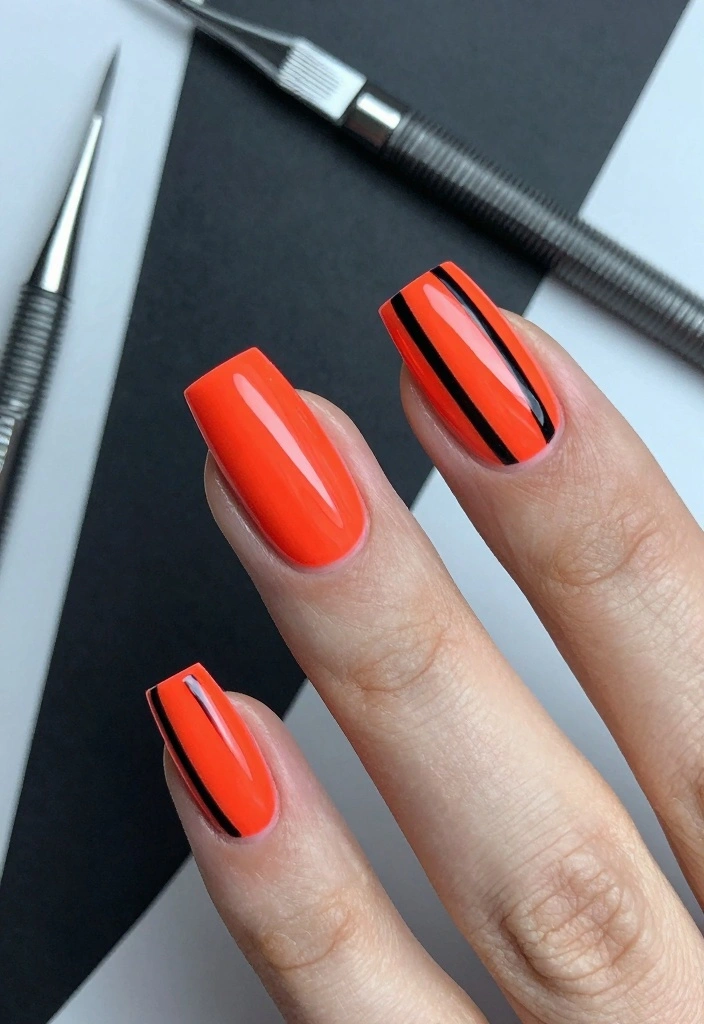
Bring some flair to your neon red nails with bold black stripes! This edgy design creates a striking contrast that’s both trendy and fun. Perfect for those who love a punk or goth aesthetic while keeping it fresh and vibrant.
To create this look, start with two coats of neon red. Once dry, add black stripes using tape or a striping brush. Play around with thickness and direction for a unique design that reflects your personality!
Key tips for striped nails:
– Use striping tape for clean, sharp lines; wait for the red polish to dry completely first.
– Experiment with different stripe directions—vertical, horizontal, or diagonal.
– A matte topcoat can add depth and a modern touch.
This design is perfect for music festivals, edgy parties, or everyday wear when you’re feeling daring!
5. Neon Red Glitter Nails
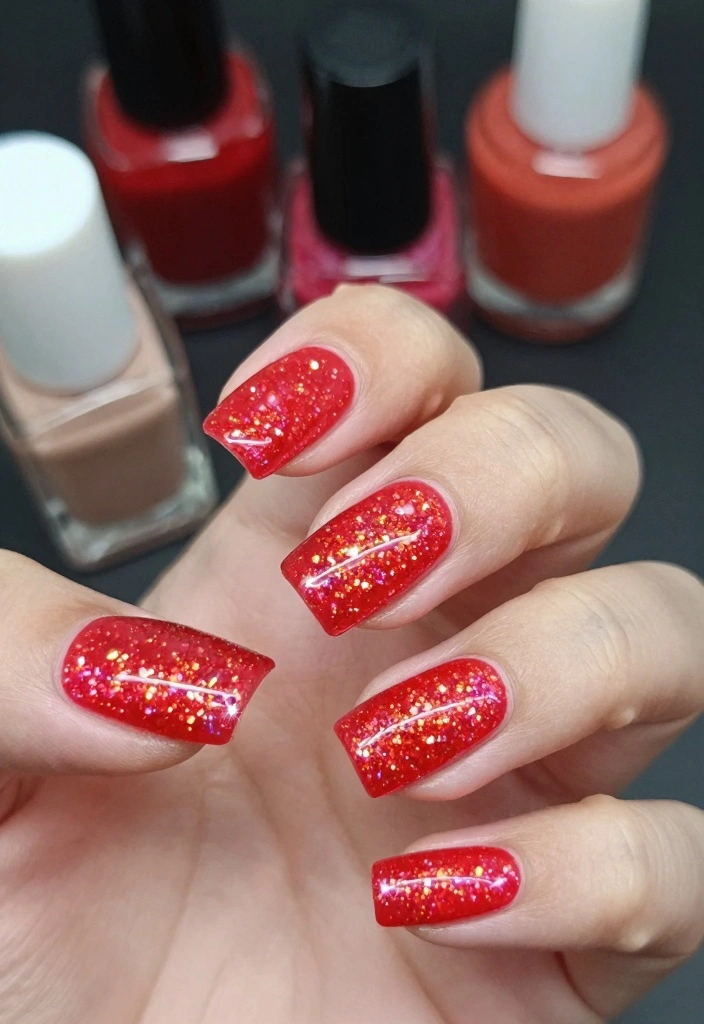
Glitter and neon red make a fabulous duo that instantly elevates your manicure! This fun and festive design is perfect for celebrations, parties, or whenever you want to shine. Adding glitter transforms your nails into sparkling showstoppers that catch every eye.
To create glittery neon red nails, start with a base coat and apply two coats of neon red polish. While the second coat is still wet, sprinkle fine glitter on top, pressing gently to ensure it adheres. Seal everything with a glossy topcoat for a lasting finish.
Essential tips for glitter nails:
– Use fine glitter for a smooth, even finish.
– Apply a thicker topcoat to even out the glitter texture.
– For a gradient effect, sprinkle glitter halfway up the nail.
This dazzling look ensures you’ll be the center of attention, making it perfect for birthday parties or night outs!
How To Choose Neon Red Nails Ideas for Bold Statement Style
Choosing the perfect neon red nails can elevate your look and make a bold statement. With so many styles and designs available, it’s essential to consider a few factors to ensure you pick the right design for your special occasion. Here’s how to make the best choice:
1. Consider Your Occasion
Think about where you’ll be wearing your neon red nails. Are you attending a wedding, a party, or a casual lunch? Different occasions may call for different styles. For instance, classic neon red with a glossy finish might be perfect for formal events, while neon red glitter nails can add glam to a night out.
2. Nail Length and Shape
Your nail length and shape can influence how the color appears. Long nails can showcase intricate designs like neon red ombre or marble nails, while short nails might work better with simple styles, such as neon red with black stripes. Determine whether you want square, almond, or stiletto shapes as each can alter the overall look.
3. Personal Style
Your personal style plays a crucial role in your choice. Are you bold and daring, or do you prefer a more classic look? If you love making a statement, go for designs like neon red with animal print or chain patterns. If you lean towards subtlety, consider a matte finish or negative space designs that combine neon red with other colors.
4. Nail Art Techniques
Different nail art techniques can create various effects. If you’re new to nail art, you might want to start with simpler designs like classic neon red. As you gain confidence, experiment with more intricate techniques like marbling or adding rhinestones. Understanding these techniques helps in deciding how complex or simple you want your design to be.
5. Color Pairing
Neon red can pair beautifully with other colors. Think about what other shades or patterns you want to include. Neon red with gold foil accents creates a luxurious look, while neon red with pastel combos gives a refreshing vibe. Experimenting with color combinations can lead to unique nail designs that reflect your personality.
6. Application Method
Consider how you plan to apply your neon red nails. You may choose traditional polish, gel, or even press-on nails. Gel nails often provide a longer-lasting finish, while press-ons can be quick and easy for an immediate look. Understanding the application method can help you decide the right neon red nail aesthetics that fit your lifestyle.
Pro Tip: Before committing to a design, consider trying temporary nail wraps or stickers. They allow you to test different styles without long-term commitment. This way, you can find your favorite neon red nails ideas while keeping your options open for future occasions!
By keeping these points in mind, you can select neon red nails that not only look fabulous but also fit perfectly with your unique style and the occasion you’re dressing for. Happy nail designing!
6. Neon Red Negative Space Nails
Negative space nails are a trendy way to showcase your neon red polish in a fresh and artistic manner. This design allows parts of your natural nail to shine through, creating a chic contrast that’s both modern and stylish. It’s great for those who prefer a sophisticated yet playful look.
Start by applying a base coat, then use striping tape to create desired shapes on your nails. Paint the exposed areas with neon red, and once dry, remove the tape to reveal stunning designs.
Helpful tips for negative space nails:
– Experiment with different shapes like triangles or stripes for variety.
– Ensure the base coat is fully dry before applying tape for best results.
– A matte topcoat can give your design a trendy finish.
Neon red negative space nails are perfect for the office or casual outings, striking the right balance between playful and professional!
7. Neon Red Marble Nails
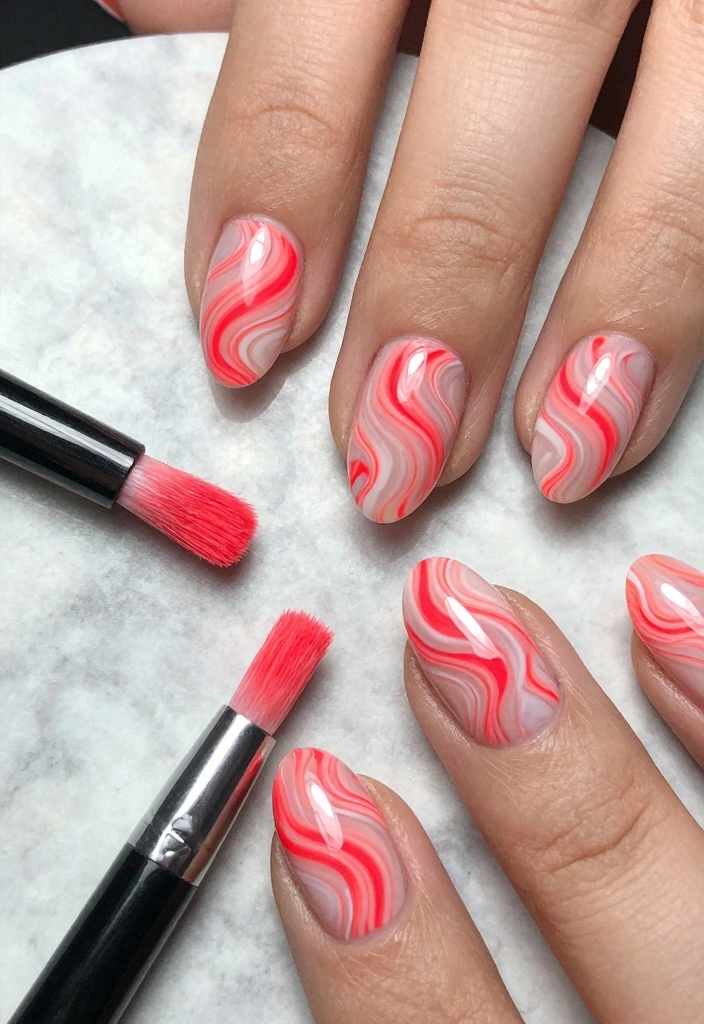
Marble nails are always a classic, and adding neon red takes them to the next level! This technique creates a beautiful swirling effect that resembles marble, bringing an artistic flair to your nails. Ideal for those who appreciate intricate designs with a twist.
To achieve this look, start with a base coat of white or light color. Use a dotting tool or thin brush to add swirls or dots of neon red and other colors. Swirl the colors together for that marbled effect.
Essential tips for marbled nails:
– Work quickly; the polish should remain wet for the best results.
– Experiment with different colors to create unique designs.
– Finish with a topcoat for extra shine.
This marbled look is perfect for weddings, parties, or any event where you want your nails to stand out!
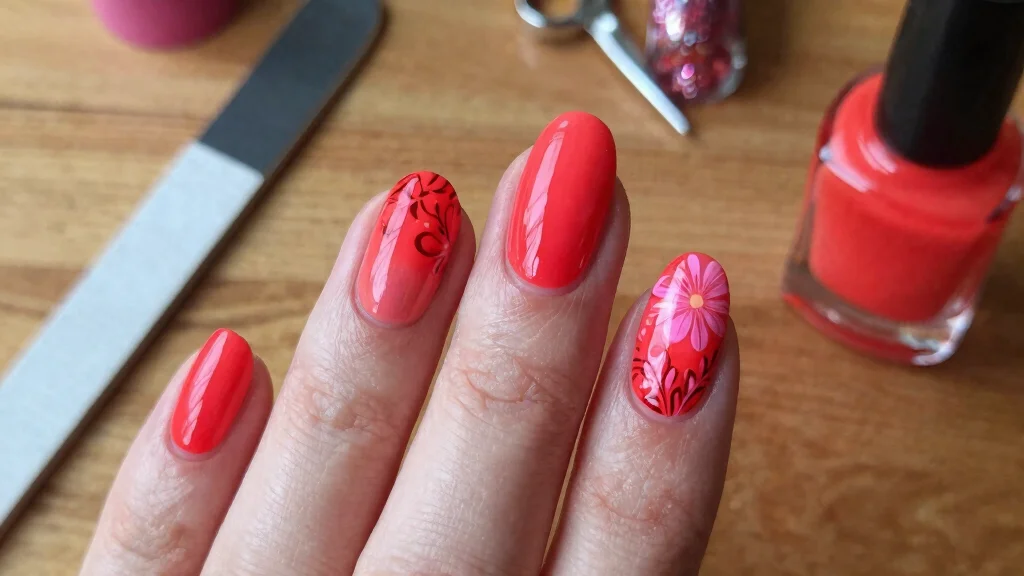
8. Neon Red Floral Nail Art
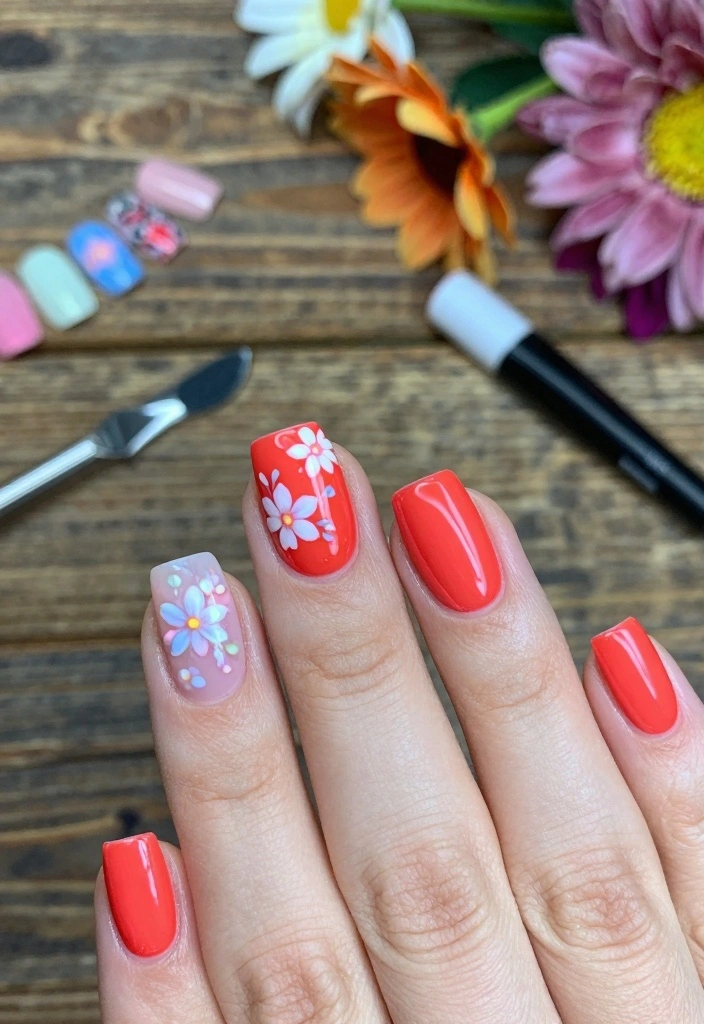
Floral designs add a charming touch to your neon red nails. The combination of bold neon red with delicate flowers creates a beautiful contrast, making it perfect for spring or summer events. This design is excellent for special occasions or whenever you want to feel extra lovely.
Begin with two coats of neon red polish. Once dry, use a fine brush or dotting tool to paint small flowers in white or pastel shades, adding details like leaves for extra flair. Seal your artwork with a topcoat to lock in the beauty.
Helpful tips for floral nail art:
– Use a fine brush for better control when painting delicate flowers.
– Mix different flower designs for a more dynamic look.
– Make sure the red polish is fully dry before adding any artwork.
This design beautifully blends bold and soft elements, perfect for weddings, brunches, or any festive occasion!
9. Neon Red with Rhinestones
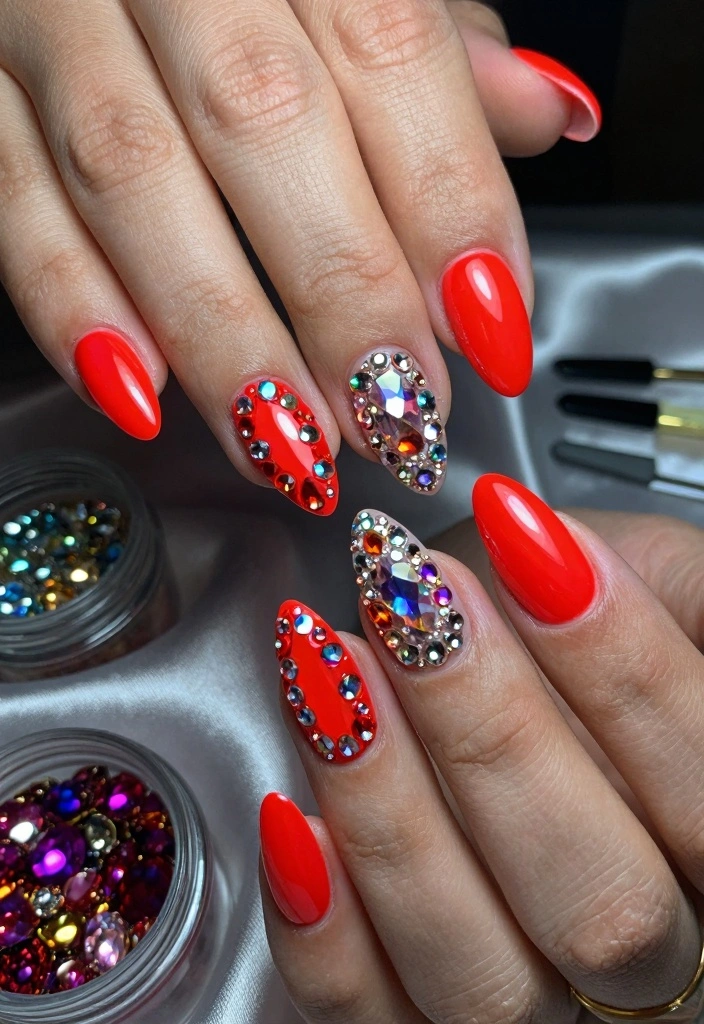
For those who love glam, adding rhinestones to your neon red nails is a must! This design is bold and eye-catching, perfect for events where you want to shine. Rhinestones catch the light beautifully, adding a luxurious touch to your manicure.
Start by painting your nails with neon red polish. Before it dries, carefully place rhinestones onto your nails in your desired pattern. Finish with a topcoat to secure them in place.
Essential tips for using rhinestones:
– Use a clear adhesive for better rhinestone adhesion, if necessary.
– Space rhinestones evenly for a balanced look.
– Mix sizes for added interest and texture.
This dazzling design is perfect for parties, nights out, or any special celebration where you want your nails to be a conversation starter!
10. Neon Red with a Matte Finish
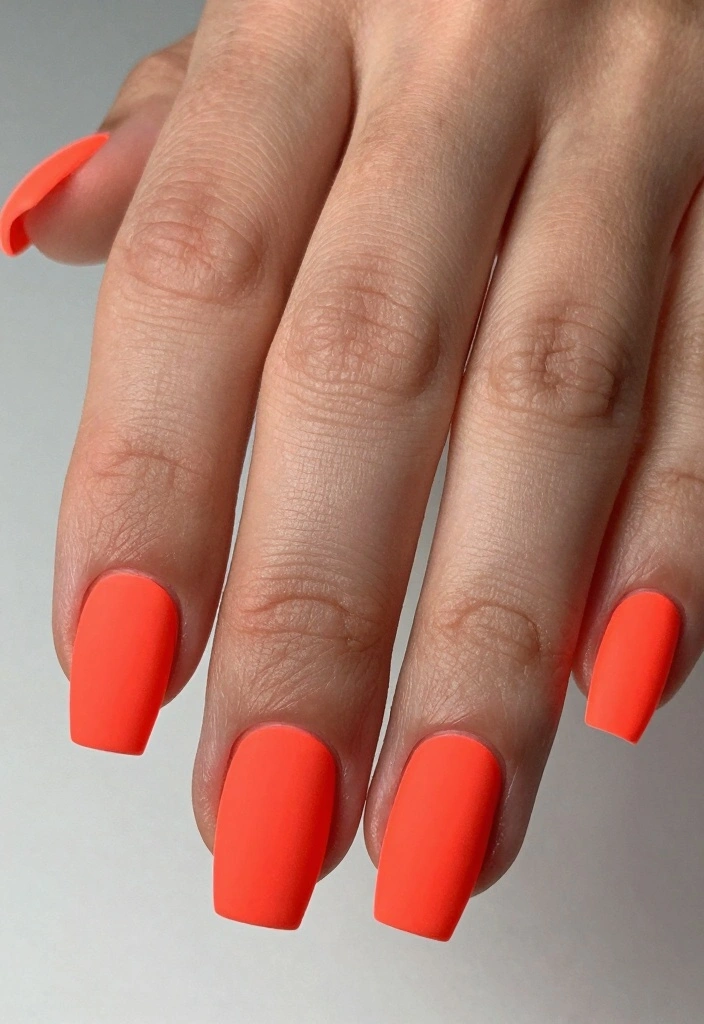
Matte finishes are super trendy, and pairing them with neon red creates a stunningly sophisticated look. This style is bold yet understated, perfect for those looking to make a statement without excessive shine. The matte texture adds a unique touch that stands out beautifully.
To achieve this design, apply a base coat followed by two coats of neon red polish. Once dry, finish with a matte topcoat for that soft, velvety appearance that contrasts nicely against shiny surfaces.
Key tips for matte nails:
– Make sure the polish is completely dry before applying the matte topcoat.
– Keep your nails well-maintained, as matte finishes can show imperfections.
– Pair with shiny accents for an interesting contrast.
This design is perfect for chic events, casual outings, or anywhere you want a modern twist on your nails!
11. Neon Red and Pastel Combos
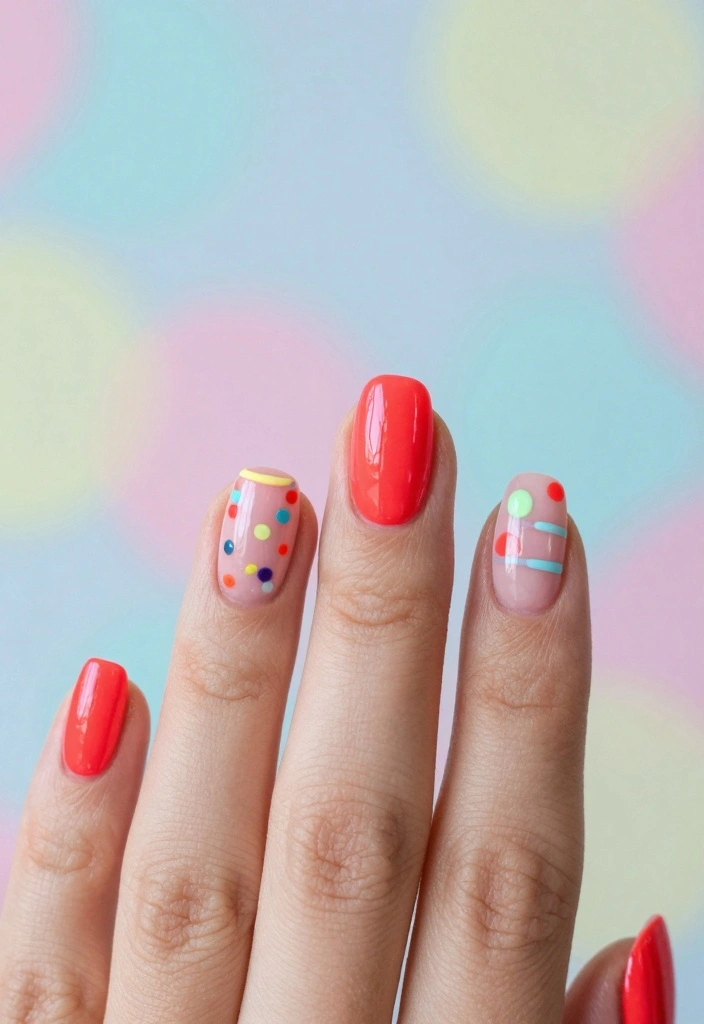
Combining neon red with pastel colors creates a delightful contrast, perfect for cheerful nail designs. This combination adds a fun twist to your neon red manicure, making it ideal for spring or summer. Soft pinks, blues, or greens can brighten up the bold red beautifully.
To create this look, start with two coats of neon red polish and then add pastel accents. Use nail stencils or a fine brush to create dots, stripes, or small patterns. Seal everything in with a topcoat for a lively finish.
Essential tips for pastel combinations:
– Choose contrasting pastel shades to make the neon red pop even more.
– Keep designs simple for a clean, fresh look.
– Wait until the neon red base is dry before adding pastel details.
This style is perfect for picnics, casual outings, or whenever you want to feel vibrant and fun!
12. Neon Red with Animal Print
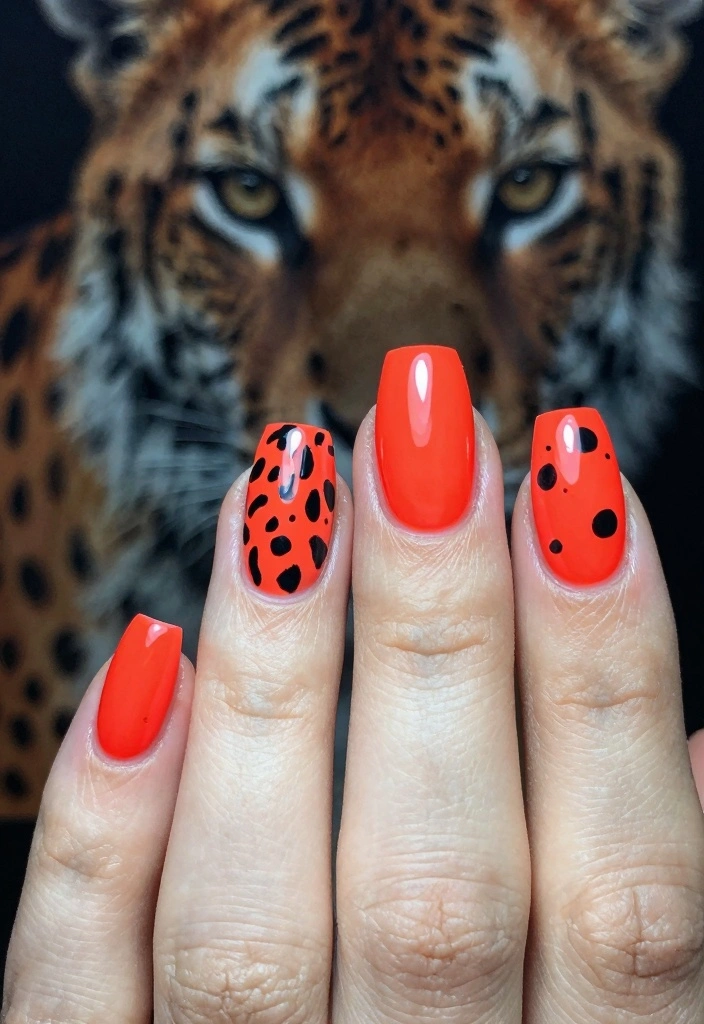
Animal print meets neon red in this daring design! This wild combination brings a fierce vibe to your nails, making it perfect for fashion-forward individuals. From leopard spots to zebra stripes, adding animal print designs on neon red creates a striking look that’s sure to turn heads.
To achieve this style, apply two coats of neon red as your base. Once dry, use a fine brush or stamping plate to apply animal print designs in black or gold for an extra touch. Finish with a glossy topcoat to make everything pop.
Key tips for animal print nails:
– Practice your designs on nail dummies if you’re new to animal prints.
– Use nail stamping kits for precise designs.
– Keep animal prints minimal for a more chic appearance.
This design is perfect for edgy events, parties, or whenever you want to feel bold and fabulous!
13. Neon Red with Chain Patterns
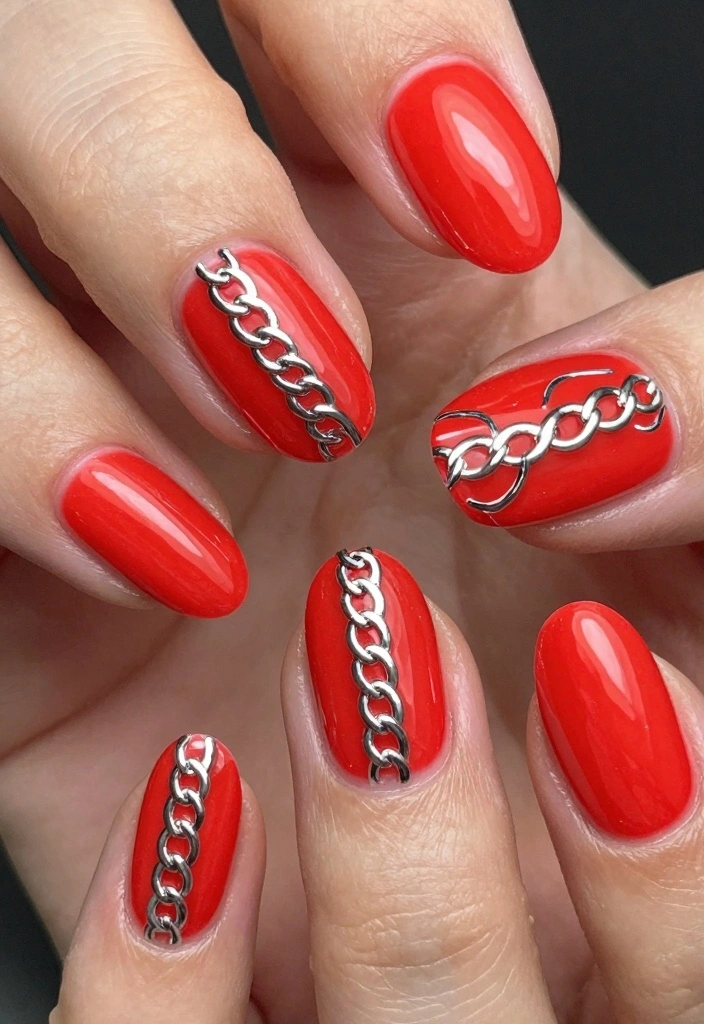
Chain patterns add a fashionable edge to your neon red nails, creating a bold and modern look. This design channels high fashion, giving you that runway-ready feel! Chains can vary from delicate to chunky, allowing for personal expression in your style.
Start with your neon red base, then use a fine brush or nail tape to create chain-like designs. Silver or gold polish enhances this effect, adding a chic touch to the bright red. Seal the design with a topcoat for a polished finish.
Essential tips for chain patterns:
– Use metallic polishes for a luxurious look.
– Practice chain designs on paper before applying to nails.
– Keep the rest of your manicure simple to let the chains shine.
This design is ideal for fashion events, parties, or any occasion where you want to stand out with sophistication!
14. Neon Red Drip Nails
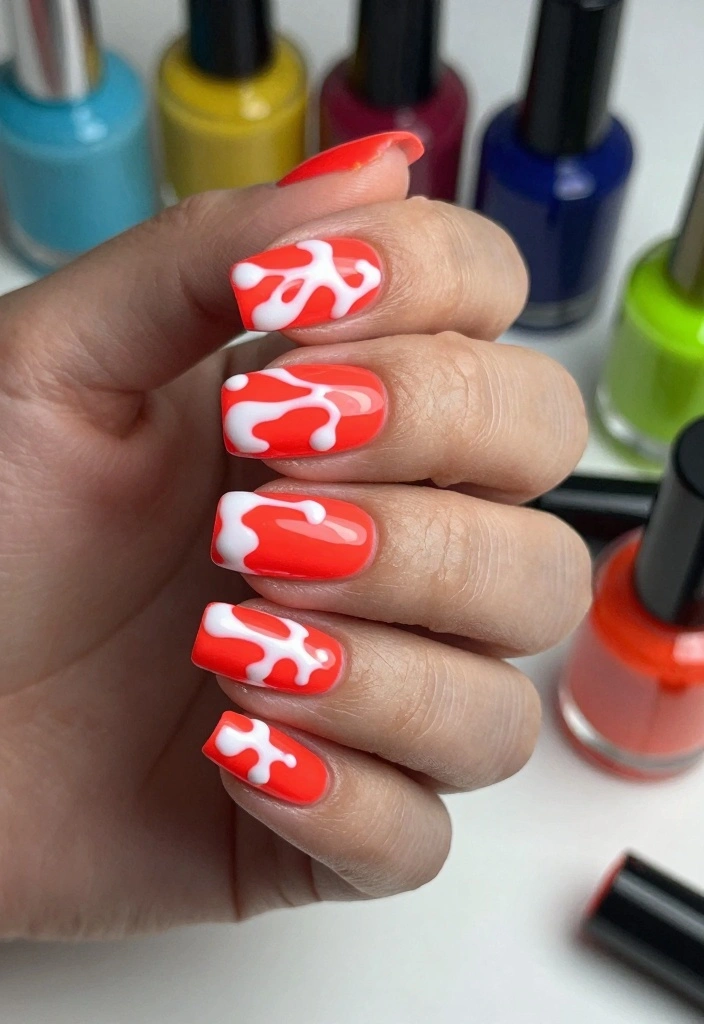
Drip nails are a fun trend that adds a creative twist to your manicure. By creating a ‘dripping’ effect with neon red, you can achieve an eye-catching look that’s playful and artistic. This design is perfect for anyone who loves to stand out in a crowd!
To create drip nails, start with a base coat, then apply two coats of neon red polish. Use a dotting tool or fine brush to create drip shapes along the tips or sides of your nails, layering in white or a contrasting color to mimic the dripping effect. Seal everything with a glossy topcoat.
Key tips for drip nails:
– Practice your drip design on paper for confidence before applying.
– Use a quick-drying topcoat for the best results.
– Consider adding glitter to the drips for extra flair!
This design works for casual outings, parties, or whenever you want to show off your unique style!
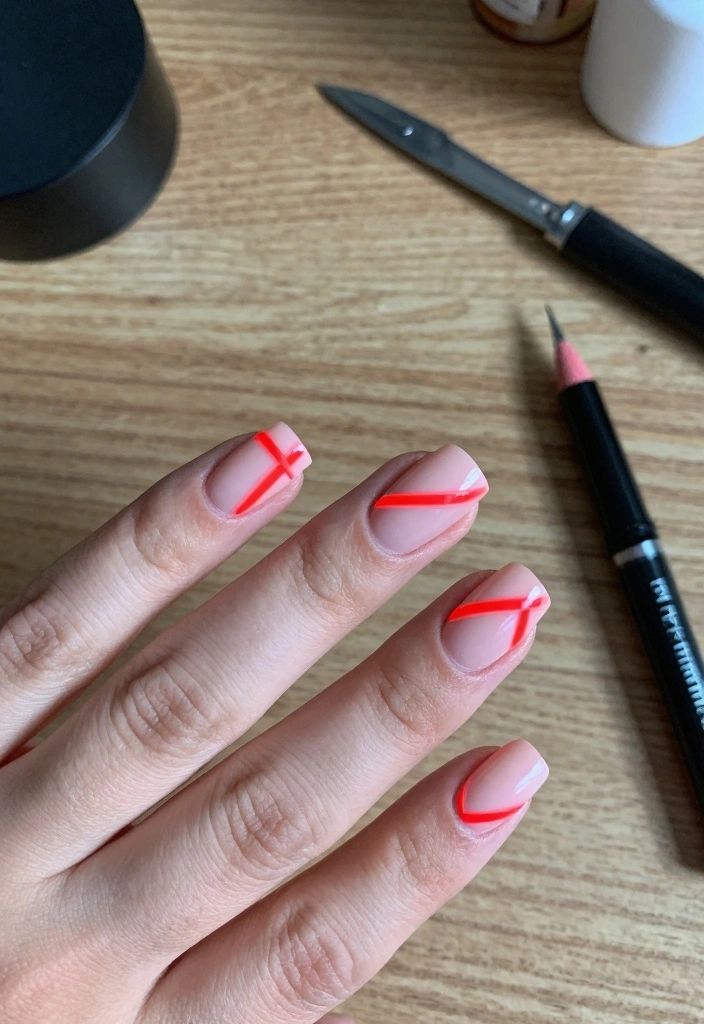
15. Neon Red with Abstract Designs

Abstract designs are all about creativity, making them a perfect fit for neon red nails! This look allows you to freely express yourself, mixing shapes, lines, and colors that resonate with your personality. It’s bold, unique, and ideal for anyone with an artistic soul.
To create abstract nails, start with a clean base coat, followed by two coats of neon red polish. Next, use a fine brush to paint various shapes, lines, or dots with contrasting colors like black, white, or metallics. Seal the design with a topcoat to lock everything in.
Helpful tips for abstract designs:
– Draw inspiration from art or patterns around you.
– Embrace the abstract style; don’t overthink the shapes!
– Ensure the red polish is completely dry before adding your designs.
This style is perfect for artistic events, festivals, or when you want to showcase your creative side!
Fun fact: 78% of nail art fans say neon red nails ideas instantly boost confidence for bold looks. Abstract designs let you mix shapes and colors to express your personality in minutes. Start with a clean base coat, then add contrasting lines for a striking, share-ready finish.
Conclusion
Neon red nails are a fun and stylish way to express yourself, no matter the occasion! Each design brings its own unique flair, offering options for every personality and event. Whether you prefer a classic glossy finish or something more adventurous like ombre or drip designs, there’s a neon red nail look perfect for you.
Bold, vibrant, and eye-catching, these nails are sure to make a statement. So why not treat yourself to a fresh manicure? Explore these ideas and see which one resonates with your style! Don’t forget to share your favorite looks and inspire others to embrace the neon trend.
Frequently Asked Questions
What are some bold neon red nails ideas for a special event?
If you’re after neon red nails ideas that scream a bold nail art moment, try these looks: 1) Neon red with a matte finish and a glossy accent nail; 2) Neon red with a glitter gradient starting at the tips for extra sparkle; 3) Negative-space neon red designs using clear sections; 4) Geometric lines in black or white over neon red; 5) Rhinestone or stud accents forming a chic crescent or single nail statement. Pro tips: start with a light base or white to boost brightness, apply vibrant nail colors in thin layers, seal with a durable top coat, and cure each layer if you’re using gel. This gives you a true statement nail looks vibe that’s perfect for special occasions.
How can I recreate neon red nails ideas at home with long-lasting wear?
You can absolutely recreate these looks at home with lasting impact. Start with a clean, dry base and use a light base layer or white undercoat to maximize brightness of your neon red nails ideas. If you’re using regular polish, apply 2–3 thin coats with a quick-dry top coat; for gel, cure between coats and finish with a glossy or matte top coat. Use a striping brush or tape for clean neon nail designs, and cap the free edges to prevent chipping. Prolong longevity by avoiding acetone-heavy removers, wearing gloves for chores, and reapplying a top coat every 2–3 days to keep your vibrant nail colors popping. Your nails will stay bold, just like a true statement nail looks.
Which neon nail designs pair best with neon red nails for a statement look?
Pairing neon red with complementary neon nail designs can elevate your look without clashing. Try: 1) Black geometric lines or minimalistic white accents over neon red for a striking contrast; 2) Silver foil or chrome accents to add a futuristic edge; 3) A glitter or chrome gradient on one accent nail to create a focal point; 4) A matte finish on most nails with one glossy neon red tip or design; 5) A delicate lace or floral pattern in a light color over a red base for a chic twist. These combos keep your bold nail art lively while staying wearable and on-trend for trendy manicure styles.
What tools and polishes do I need for vibrant neon red nails?
Set yourself up with the right tools for vibrant neon red nails. Essential items: a high-quality neon red nails polish (or neon pigments for gel), a reliable base coat, a top coat (glossy or matte), and a white base if you want extra brightness. Add a striping brush or thin nail art brush for neon nail designs, striping tape for clean lines, a dotting tool for dots, and optional rhinestones or foil for accents. If using gel, have a UV/LED lamp handy. A good nail file, cuticle oil, and hand moisturizer complete the kit for perfect, long-lasting vibrant nail colors.
How do I care for neon red nails to keep them looking fresh and bold for longer?
To keep your neon red manicure vibrant and lasting, treat it with care. Avoid harsh acetone and use a gentle remover when needed. Reapply a top coat every 2–3 days to prevent chipping and fading of your neon red nails ideas. Wear gloves for cleaning or dishwashing, and keep cuticles hydrated with oil to prevent lifting. If you’re wearing gel, follow your lamp-curing schedule and use a dust-free wipe to remove tacky layers. With these steps, your bold nail art stays bright, and your statement nail looks stay fresh for longer.
Related Topics
neon red nails
bold nail art
vibrant nail colors
trendy manicure
statement nails
special occasion nails
nail design ideas
easy nail art
advanced techniques
party ready nails
fashionable nails
seasonal nail trends