The winter season brings a special charm that often inspires us to embrace a frosty elegance, especially when it comes to beauty. As the snowflakes begin to fall, many of us find ourselves craving stylish and chic ways to express this enchanting time of year. With holiday parties, cozy gatherings, and festive celebrations on the horizon, what better way to make a statement than with stunning white winter nails?
If you love all things beauty or are simply someone who enjoys expressing personal style through nail art, this post is just for you. Whether you’re a nail art novice or a seasoned pro, you’ll discover a collection of ideas that cater to every taste and skill level. From sleek minimalist designs to intricate frosty nail art, I’ve compiled 16 elegant manicure ideas that capture the essence of winter.
You’ll gain inspiration to create beautiful nail art that is not only visually appealing but also perfect for the season. Each idea is designed to evoke a sense of winter wonder, ensuring your nails complement your festive outfits perfectly. So, get ready to dive into a world of creativity with our collection of winter nail art that will keep your hands looking fabulous all season long!
Key Takeaways
– Explore 16 white winter nails ideas that cater to various tastes, from minimalistic to elaborate designs.
– Each idea is crafted to evoke the beauty of winter, making them perfect for seasonal celebrations.
– Nail art styles include frosted french tips, icy snowflake art, and elegant pearl finishes, ensuring something for everyone.
– Tips on how to achieve these looks at home or in a salon setting provide practical guidance.
– Stay updated with current seasonal nail trends and elevate your winter style effortlessly.
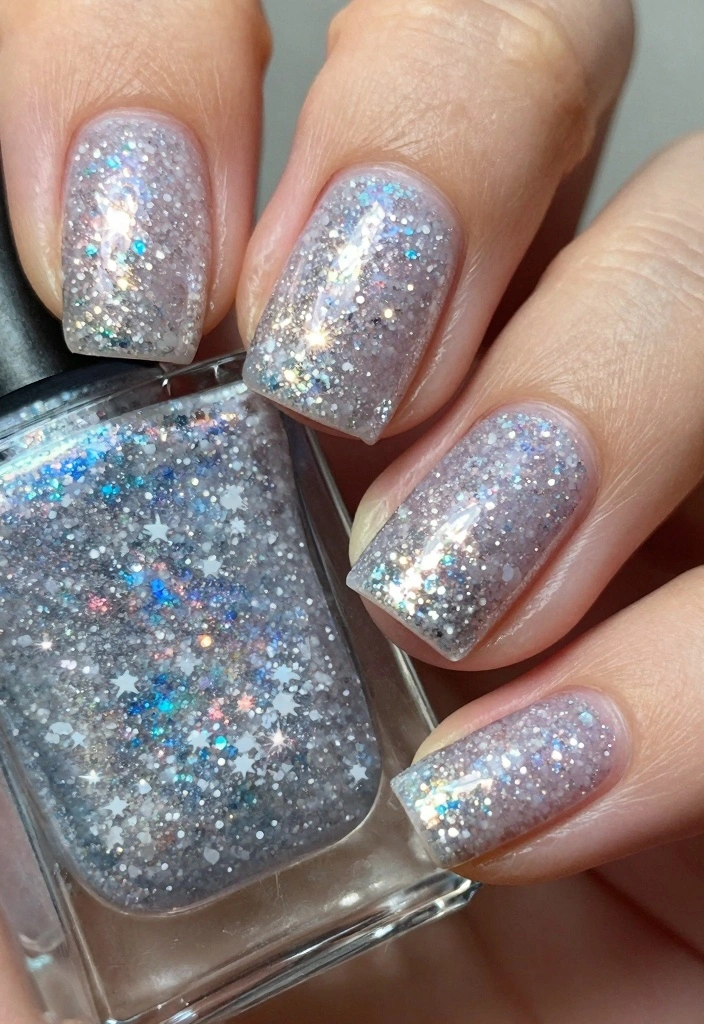
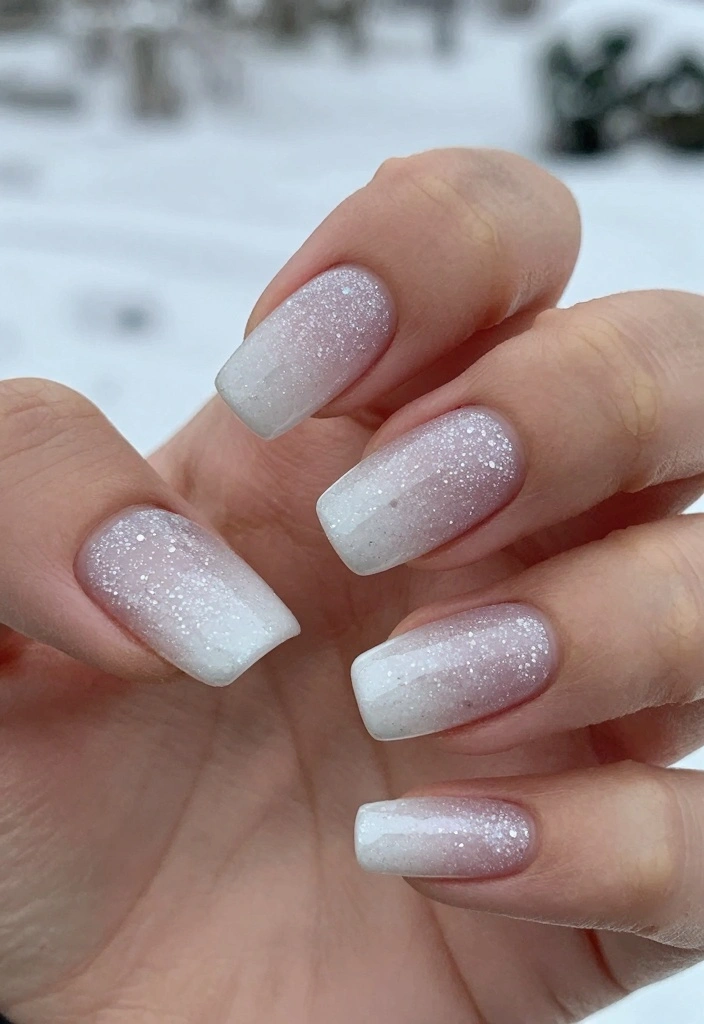
1. Snowy Ombre Delight
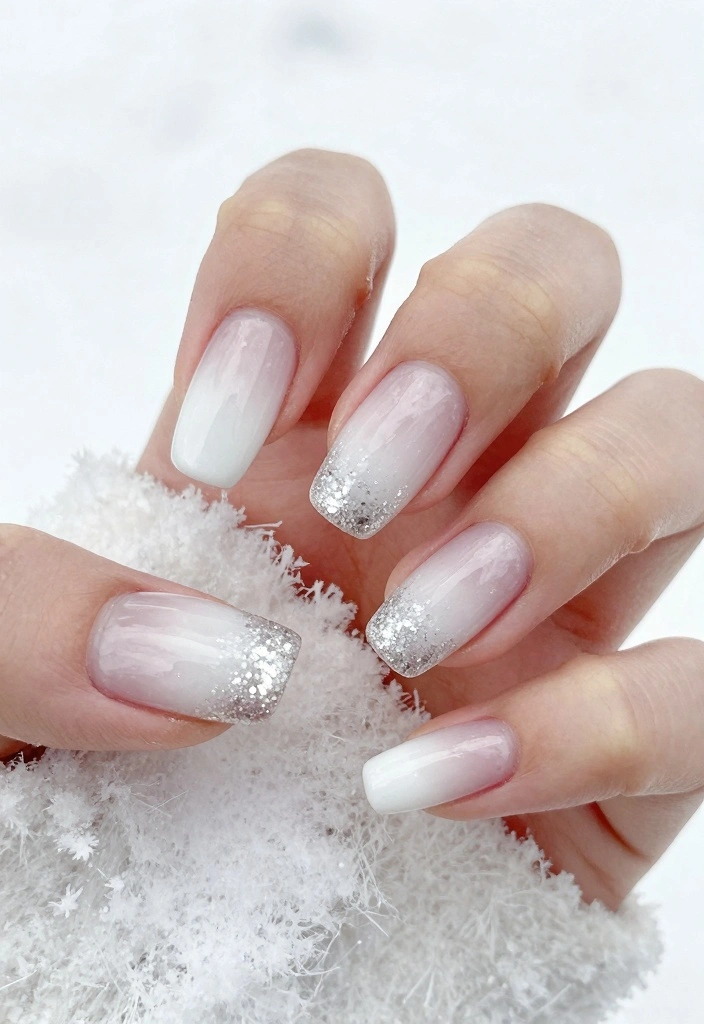
Kick off your winter nail adventure with a breathtaking snowy ombre effect. Imagine a deep winter white at the base seamlessly fading into a soft, frosty finish at the tips. This gradient look beautifully embodies the spirit of a winter wonderland, evoking the gentle fall of snowflakes on a chilly day. The delicate charm of this design makes it a stunning choice for any occasion this season.
To create this enchanting style, start by selecting a white base polish alongside a sheer glitter polish for that frosty touch. Apply a clear base coat first, then use a makeup sponge to dab on the white at the base and follow with the glitter at the tips for a blended effect. Seal it off with a glossy top coat to enhance the shine.
Key steps to create this look:
– Choose a white base and sheer glitter polish
– Apply a base coat for a smooth finish
– Use a sponge to blend colors seamlessly
– Finish with a glossy top coat for shine
This design not only offers elegance but also adds depth to your nails, making them a striking statement piece for holiday parties or cozy gatherings.
2. Frosted French Tips

This winter, put a frosty spin on the classic French tip! Replace the traditional white tips with a pearlized or glittery white polish, mimicking the beautiful frost seen on winter mornings. This fresh take on a timeless design adds a sparkling touch that elevates your nail game.
To achieve these frosted French tips, start with a clear base coat and apply two layers of a nude or soft pink polish. Using a thin brush, carefully paint the tips with your chosen frosty white or glitter polish. Complete the look with a high-shine top coat to lock in that fresh appeal.
Steps to create frosted French tips:
– Begin with a clear base coat for protection
– Apply two coats of nude or soft pink polish
– Use a brush for precise frosty tips
– Seal with a high-shine top coat for gloss
This design is perfect for minimalists, offering a subtle yet elegant touch that suits any winter occasion beautifully.
Fun fact: Frosted French tips are perfect for white winter nails, blending pearlized white with a soft nude base for a frosty look. Pro tip: start with a clear base coat, apply 2 nude layers, then sweep the frosty white on the tips with a thin brush for extra sparkle.
How To Choose The Right White Winter Nails
When it comes to selecting the perfect white winter nails, there are several factors to consider. Each detail can help you achieve that frosty, elegant look that’s perfect for the season. Here’s how to make the best choice for your winter nail art.
1. Nail Shape
The shape of your nails can influence how your white winter nails will look. Common shapes include square, oval, almond, and stiletto. Think about your personal style and comfort. For a classic look, square or oval shapes work wonders. For something a bit bolder, consider almond or stiletto. Choose a shape that complements your fingers and matches your overall style.
2. Finish Type
Different finishes can drastically change the appearance of your nail art. Options include glossy, matte, or pearlescent finishes. A glossy finish gives an elegant shine, while matte offers a chic and modern vibe. Pearlescent can add a unique shimmer that mimics frozen frost. Experiment with different finishes to see which style resonates with you the most.
3. Nail Art Design
Decide on the nail art designs you want to incorporate. Do you prefer minimalist patterns, like simple glitter tips, or something more detailed, like snowflakes or winter scenery? Consider your skill level too; some designs may require more practice. Look for inspiration in seasonal nail trends and choose designs that will make your nails stand out yet remain elegant.
4. Color Palette
While white is the primary color, think about how you want to accent or complement it. Gold and silver can add a touch of luxury, while pastel colors can give a soft winter feel. You could also consider adding muted blues or icy greys to enhance that frosty look. Think about the overall vibe you want your nails to convey when choosing your color palette.
5. Nail Care Products
Choosing the right products will ensure your manicure lasts through the winter months. Look for high-quality nail polishes that are chip-resistant and quick-drying. Invest in a good base coat to protect your nails and a top coat for a glossy finish. If you’re going for intricate designs, nail art brushes or dotting tools can make a significant difference in the application process.
6. Budget Considerations
Finally, keep your budget in mind. While you might be tempted to splurge on high-end brands, there are many affordable options that still provide excellent results. Consider purchasing multi-use kits that offer a range of colors and tools. This can save money in the long run and allow you to experiment with various designs.
Pro Tip: Before settling on a design, try a nail wrap or press-on nails for an easy way to test out your winter nail ideas. This allows you to see how the design looks without the commitment of a full manicure. Plus, it’s a fun way to change your style throughout the season!
3. Icy Snowflake Art
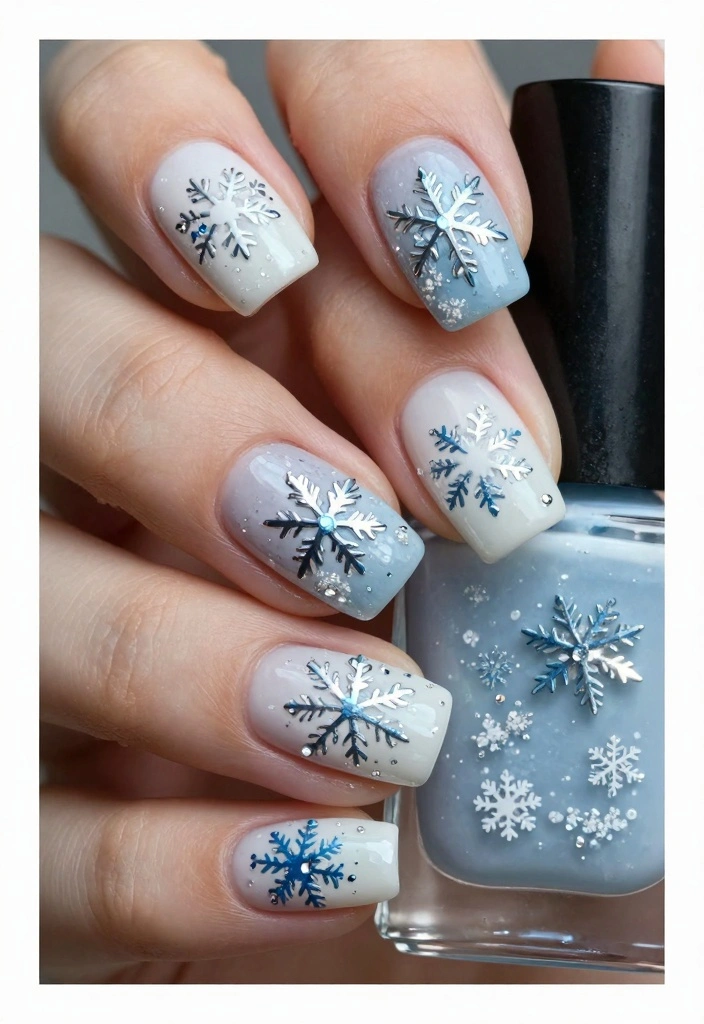
Celebrate the beauty of winter with stunning icy snowflake art on your nails. This design brings a delicate touch, perfect for those who appreciate intricate details without overwhelming their look. Paint snowflakes on a white or light blue base for an ethereal winter vibe.
To create this charming nail art, start with a solid base of white or very light blue polish. Use a fine nail art brush to draw delicate snowflake designs with shimmering silver or blue polish. Enhance the look by adding tiny rhinestones that mimic ice crystals, then seal everything with a top coat for durability.
Steps for icy snowflake art:
– Begin with a light base of white or light blue
– Use a fine brush for intricate snowflake designs
– Add rhinestones for a sparkling touch
– Seal with a top coat for longevity
This nail art is not just enchanting, but it also showcases your creativity and love for winter, making it perfect for holiday parties or festive gatherings.
4. Minimalist Glitter Tips
For a more subtle sparkle, minimalist glitter tips are an excellent choice. This design features a hint of glitter at the tips, striking the perfect balance for both casual and formal occasions. A clean base gives a fresh, polished look that’s oh-so-elegant.
Creating this look is straightforward: start with a clean base coat, then apply two coats of pure white or soft nude polish for a flawless touch. Focus the glitter polish on just the tips to achieve that understated sparkle. Finish with a glossy top coat for shine and protection.
Steps to achieve minimalist glitter tips:
– Start with a clean base coat for a smooth finish
– Apply two coats of white or nude polish
– Concentrate glitter on the tips for subtle sparkle
– Seal with a glossy top coat for durability
This design is chic and easy to maintain, making it a go-to for anyone wanting a touch of glam without overwhelming their style.
5. Frosty Marble Effect
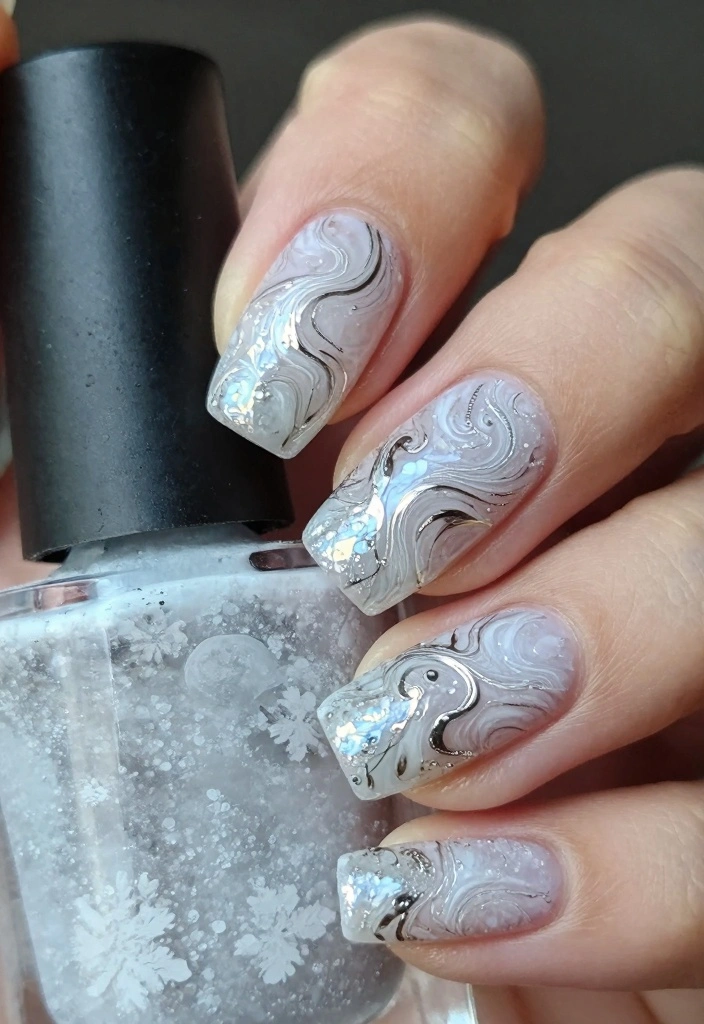
For something truly unique this winter, try the frosty marble effect! This design artfully blends whites and silvers, creating an icy appearance reminiscent of swirling snowflakes in the crisp winter air. It’s an eye-catching choice that radiates elegance and style.
To create the frosty marble effect, start with a white base coat. Using a thin brush or dotting tool, create swirling designs with a silvery polish. Blend the colors lightly with a brush for that marbled look, and don’t forget to seal it with a top coat for protection.
Steps to create the frosty marble effect:
– Start with a solid white base coat
– Use a thin brush for swirling silvery designs
– Blend colors for a marble appearance
– Seal with a top coat for longevity
This technique may take a bit of practice, but the stunning results will be worth the effort. It’s stylish and perfect for any winter gathering!
6. Winter Wonderland Glitter
Capture the magic of a winter wonderland with a dazzling glitter nail look! Begin with a pure white base, then add a generous layer of fine glitter that sparkles like fresh snow in the sunlight. This design is ideal for festive celebrations where you want to shine.
To achieve this glamorous look, apply a layer of white nail polish as your base. While the polish is still tacky, sprinkle fine glitter generously over the entire nail for maximum effect. Finish with a top coat to keep the glitter intact and shiny.
Steps for winter wonderland glitter:
– Apply a layer of white polish as a base
– Sprinkle fine glitter while the polish is tacky
– Seal with a top coat for a lasting finish
This design works beautifully with various nail shapes, whether you prefer short and rounded or long and pointed. It’s festive and fun!
7. Elegant Pearl Finish
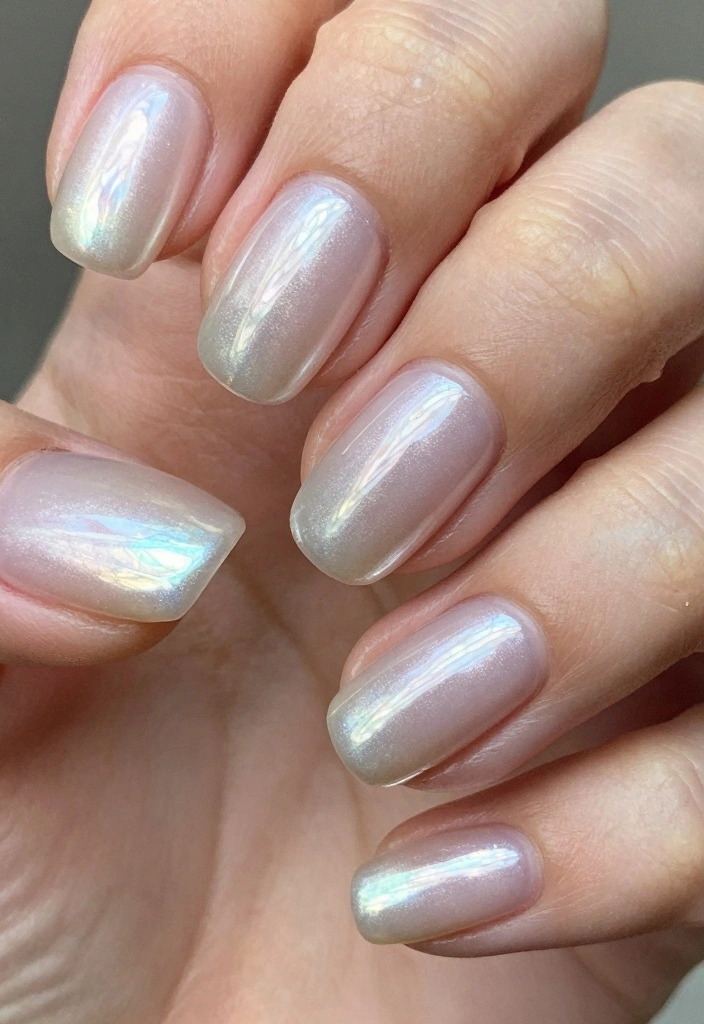
For a soft yet sophisticated look, consider an elegant pearl finish. This design offers your nails a lustrous sheen that embodies class and elegance. It’s a beautiful way to embrace the winter spirit without needing elaborate designs.
To achieve this refined look, start with a solid white polish as a base coat. Then, choose a pearlized top coat to give your nails that soft, radiant finish. For added sophistication, consider applying tiny pearls or rhinestones at the base of each nail for an extra touch of glam.
Steps for achieving an elegant pearl finish:
– Apply a solid white polish as a base
– Use a pearlized top coat for shine
– Add tiny pearls or rhinestones for elegance
This design is chic and versatile, perfect for any occasion from formal events to casual outings. It’s all about embracing simplicity and elegance.
8. Sleek White Matte
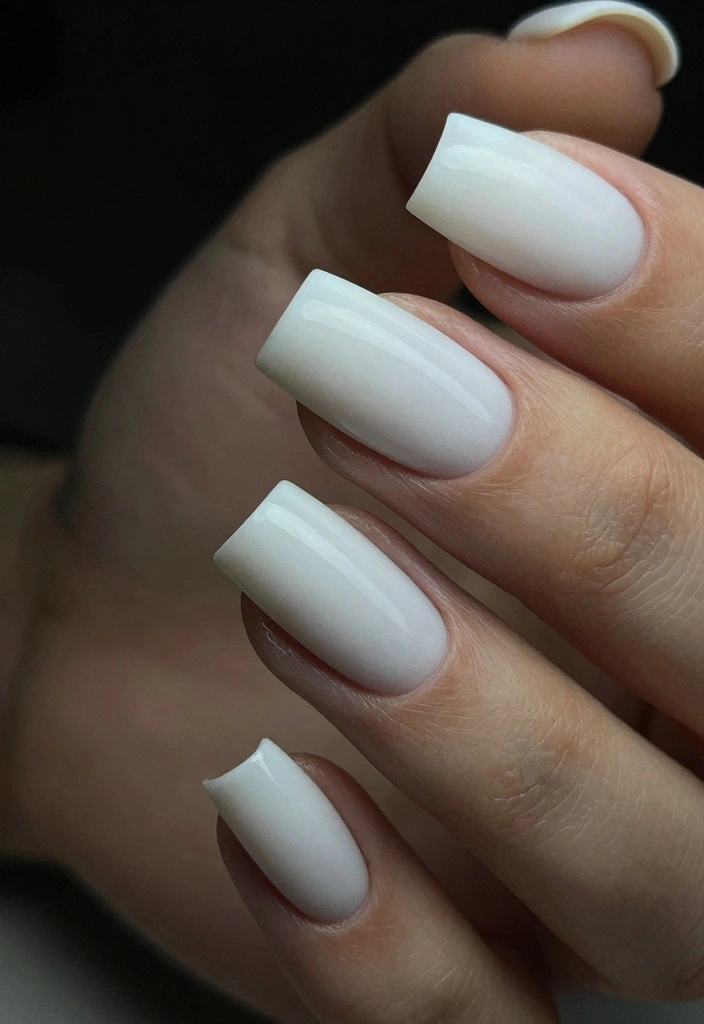
Matte nails offer a modern twist on winter nail art, and a sleek white matte finish is particularly stunning. This look stands out beautifully, exuding a chic and contemporary vibe. It’s perfect for those who appreciate minimalism in their style.
To achieve this trendy look, start with a white base coat. Once it’s dried, apply a matte top coat for that velvety finish. For a playful contrast, you can apply the matte top coat to only some nails, leaving a couple glossy for added flair.
Steps to create sleek white matte nails:
– Start with a white base coat
– Apply a matte top coat for velvety finish
– Consider mixing matte and glossy nails for contrast
This style is sleek and sophisticated, perfect for everyday wear or a night out. It’s a great way to keep your nails looking polished without fuss.
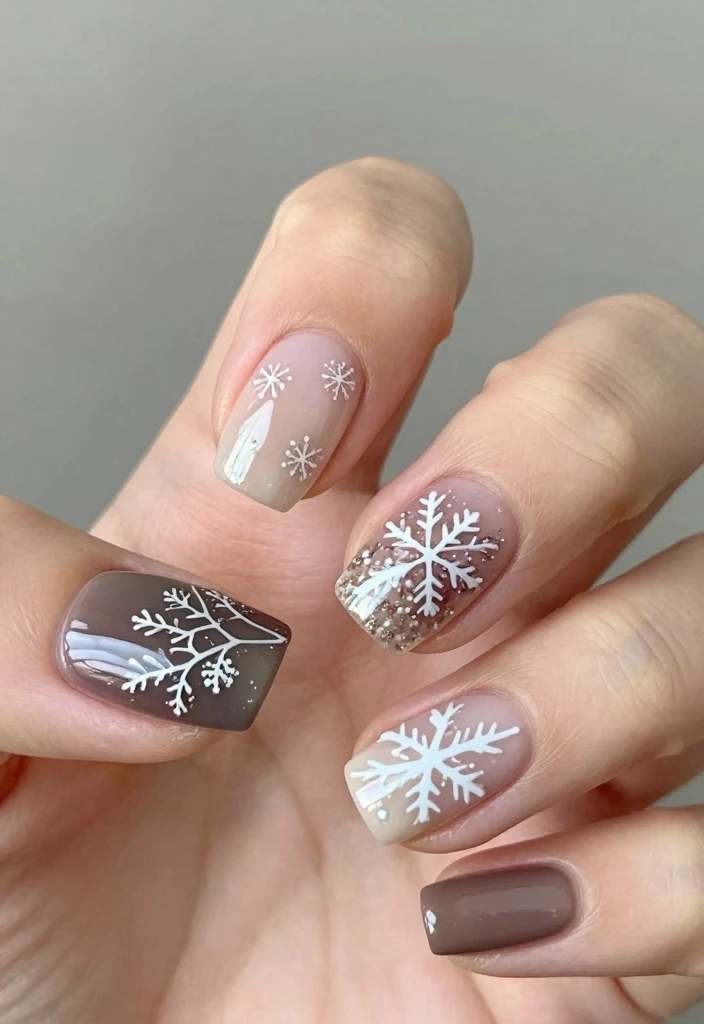
9. Winter Scenery Nail Art
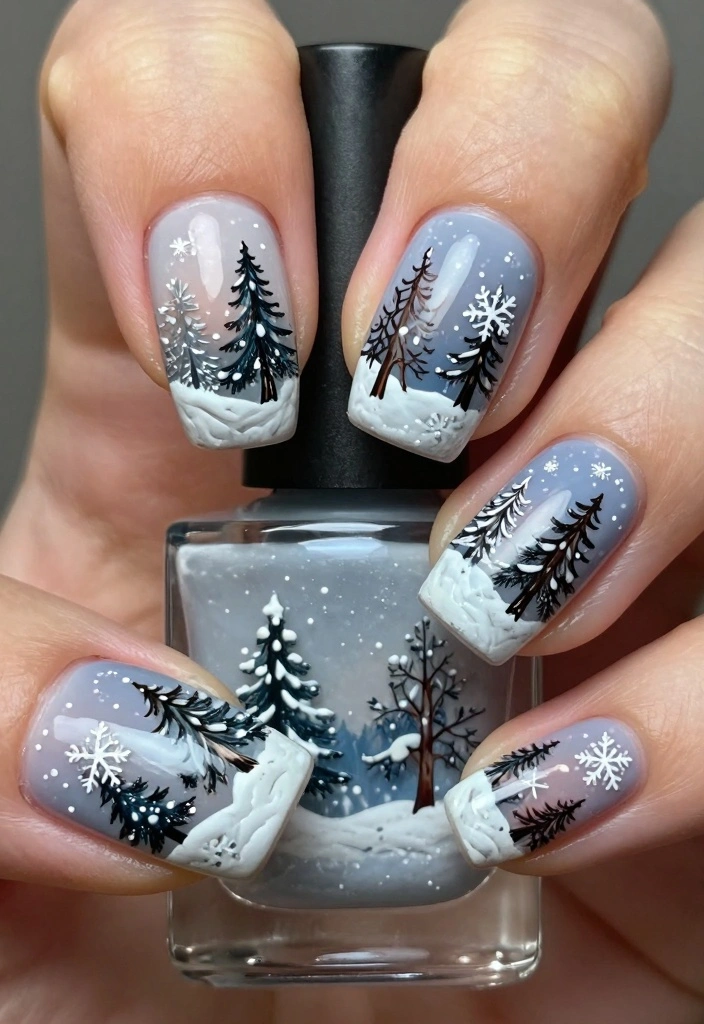
Bring the enchanting beauty of winter to your fingertips with intricate winter scenery designs. Imagine tiny trees dusted with snow, a cozy cabin, or a beautiful sunset over a snowy landscape, all painted on your nails. This detailed art is perfect for those who want to showcase their artistic flair during the winter months.
To create winter scenery nail art, start with a light base coat, such as white, pale blue, or a nude tone. Using a fine brush or nail art pen, paint small winter scenes. Feel free to mix colors to create depth and dimension. Seal your artwork with a glossy top coat to protect it.
Steps for winter scenery nail art:
– Start with a light base coat
– Use a fine brush to paint winter scenes
– Mix colors for depth and dimension
– Seal with a glossy top coat for protection
This design allows for endless creativity and is a fantastic way to express your love for winter. It’s sure to spark conversation at any holiday gathering!
Fun fact: you can fit a tiny winter landscape—two pines, a cabin, and a sunset—on white winter nails in under 10 minutes. Start with a pale base, then layer details with a fine brush for depth.
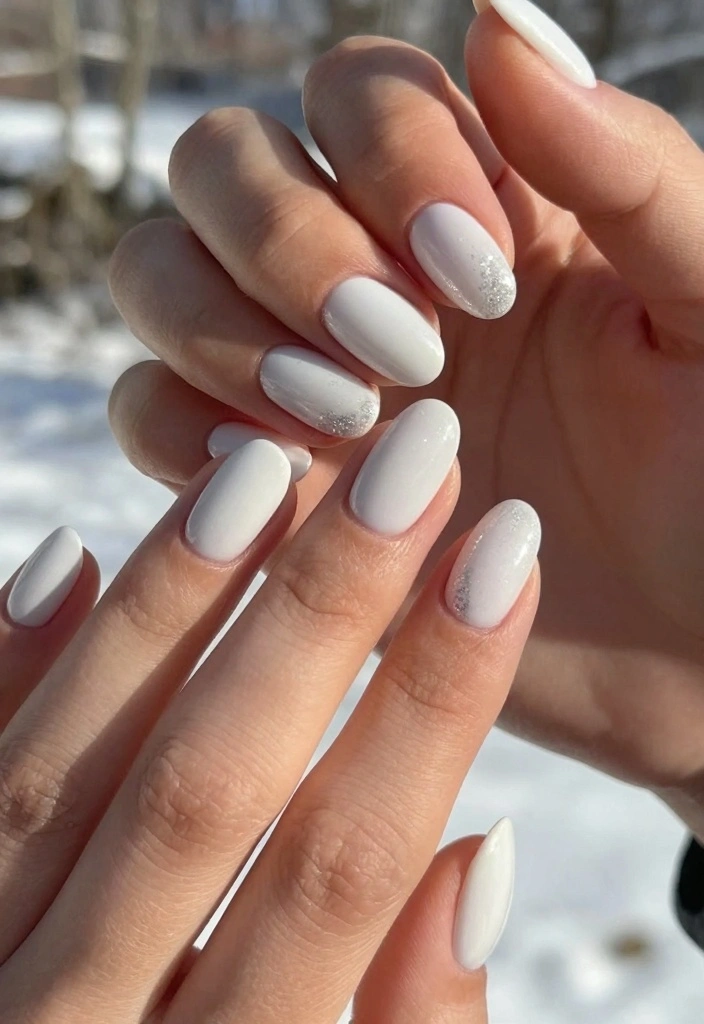
10. Subtle Glitter Gradient
If you want a touch of sparkle while keeping it minimal, a subtle glitter gradient is your perfect design choice. This classy and elegant look suits any winter occasion beautifully. You can easily customize the intensity of the glitter to match your mood.
To create this chic look, start with a solid base of white nail polish. Apply a layer of glitter polish starting from the tips and gradually fading it up toward the cuticle. Seal the design with a top coat for added longevity.
Steps for the subtle glitter gradient:
– Start with a solid white base
– Apply glitter from tips, fading upwards
– Seal with a top coat for durability
This design strikes a perfect balance—offering just the right amount of sparkle without overwhelming the classic white base. It’s a stylish way to embrace winter elegance.
11. Artistic Snowman Accents
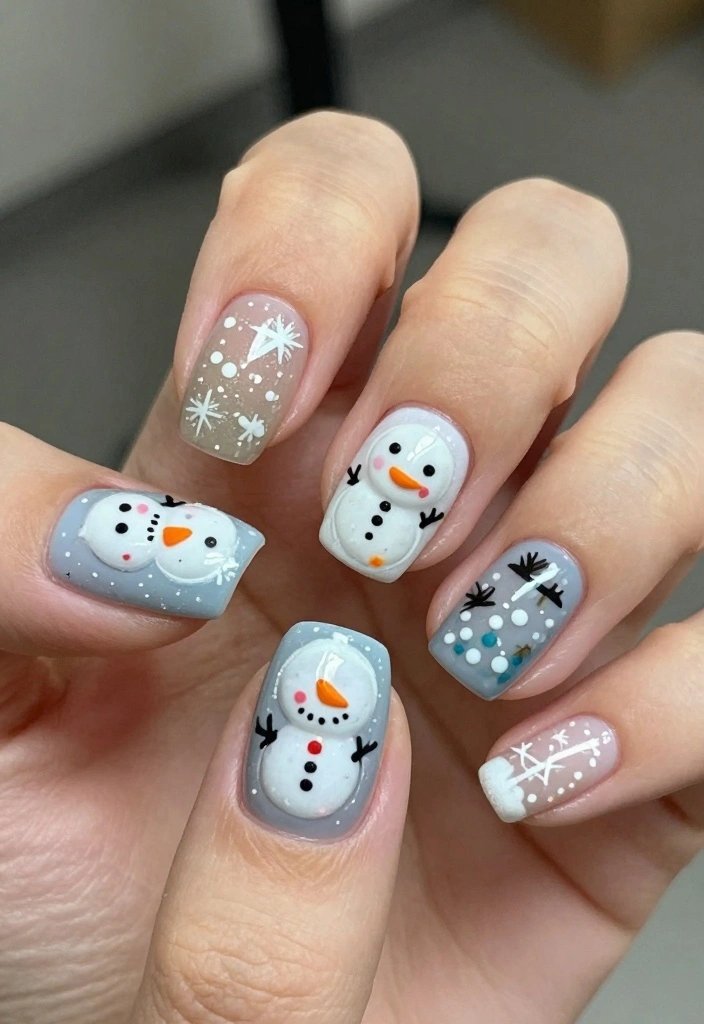
Add a playful touch to your winter nails with whimsical artistic snowman accents! This cheerful design brings a fun vibe to your manicure while maintaining an elegant look. Perfect for the festive season, it’s a surefire way to stand out.
To create artistic snowman accents, start with a light base coat. Use a fine nail brush to paint tiny snowmen on one or two accent nails, and consider using dotting tools to create tiny snowflakes around them. Finish with a glossy top coat to protect your artwork.
Steps for artistic snowman accents:
– Start with a light base coat
– Paint tiny snowmen on accent nails
– Add snowflakes using dotting tools
– Seal with a glossy top coat for protection
This design is not only adorable, but it also serves as a joyful reminder of the happiness winter brings. It’s ideal for holiday parties and festive gatherings.
12. Elegant White and Gold

Combine the elegance of white with shimmering touches of gold for a luxurious winter manicure! Gold detailing elevates your white winter nails to a stunning level. This design is perfect for holiday parties or formal events where you want to shine bright.
To create this exquisite look, start with a solid white base coat. Use a gold nail art pen to add delicate lines, dots, or even leaf patterns for a chic effect. For a dramatic flair, consider using gold foil accents. Seal it all with a top coat to enhance the shine.
Steps for elegant white and gold nails:
– Start with a solid white base coat
– Use a gold pen for intricate detailing
– Add gold foil for a dramatic touch
– Seal with a top coat for a lasting finish
This design is all about elegance with a hint of glam, making it a timeless winter favorite.
13. Twinkling Star Accents
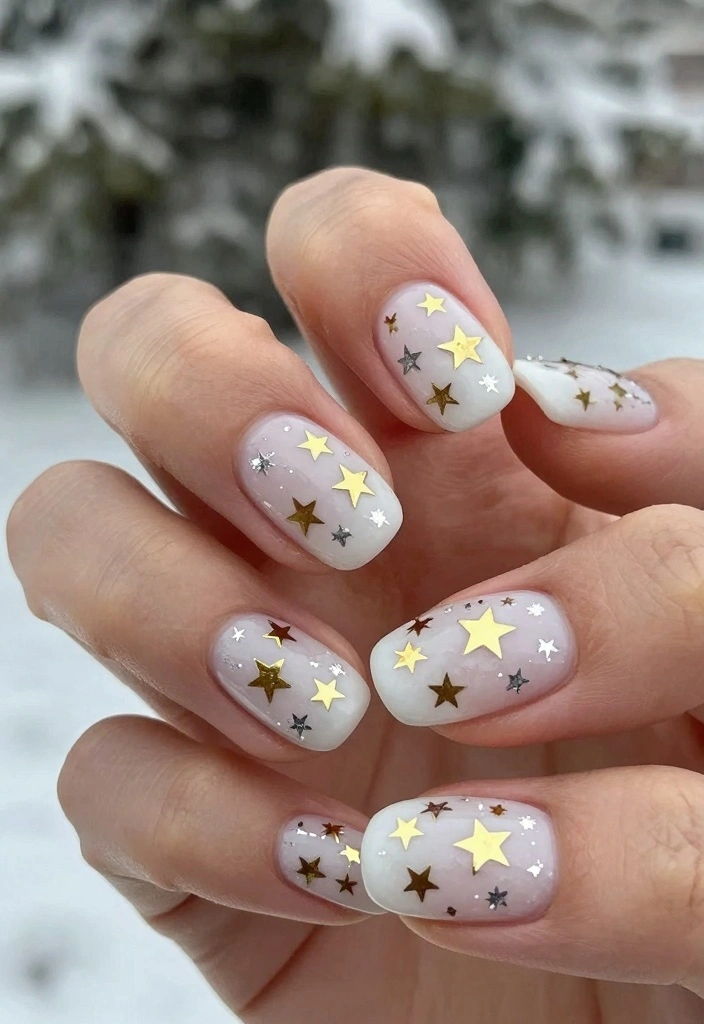
Celebrate the beauty of winter nights with twinkling star accents on your nails! This design adds a magical touch to your winter look, ideal for the holiday season. It’s simple to create while looking stunning against a white base.
To achieve this enchanting design, start with a solid white base coat. Use a fine brush or nail art pen to add tiny star shapes in gold or silver on one or two accent nails. You can also sprinkle tiny dots to represent twinkling stars. Seal it with a glossy top coat for a polished finish.
Steps for twinkling star accents:
– Apply a solid white base coat
– Add tiny stars in gold or silver
– Sprinkle dots for extra twinkling effect
– Seal with a glossy top coat
This design is captivating yet minimalist, making it a fantastic choice for winter festivities while adding a hint of sparkle.
14. Frosty Glitter Fade
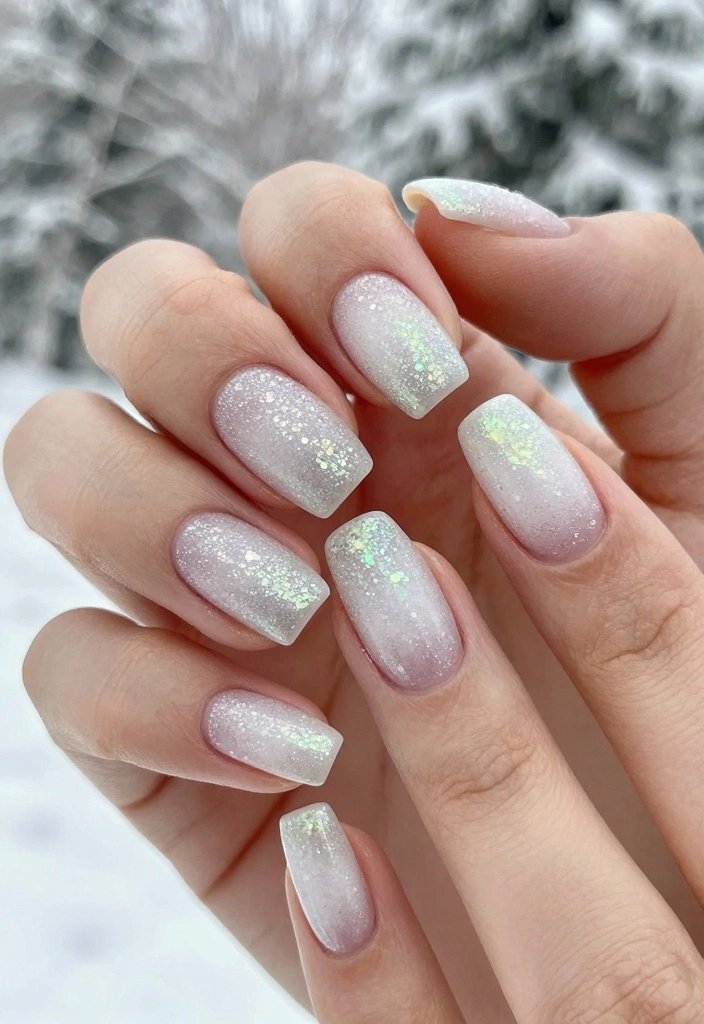
For those who adore a hint of sparkle, the frosty glitter fade offers an exquisite blend of elegance and fun. This design features a gradual fade of glitter from the tips of your nails down to a clean white base, perfectly capturing winter’s beauty.
To create this beautiful look, start with a solid white nail polish base. Next, use a brush to apply glitter from the tips, fading it downwards with a lighter touch as you go. Seal everything with a glossy top coat for added protection.
Steps for frosty glitter fade:
– Start with a solid white base coat
– Apply glitter from tips, fading downwards
– Seal with a top coat for durability
This design is playful yet classy, making it a great choice for parties and gatherings. It’s an effortless way to embrace the enchanting sparkle of winter.
15. Winter Berries & Branches
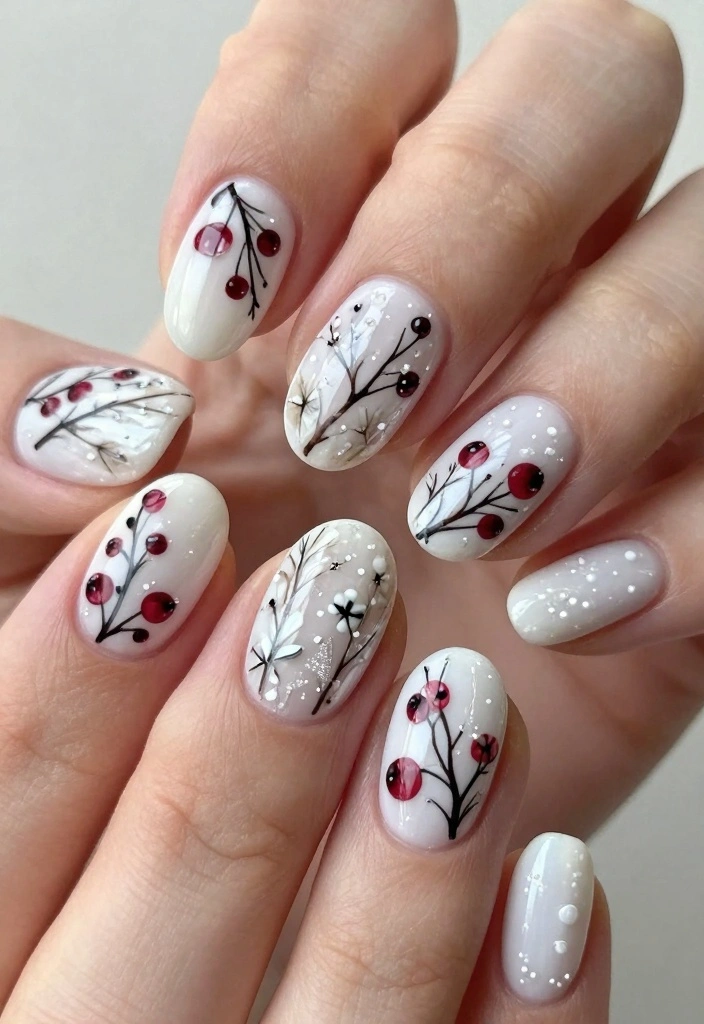
Embrace the beauty of winter’s natural elements with a design featuring lovely winter berries and branches. This elegant look brings a touch of the outdoors to your nails while keeping the color palette subtle and refined.
To create this charming design, start with a white or light base coat. Use a fine brush to paint tiny dark brown branches and add small dots of red or deep blue for berries. Finish with a glossy top coat to give your nails a polished appearance.
Steps for winter berries and branches:
– Start with a white or light base coat
– Use a fine brush for branches and berries
– Add small dots for berries in red or blue
– Seal with a glossy top coat for a polished look
This design is perfect for nature lovers wanting to celebrate winter’s beauty through their nails. It’s unique, elegant, and a beautiful way to stand out.
I love how white winter nails with tiny berries and branches turn a chilly day into something polished. Keep the base light and add tiny red berries for a tasteful pop. Then finish with a glossy top coat.
16. Cozy Sweater Patterns
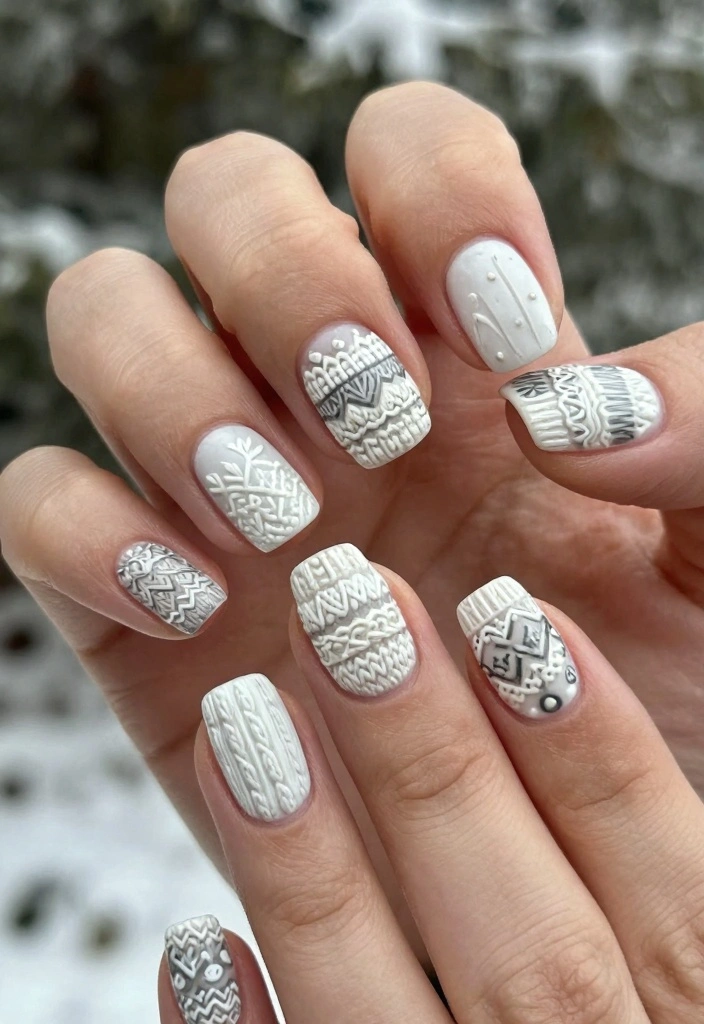
Lastly, bring the warmth of winter sweaters to your nails with cozy sweater patterns! This delightful design is perfect for those who adore intricate detailing and the comfort of winter. It’s a standout choice that’s sure to attract attention.
To create this cozy look, start with a white or light base coat. Use a nail art brush to paint knit patterns or snowflakes, opting for contrasting colors like light blue or pastel shades. Finish with a matte top coat for that snug feel.
Steps for cozy sweater patterns:
– Start with a white or light base coat
– Use a brush for knit patterns or snowflakes
– Opt for contrasting colors for a cozy touch
– Finish with a matte top coat for warmth
This design is charming and perfect for holiday gatherings or casual winter outings. It’s a wonderful way to express your style while embracing the warmth of the season.
Conclusion
Winter is a wonderful time to experiment with your nails, channeling the beauty of the season onto your fingertips. From minimalist designs to intricate nail art, there are endless ways to express your love for winter through your manicures. Whether you choose a subtle frosty look or a dazzling glitter design, let your nails reflect the magic of this season.
With these 16 white winter nail ideas, you’re all set to embrace the chilly weather in style. So go ahead, grab your favorite nail polish and get creative!
Frequently Asked Questions
What white winter nails ideas give a frosty, elegant look?
There are several chic routes for white winter nails that read frosty and elegant. Try a solid white with a matte top coat for a clean, minimalist vibe that fits seasonal nail trends. Add a sheer white glaze with tiny silver flakes to create classic frosty nail designs. For a touch of glamour, use subtle negative-space snowflake decals or a thin silver foil line to nod to holiday nail inspiration. Finish with a glossy or satin finish to keep it polished and timeless in any lighting.
How do I recreate minimalist white winter nail art at home?
Start with clean, filed nails and a solid base coat to protect your nails. Apply two thin coats of white polish for full coverage, letting each layer dry. For winter nail art with negative space, use tape to reserve shapes, then paint over and remove carefully. A dotting tool or thin brush lets you add delicate snowflakes or tiny dots for a elegant manicure ideas look. Seal with a top coat (glossy or matte) and let it set. Quick tip: test designs on a swatch nail first to nail the look before you try it on every finger.
Which nail shapes pair best with white winter nails for an elegant manicure?
For a classic and refined feel, go with square or squoval shapes to keep lines clean and neat. Almond or rounded nails add a touch of softness that pairs nicely with minimalist white winter nails. If you want something bolder but still sleek, a long coffin shape can showcase silver accents or frosted tips beautifully while staying within holiday nail inspiration cues. Regardless of shape, thin, even coats and a precise edge finish will elevate the look to elegant manicure ideas.
What tools and products are essential for frosty white nail designs?
You don’t need a full kit, just a small thoughtful set. Use a true white nail polish (or a sheer white for a frosted base), a sheer or clear top coat, and a top coat with good lasting power. Grab striping tape or nail vinyls for clean lines, a dotting tool or fine brush for snowflakes, and a silver or icy foil for accents in line with winter nail art and seasonal nail trends. A good base coat protects against staining, and a matte top coat can give a frosty, understated vibe that nods to holiday nail inspiration without overdoing it.
How can I make white winter nails last through the holiday season?
Prep nails well with a strong base coat and apply thin, even layers of white polish, sealing the edge of each layer to prevent chipping. Use a durable top coat and reapply it every 2–3 days to maintain the frosty look. Keep your hands moisturized and wear gloves in cold weather to protect the finish from dryness and cracking. If a chip happens, perform a quick fix by lightly buffing the area and applying a new coat of top sealant. This approach keeps your white winter nails looking fresh and on trend for holiday nail inspiration and beyond.
Related Topics
white winter nails
frosty nail designs
minimalist nail art
elegant manicure
holiday nail trends
seasonal nail inspiration
easy winter nails
chic nail styles
winter nail art
beginner friendly
trendy nail designs
festive nail ideas