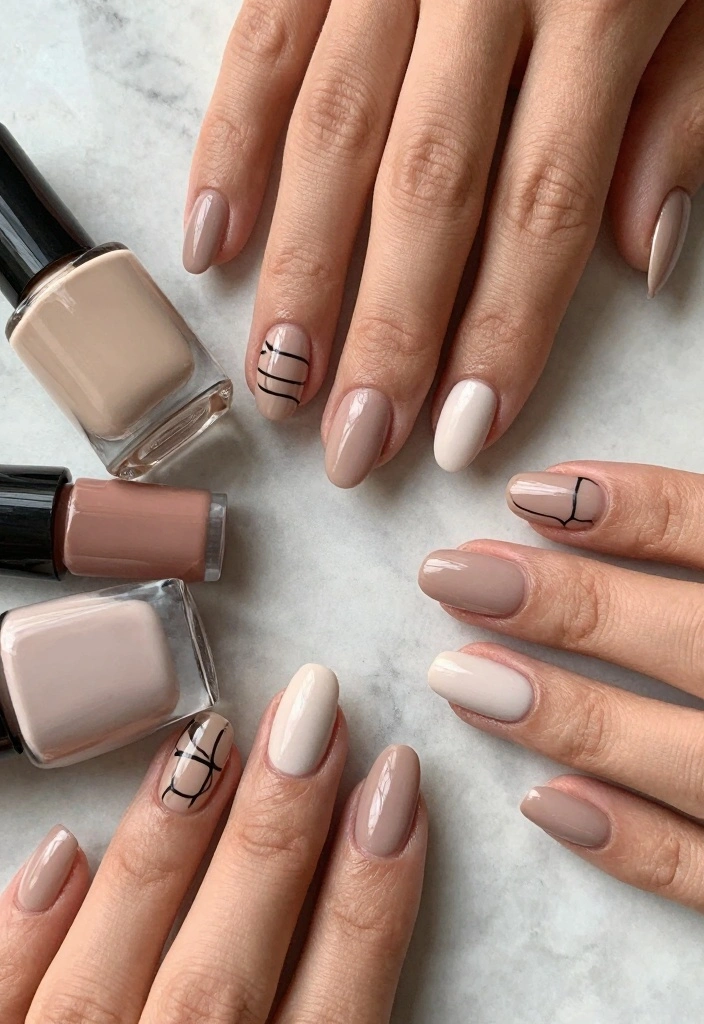
Winter is here, and with it comes the desire for cozy vibes and chic styles. If you’re like me, this season has you craving clean, minimalistic looks that still pack a punch. With the chill in the air, what better way to express yourself than through stunning neutral winter nails? Whether you prefer soft beiges or elegant taupes, there are so many ways to keep your nail game fresh and stylish.
This post is for anyone who loves beauty and wants to embrace a sustainable, minimalist aesthetic. If you enjoy chic nail art that feels effortless yet polished, you’re in for a treat. I’ve curated a collection of 16 neutral winter nails ideas that are not only clean and chic but also perfect for the winter season. Each design offers a blend of simplicity and sophistication that you can easily achieve.
As you explore these minimalist nail designs, you’ll discover a variety of styles that reflect the tranquility of winter. From subtle hints of color to striking negative space art, these ideas will inspire you to embrace your inner artist. Get ready to elevate your manicure game this winter with these tips and designs that promise to keep you looking effortlessly chic!
Key Takeaways
– Discover 16 unique neutral winter nails ideas that combine style and simplicity.
– Explore designs like the Soft Beige Delight and Taupe Elegance for an effortlessly chic look.
– Learn how to incorporate fun elements like whimsical snowflakes and subtle glitter gradients into your nail art.
– Get tips on achieving a minimalist aesthetic that aligns with clean beauty principles and sustainability.
– Find inspiration for different occasions, whether you want a sophisticated office nail or a playful winter party design.
1. Soft Beige Delight
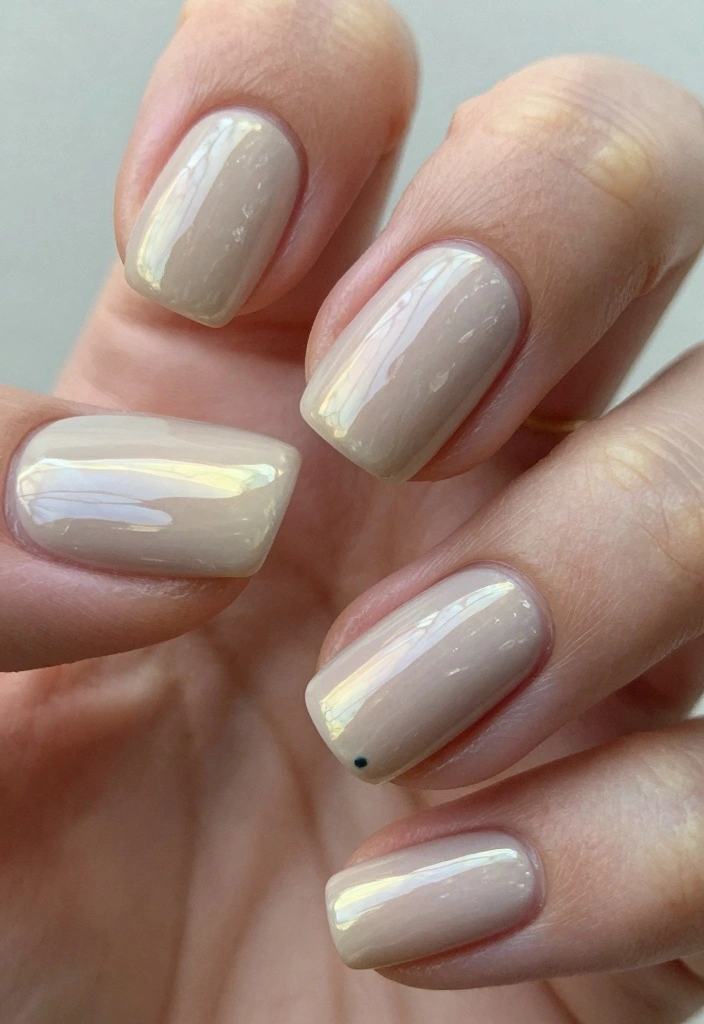
Soft beige nails radiate understated elegance, making them a go-to choice for any occasion. This versatile shade flatters all skin tones and provides a polished look that feels fresh and clean. Whether you prefer a glossy shine for a sophisticated vibe or a matte finish for subtlety, beige offers endless possibilities for customization. Experimenting with nail shapes like almond or square can also add a unique twist to your style.
Try adding a fine white stripe along the cuticle for an eye-catching detail that elevates the classic beige. This chic combination is perfect for anyone looking to keep their nails simple yet stylish.
Key steps to achieve this look:
– Apply a high-quality base coat for lasting wear.
– Use two thin coats of beige polish for an even finish.
– Seal your look with a glossy or matte top coat for your preferred shine.
This soft beige design enhances your nails while maintaining a minimalist aesthetic. You’ll appreciate its versatility and elegance for weeks to come.
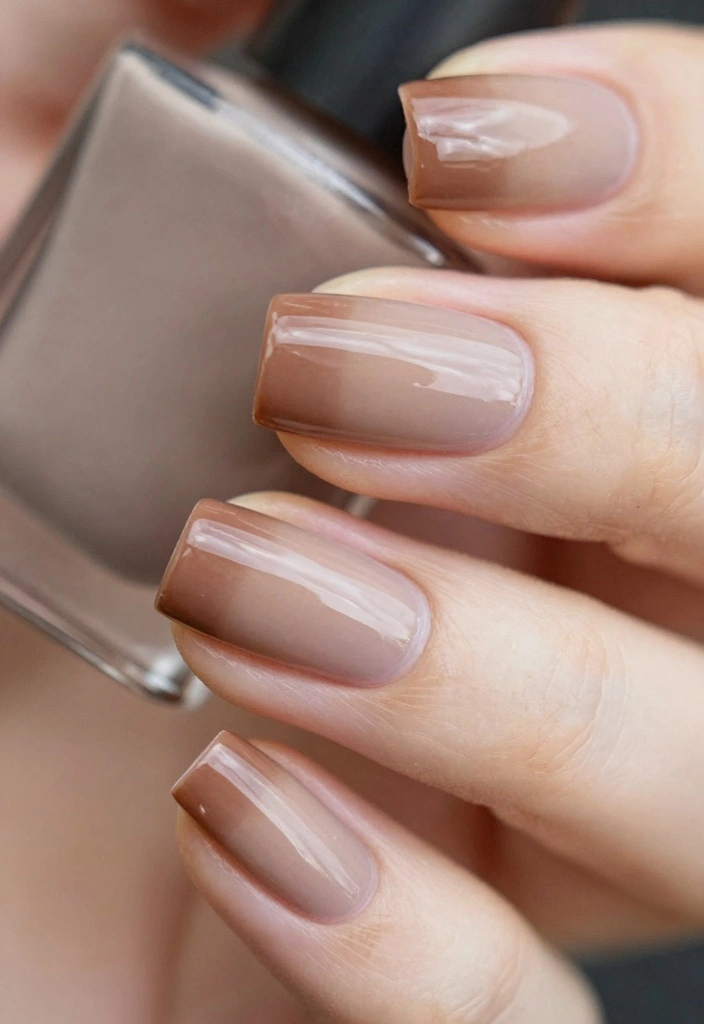
2. Taupe Elegance
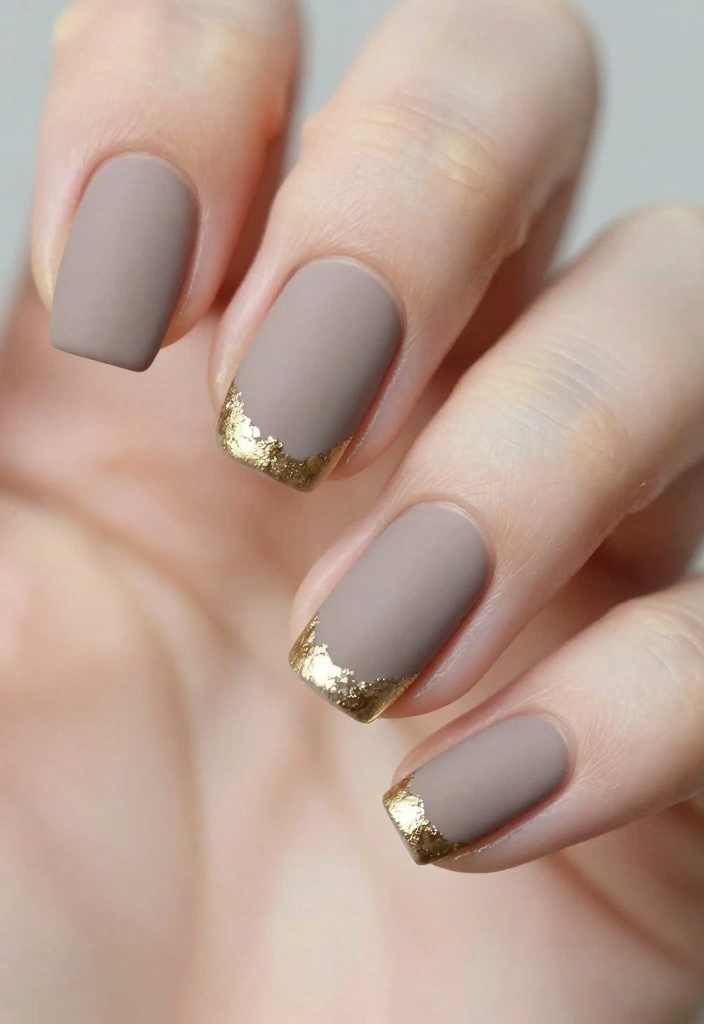
Taupe nails are the perfect blend of sophistication and warmth, making them an ideal winter choice. This chic color, a mix of gray and brown, adapts beautifully to any outfit, whether casual or formal. A matte finish can give your taupe nails a modern touch, while a glossy top coat adds a hint of glam.
Consider a French manicure twist by glossing just the tips for an effortlessly stylish look. Taupe’s understated appeal makes it perfect for everything from board meetings to intimate dinners.
Application tips:
– Buff your nails before applying for a smooth surface.
– Don’t forget a base coat to avoid staining.
– Finish with a top coat for protection and shine.
Taupe also serves as a fabulous base for nail art; think gold foil accents or tiny contrasting dots for a minimalist design that stands out.
3. Frosted Gray Tips
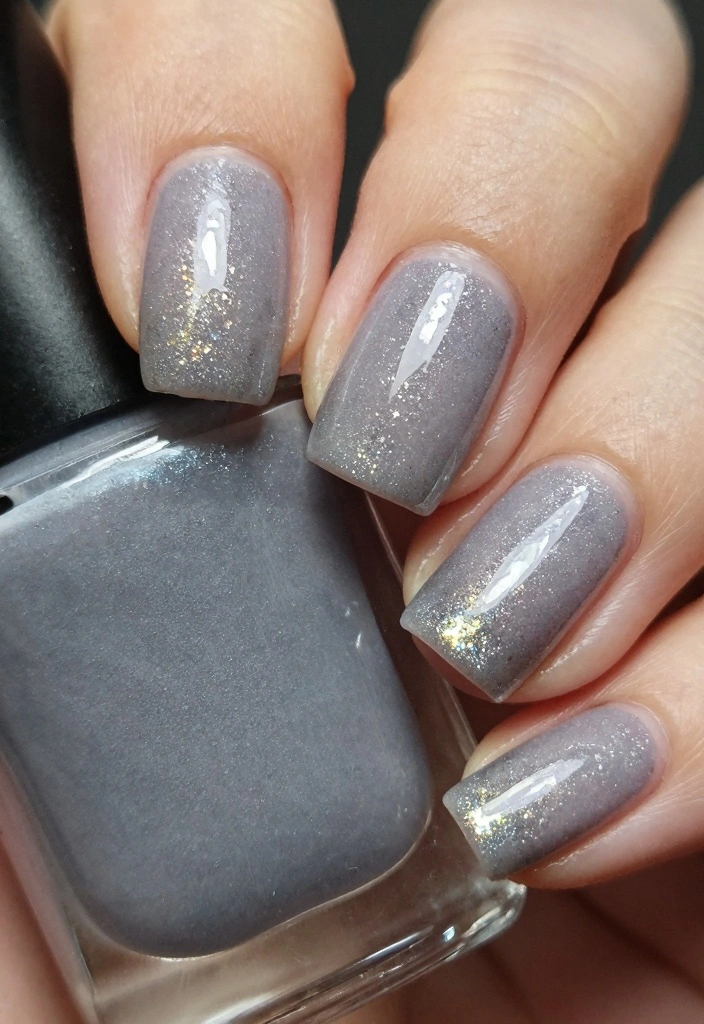
Frosted gray tips provide a refreshing twist on the classic French manicure, perfectly suited for winter. Start with a soft gray base, ensuring it’s completely dry before proceeding. Use a sparkly silver polish or sheer glitter top coat to create frosted tips that add a festive touch to your nails.
This design combines trendy and understated elements, making it perfect for holiday parties or cozy gatherings. The combination of soft gray with shimmering tips gives you a chic yet subtle style.
How to achieve this look:
1. Apply a base coat and let it dry.
2. Paint on two coats of pale gray polish.
3. After it dries, use a thin brush to apply frosted tips.
4. Seal with a top coat for durability.
If you’re unsure about freehanding it, use tape to create clean lines for the tips.
4. Minimalist White Outline
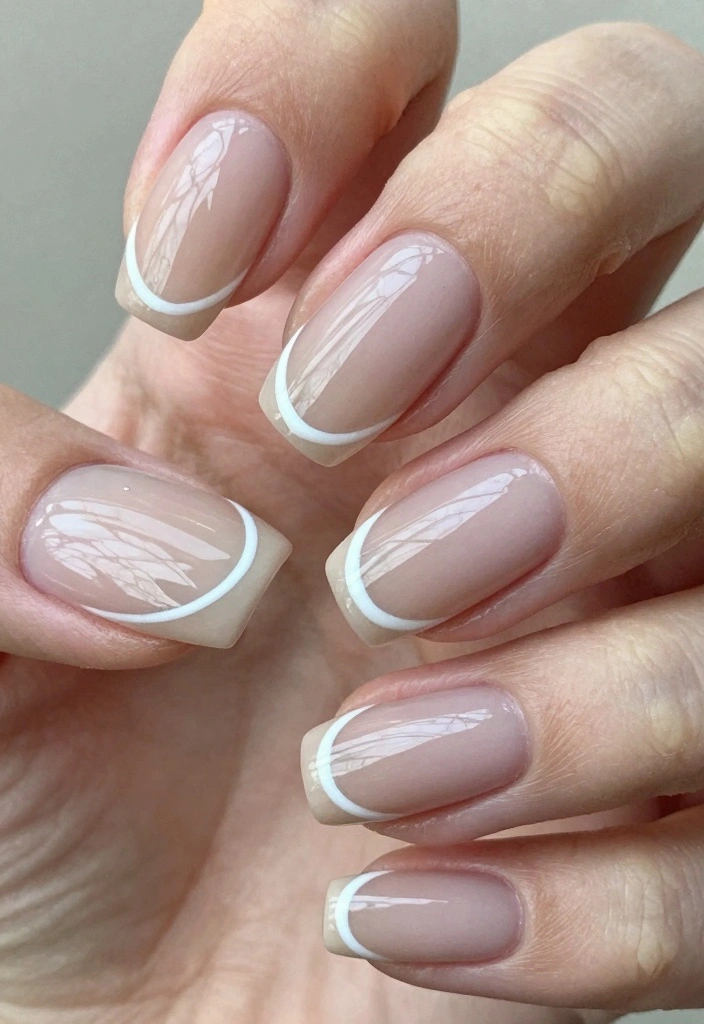
For fans of clean aesthetics, a minimalist white outline on neutral nails is a must-try. Begin with a nude base and utilize a fine nail brush to draw a simple white outline at the tips or along the sides. This modern design is easy to achieve yet delivers a striking visual impact.
The contrast between the nude and white creates a polished look that works for any occasion, from casual outings to formal events.
Step-by-step:
1. Apply a nude base coat and let it dry completely.
2. Use a fine brush to outline the tips in white.
3. Finish with a top coat to smooth it all out.
For beginners, practice on paper to perfect your technique before attempting your nails!
5. Earthy Tone Ombré
Earthy tones are a beautiful way to infuse warmth into your winter look without resorting to bright colors. A captivating ombré effect with gradients of nude, taupe, and brown creates an inviting and nature-inspired aesthetic. This design is not only visually appealing but also aligns with sustainable beauty practices, emphasizing a minimalist approach.
The result is a striking yet understated look that’s perfect for the eco-conscious beauty enthusiast.
How to achieve the ombré effect:
1. Apply a base coat and let it dry.
2. Use a makeup sponge to apply colors in a gradient.
3. Seal with a top coat for shine and durability.
This design allows you to enjoy complexity while staying true to minimalism!
6. Negative Space Chic
Negative space nail designs offer a creative yet clean aesthetic, perfect for modern minimalists. Start with a nude base and use tape to create geometric shapes or lines that leave parts of your natural nail exposed. This bold choice incorporates simplicity while making a stylish statement.
It’s an ideal design for those looking to embrace minimalism without compromising on creativity.
Execution steps:
1. Start with a clear base coat.
2. Use tape to section off areas to remain nude.
3. Apply polish to the exposed sections in your desired pattern.
4. Finish with a top coat for a polished appearance.
Practice with tape on paper before attempting your nails to ensure crisp lines!
Fun Fact: Negative space nail designs can cut polish usage by up to 30%, making neutral winter nails both chic and sustainable. Start with a nude base and use tape to frame geometric shapes for a bold, minimalist look.
How To Choose Neutral Winter Nails
Choosing the right neutral winter nails can enhance your style while keeping it chic and minimal. Here are some key points to help you select the perfect look for the season.
1. Nail Shape
The shape of your nails can dramatically influence the overall look of your manicure. Popular shapes include oval, almond, square, and coffin. Look at your natural nail shape and choose something that complements it while allowing for the neutral designs you want. A streamlined, elegant shape often pairs well with minimalist styles.
2. Color Palette
Neutral winter nails often include shades like soft beige, taupe, gray, and creamy whites. Decide on a color palette that fits your personal style and complements your winter wardrobe. Consider how the colors will look with the outfits you plan to wear. A good rule of thumb is to choose shades that can seamlessly blend with multiple pieces in your closet.
3. Nail Art Style
Determine the type of nail art that fits your aesthetic. You might prefer minimalist designs with clean lines or soft accents like delicate dots and stripes. You could even consider negative space or subtle ombré effects for a bit of flair without overwhelming your look. Test a few designs to see what resonates with your style.
4. Finish Type
The finish of your nail polish can change the entire vibe of your manicure. Options include matte, glossy, pearlized, or even a subtle glitter. If you want a more sophisticated look, a matte finish can be striking with neutral shades. However, if you prefer a clean and polished appearance, a glossy finish will shine and stand out during the winter months.
5. Sustainability
As the beauty industry shifts toward sustainability, consider choosing brands that offer eco-friendly options. Look for polishes free from harmful chemicals and those that use ethically sourced ingredients. This not only benefits your nails but also contributes to a healthier planet.
6. Maintenance and Durability
Lastly, think about the maintenance involved with your chosen style. Some nail designs require more upkeep than others. For instance, a classic French twist may need more frequent touch-ups compared to a simple nude polish. Choose a design that fits your lifestyle, ensuring you can enjoy your manicure without constant worry.
Pro Tip: When in doubt, consult with a nail technician. They can provide personalized advice based on your nail health, shape, and preferred styles. This can lead to a more tailored result that meets your expectations perfectly.
By considering these factors, you can confidently choose neutral winter nails that showcase your unique style while keeping things clean and minimal. Enjoy the process, and have fun trying out different looks this winter!
7. Creamy Almond Shine
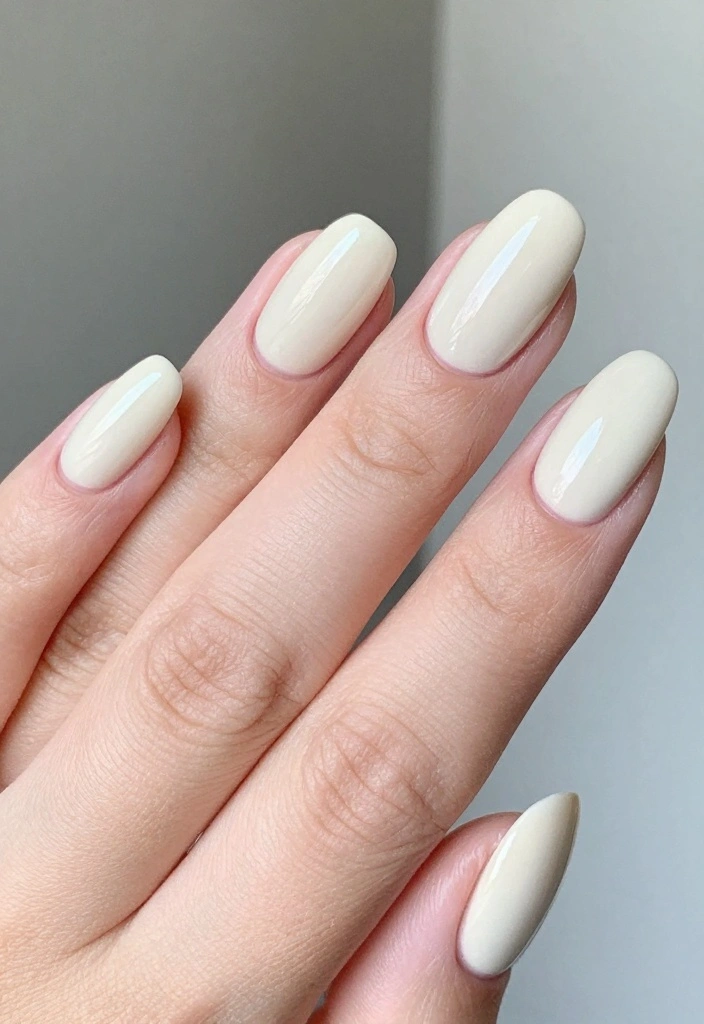
Almond-shaped nails coated in a creamy neutral tone deliver a gorgeous blend of elegance and coziness. This style embraces classic shapes while introducing a warm color that feels perfect for winter.
A soft cream polish will suit any occasion, whether you’re dressing casually or heading to a formal event. A glossy finish enhances the overall sophisticated look.
Application tips:
– Shape your nails into soft almonds before applying polish.
– Use a base coat to safeguard your natural nails.
– Seal with a top coat for lasting shine.
To maintain your almond shape, regularly file and moisturize for best results!
Creamy almond shine is the springboard for neutral winter nails that feel cozy and chic. Anyone can shape soft almond nails to elongate the fingers and add a glossy finish—no dramatic color required. It’s effortless, versatile, and keeps your look put-together from casual errands to formal events.
8. Dusty Rose Accents
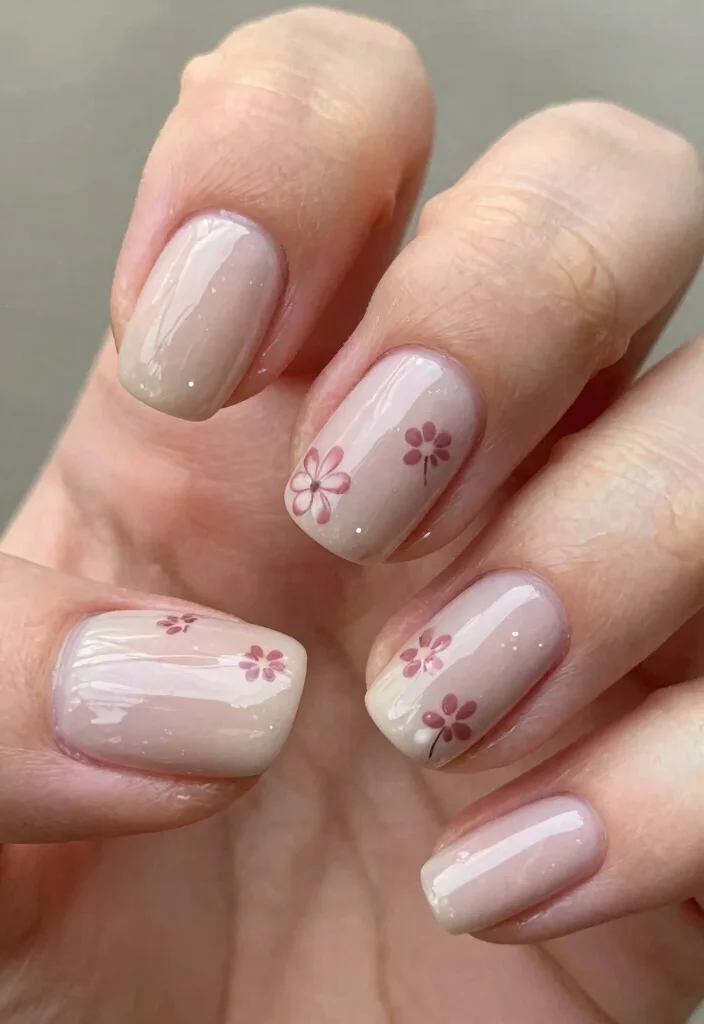
Add a romantic flair to your winter nails with dusty rose accents on a neutral base. Start with a clean nude polish and incorporate gentle accents using a soft dusty rose shade. Whether you opt for tiny flowers, heart shapes, or a simple stripe down the center, this design strikes a balance between minimalism and playful charm.
Perfect for cozy winter dates, this look keeps things sweet and stylish.
How to create dusty rose accents:
1. Apply a nude base coat and let it dry.
2. Use a dotting tool or fine brush to draw designs in dusty rose.
3. Seal with a top coat for durability.
Aim for simplicity in your designs to enhance the minimalist aesthetic!
9. Whimsical Snowflakes
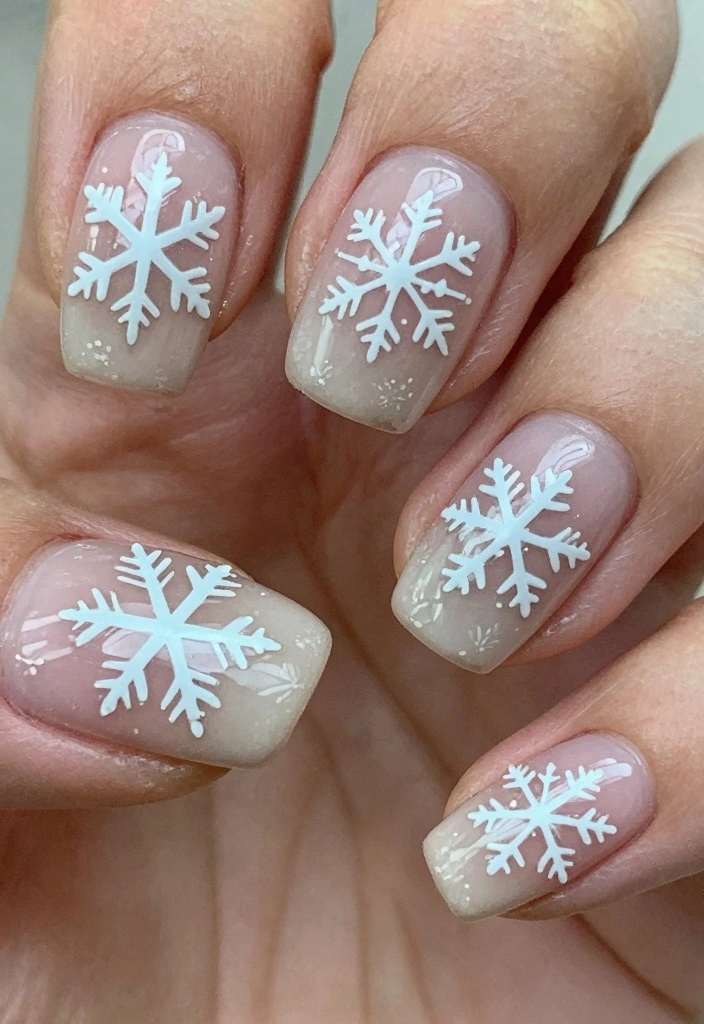
Celebrate the winter season with whimsical snowflake designs on a neutral base. Start with a soft beige or pale gray, then use white polish to create unique snowflake patterns. This festive design maintains a minimalist touch, allowing each snowflake to shine without being overly complicated.
Perfect for holiday gatherings, this style brings a cheerful vibe to your nails.
Steps to create snowflakes:
1. Apply a base coat and let it dry.
2. Use a fine brush to paint snowflake designs on each nail.
3. Finish with a clear top coat to protect your art.
Practice your designs on paper first to find your favorite snowflake shape!
10. Glossy Finish on Matte Base
Combining a matte base with glossy highlights creates a striking and modern contrast. Start with a matte neutral polish, then apply a glossy top coat to select areas, such as tips or accent nails. This texture play results in a chic look that’s perfect for trendsetters.
It’s an edgy yet minimalist style that adds depth without overwhelming your nails.
How to achieve this design:
1. Apply a matte base coat and let it dry.
2. Use a glossy top coat only on desired areas.
3. Apply a top coat for longevity to the matte polish.
Mixing textures creates a unique look that’s sure to attract attention!
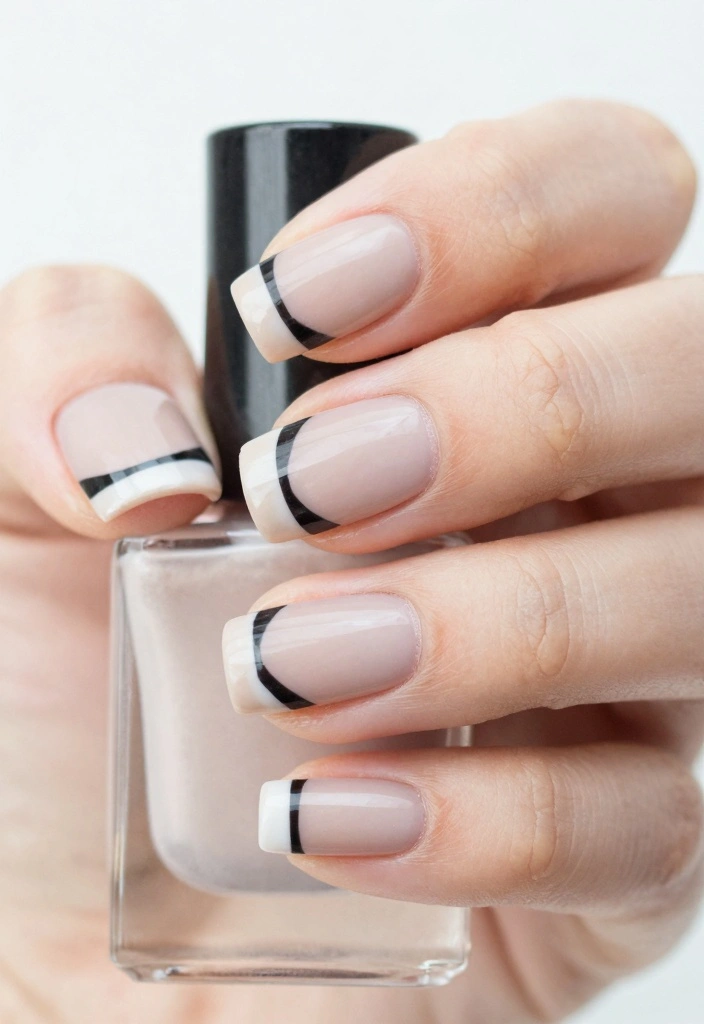
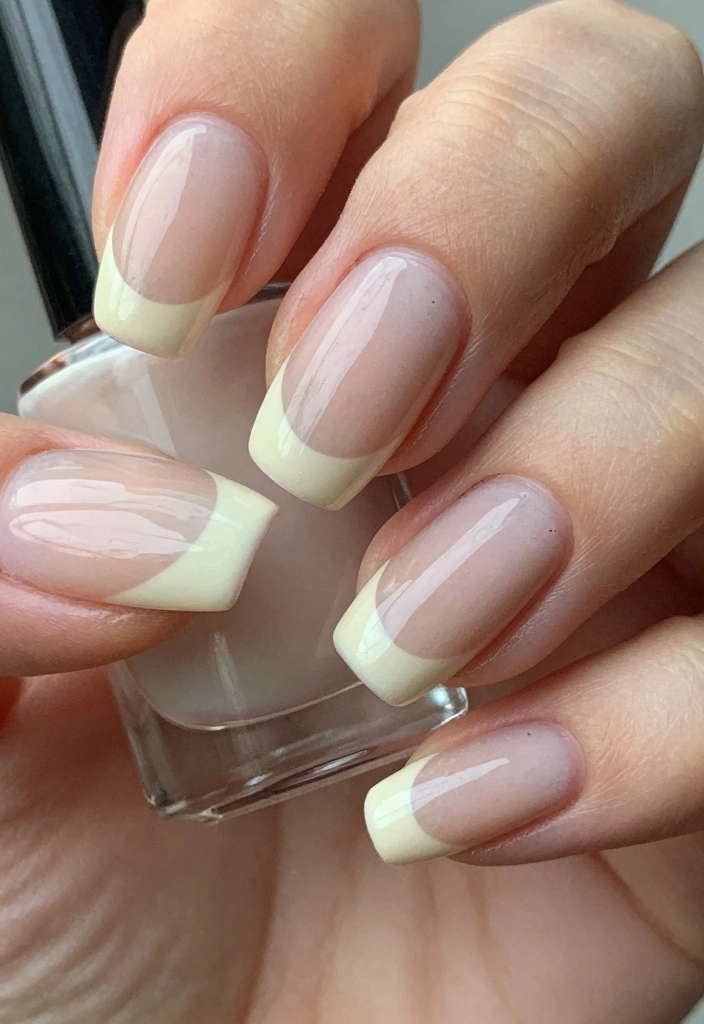
11. Clean Lines with Nude Base
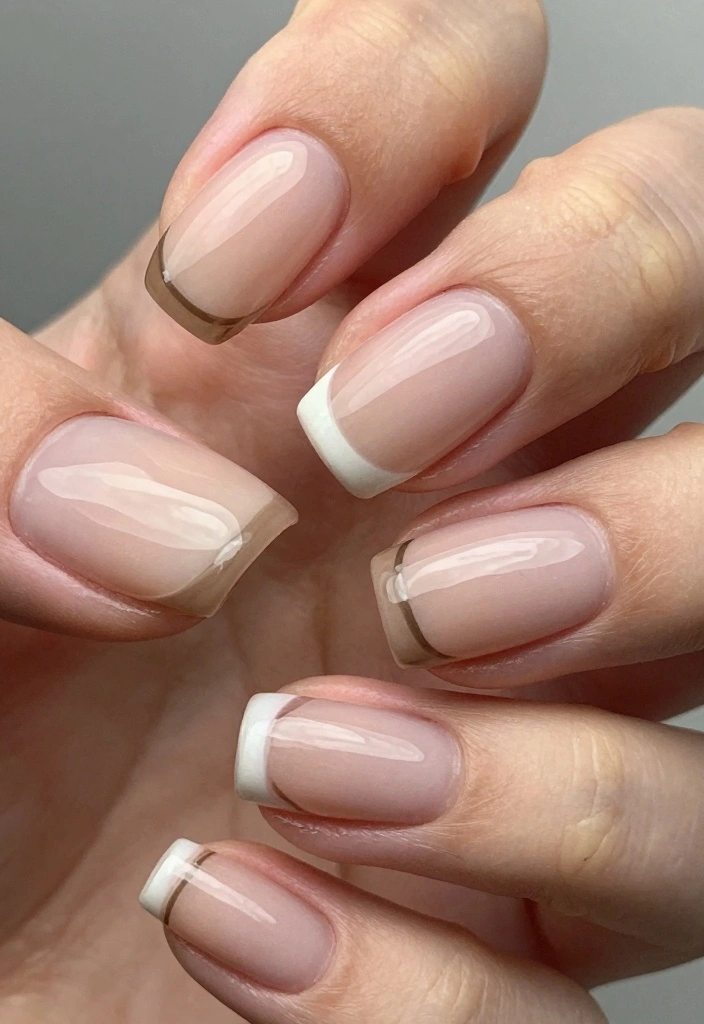
For a sharp and sleek look, clean lines on a nude base are an excellent choice. Utilize tape to create precise lines across your nails, painting one side in nude and the other in a contrasting neutral like white or light gray. This design radiates chic professionalism, making it suitable for any occasion.
Execution steps:
1. Start with clean, shaped nails and apply a base coat.
2. Use tape to create straight lines for an even division.
3. Apply your chosen colors and carefully remove the tape.
4. Finish with a top coat for a polished appearance.
Make sure colors are completely dry before removing the tape to avoid any smudging!
12. Pearlized Finish
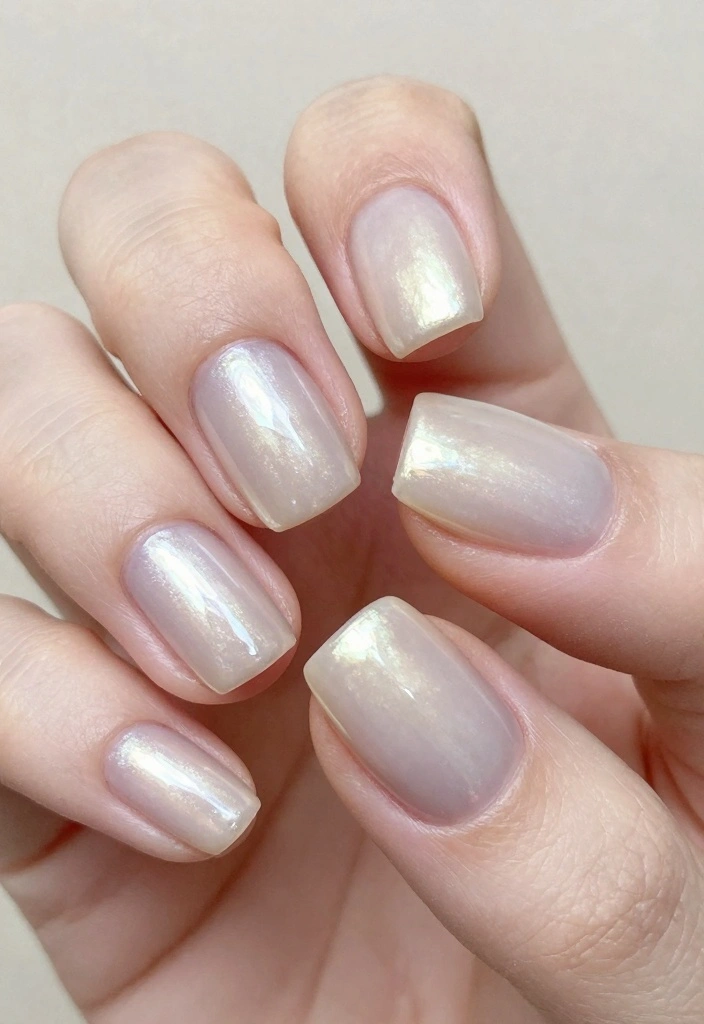
For a touch of sophistication, try a pearlized finish on your neutral nails. This design offers a soft sheen that beautifully reflects light, making it perfect for winter evenings. Choose a pale beige or soft taupe polish with a pearlized effect for that classy touch.
This design can be worn alone or serve as a base for subtle nail art.
How to create a pearlized effect:
1. Apply a base coat to protect your nails.
2. Use a pearlized polish, applying two thin coats for full coverage.
3. Seal with a glossy top coat for extra shine.
Look for polishes labeled as pearlized or iridescent for the best results!
13. Subtle Glitter Gradient
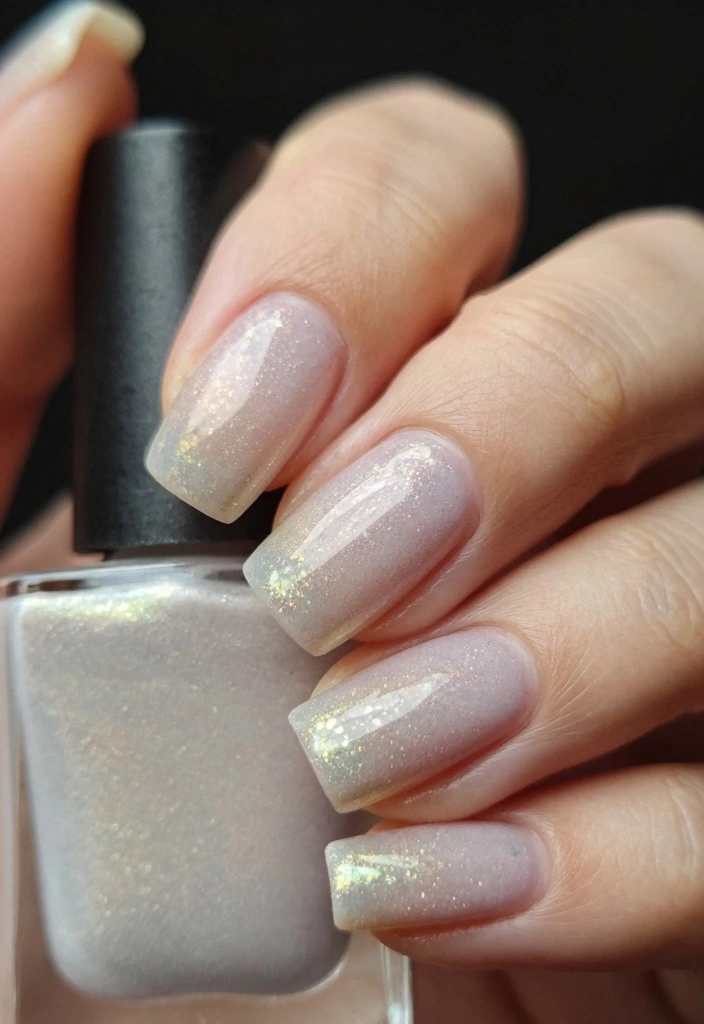
If you enjoy a hint of sparkle, consider a subtle glitter gradient on a neutral base. Start with a nude polish and gradually add glitter from the tips down, creating a beautiful fading effect. This design captures light without being too flashy, perfect for day or night looks.
It’s a chic way to incorporate festive elements while keeping a minimalist vibe.
Steps to create a glitter gradient:
1. Apply a nude base coat and allow it to dry.
2. Use a makeup sponge to dab glitter onto the tips, blending it down.
3. Finish with a top coat for a smooth finish.
Opt for fine glitter to achieve a polished look that complements your neutral base!
Fun fact: 63% of winter nail looks lean toward neutral shades with a hint of glitter. A subtle glitter gradient adds sparkle without shouting, keeping a minimalist vibe.
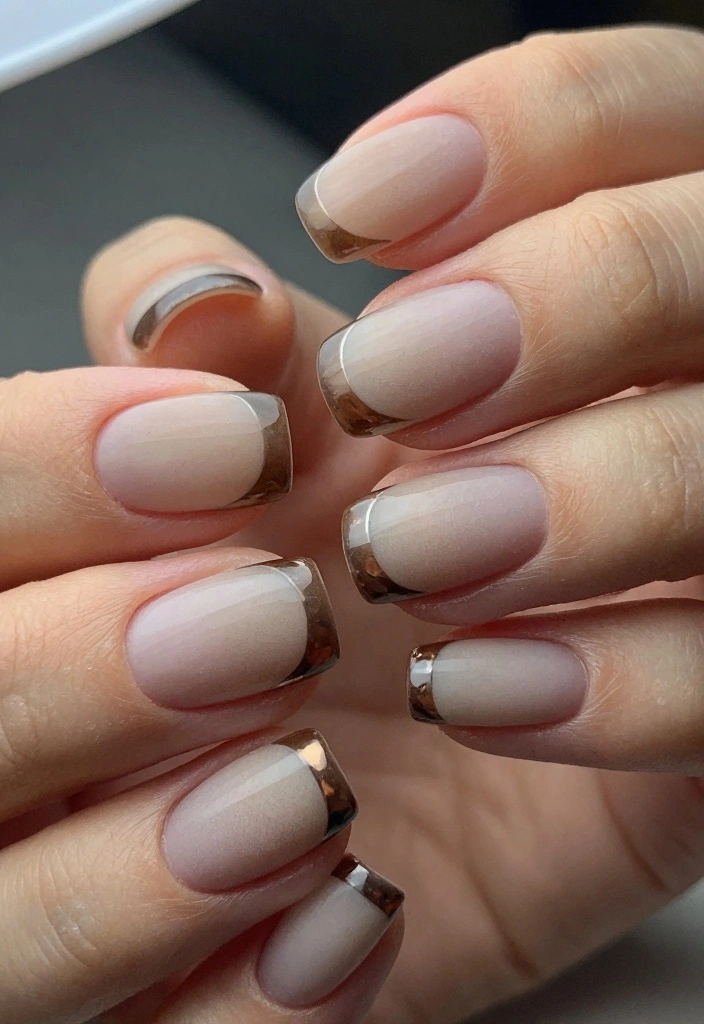
14. Classic French Twist
The classic French manicure gets a contemporary update with neutral colors for winter. Instead of traditional white tips, explore using soft cream or pale gray for a fresh take on this timeless style.
Enhance the look with a matte finish for a modern twist that feels elegant and trendy.
Execution steps:
1. Start with a base coat and let it dry.
2. Apply two coats of your chosen neutral polish.
3. Use a thin brush to paint the tips in a contrasting shade.
4. Seal with a top coat for durability.
To ensure crisp tips, use tape or steady your hand for clean lines!
15. Minimalist Artwork
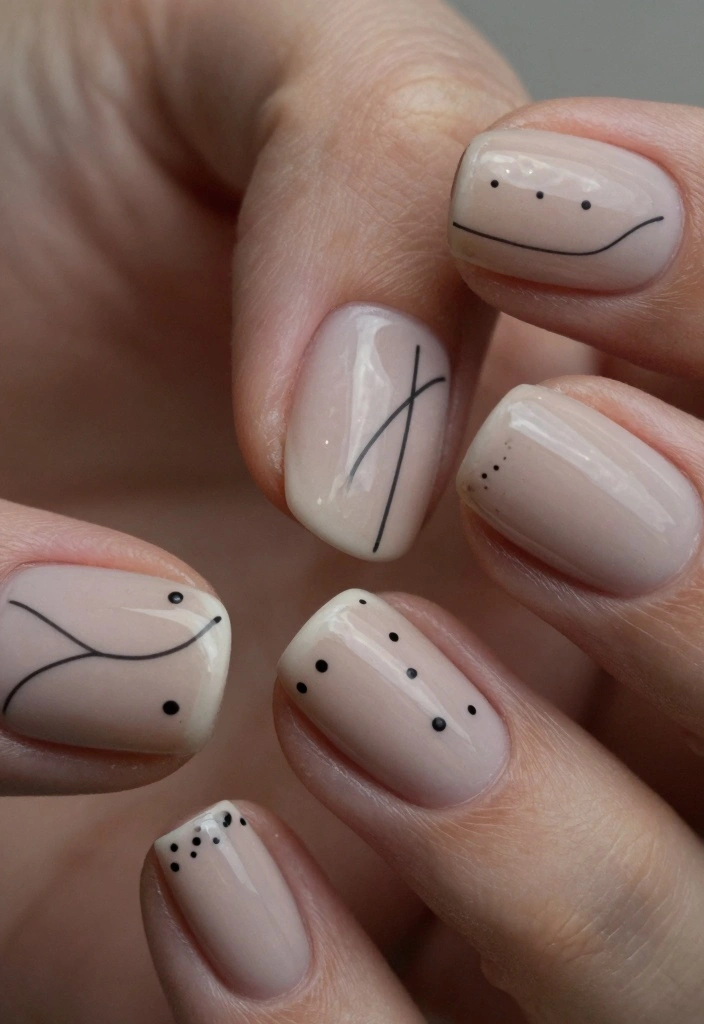
For those with an artistic flair, minimalist artwork on neutral nails offers endless creative possibilities. Use a thin brush to create simple designs like dots, lines, or abstract shapes in contrasting neutral colors. This approach allows for personal expression while maintaining an elegant look.
How to create minimalist nail art:
1. Start with a neutral base coat and let it dry.
2. Use a fine brush to create your designs in a contrasting color.
3. Finish with a top coat for enhanced durability.
Keep your designs uncomplicated for a more refined, minimalist aesthetic!
16. Chic Half-Moon Manicure
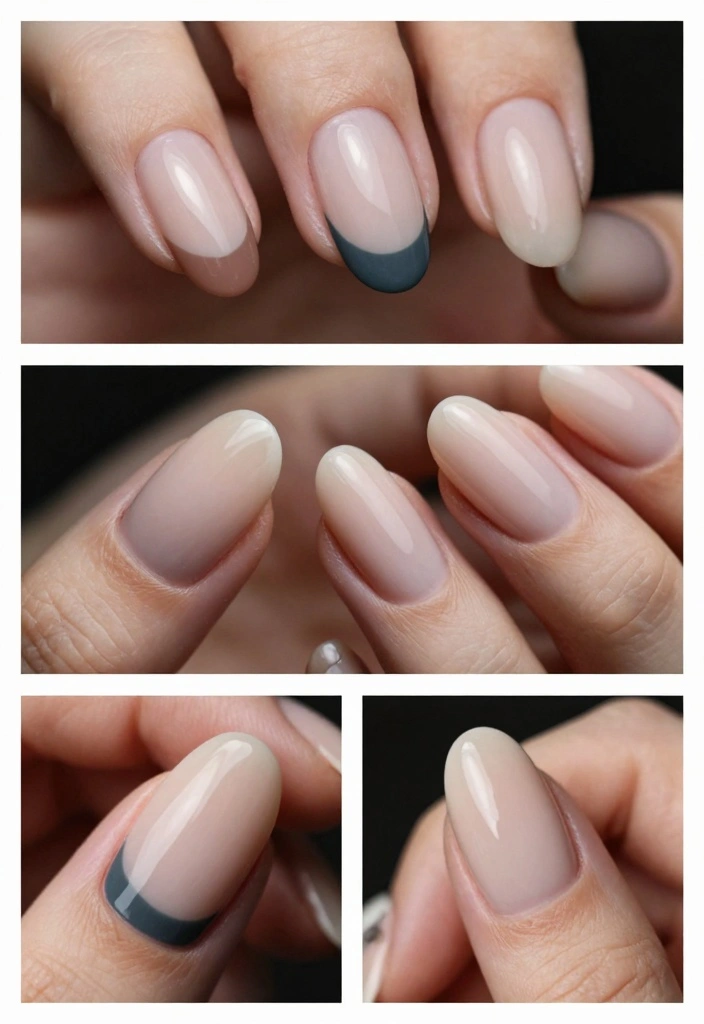
The half-moon manicure is a stylish and timeless option for neutral winter nails. Start with a nude base and create a contrasting half-moon at the base of your nails. This design honors vintage styles while feeling fresh and contemporary, making it perfect for anyone seeking a unique yet classy look.
Steps to achieve the look:
1. Start with a base coat and apply two coats of nude polish.
2. Use tape to section off the half-moon area at the base.
3. Paint the exposed area with a contrasting neutral color.
4. Carefully remove the tape and seal with a top coat.
Ensure the base color is fully dry before applying tape to avoid any smudging!
Conclusion
This winter, embrace the elegance of neutral winter nails with these chic and minimal designs.
From soft beiges to frosted tips, there’s a style for every occasion that keeps the focus on clean beauty while allowing you to express your personality.
Don’t be afraid to experiment and find what feels right for you, and remember, the beauty of minimalism lies in its simplicity!
Frequently Asked Questions
What exactly are neutral winter nails and how do they fit into minimalist nail designs?
Neutral winter nails are a season-friendly style built around soft shades like cream, beige, taupe, ivory, and greige. They create a calm, chic canvas that suits the clean beauty nails aesthetic and pairs perfectly with the minimalist nail designs approach. To keep it sustainable, choose long-wearing neutral nail polish from brands that focus on gentle ingredients. Practical steps: apply a clear base coat, two even coats of your chosen neutral color, and a durable top coat for lasting wear. For true minimalism, skip glitter and bold accents; let the shade itself tell the story. If you want a tiny touch of interest, add a single precise detail on one nail, such as a neat negative-space shape or a thin stripe.
Which colors and finishes count as neutral nail polish for a chic winter look?
For a chic winter vibe, look for neutral nail polish shades like ivory, warm whites, cream, taupe, greige, latte, and mushroom. Finishes range from creamy matte to satin or soft gloss. Practical tips: pick 2–3 shades and test them on swatches or nails in different lighting to see how they read. Use two coats of color with a solid top coat for longevity. When shopping, choose clean beauty nails products with non-toxic formulas and minimal packaging to keep things sustainable. Keep the look cohesive by sticking to neutral tones and avoiding high-contrast combos.
What are beginner-friendly minimalist nail designs that fit winter nail trends?
Winter-friendly minimalist nail designs include negative space, thin white lines on a neutral base, and a single accent nail with a tiny dot or stripe. These align with current winter nail trends while staying true to minimalist nail designs. Easy at-home steps: 1) paint a clean neutral base, 2) place striping tape to map a thin line or negative-space area, 3) paint over and carefully remove the tape, 4) seal with a top coat. Use a fine brush or dotting tool for tiny details and keep to one accent nail per hand for a truly minimalist vibe.
How can I keep neutral winter nails looking polished while staying sustainable with clean beauty nails products?
To maintain a polished look with neutral winter nails while staying sustainable, choose 2–3 shade options and rotate them. Use a reliable base coat and a durable top coat to maximize wear, and avoid thick layers that chip easily. Opt for clean beauty nails polishes that are 5-free or labeled non-toxic, and support brands with sustainable packaging. When removing, use gentle, non-acetone products to protect nails and cuticles. Recycle when possible and reuse the same shades across seasons to minimize waste.
What at-home tools and techniques help me achieve chic nail art without going overboard?
Great news for beginners: you can create chic, minimalist nail art at home with just a few tools. Gather: striping tape or nail vinyls, a fine nail art brush or dotting tool, a thin brush for precision, a dotting tool, and a cleanup brush or Q-tips for neat edges. Techniques to try include a single thin line along the edge, a tiny dot on one nail, or a negative-space feature on a single accent nail. Finish with a high-quality top coat for lasting shine. This keeps your look aligned with neutral winter nails and minimalist nail designs while staying approachable and affordable.
Related Topics
neutral winter nails
minimalist nail designs
chic nail art
sustainable beauty
winter nail trends
clean beauty nails
easy nail designs
nail care tips
short nail styles
trendy neutrals
seasonal nail art
beginner friendly